Microsoft email configuration
How to Configure Microsoft 365 SMTP for CLOUDEX TMS
Follow this guide to allow CLOUDEX TMS to send emails from your own Microsoft 365 mailbox and domain (for example info@yourcompany.com). This article covers the steps you need to complete in Microsoft 365.
1. Choose a user mailbox
2. Enable “Authenticated SMTP” for the mailbox
Open the Microsoft 365 Admin Center: https://admin.microsoft.com
Steps to enable Authenticated SMTP
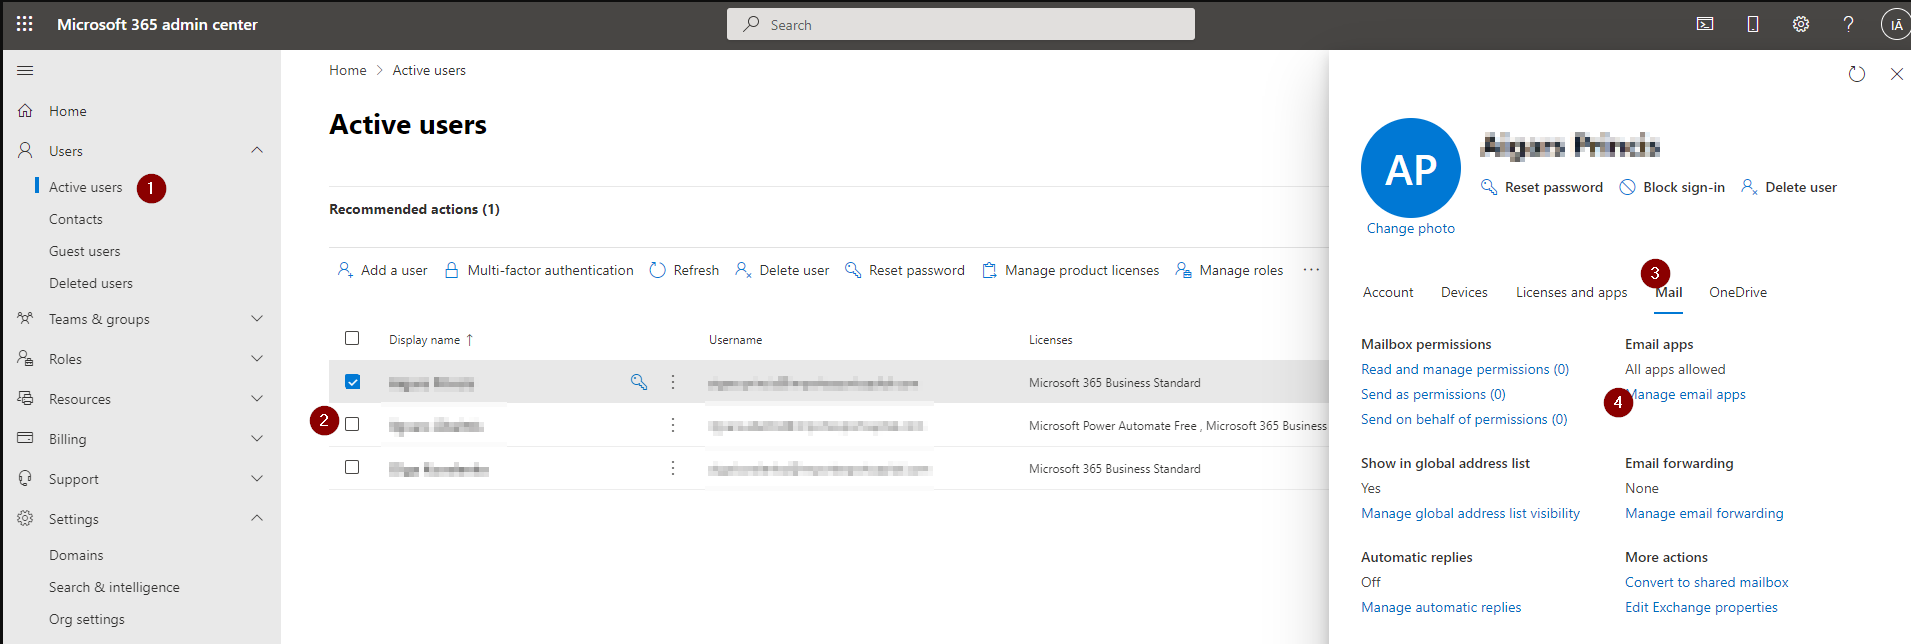
- In the left menu, click Users → Active users.
- Click on the user/mailbox you will use for CLOUDEX TMS.
- In the user details pane, go to the Mail tab.
- Click Manage email apps (or Email apps).
- In the list of email apps, find Authenticated SMTP and make sure the checkbox or toggle is ON / enabled.
- Click Save.
3. Create an app password (if MFA is enabled)
If Multi-Factor Authentication (MFA) is enabled for the mailbox you use (recommended), SMTP cannot use your normal password. In that case you must create a special app password and use it in CLOUDEX TMS.
Steps to generate an app password
- Open: https://mysignins.microsoft.com/security-info
- Sign in using the same user whose mailbox you will use for CLOUDEX TMS (for example
no-reply@yourcompany.com). - On the “Security info” page, click Add sign-in method.
- Choose App password from the list and click Add.
- Give it a recognizable name, for example CLOUDEX TMS, and confirm.
- Microsoft will show you a one-time app password. Copy this value and store it securely. You will need to paste it in the SMTP settings inside CLOUDEX TMS.
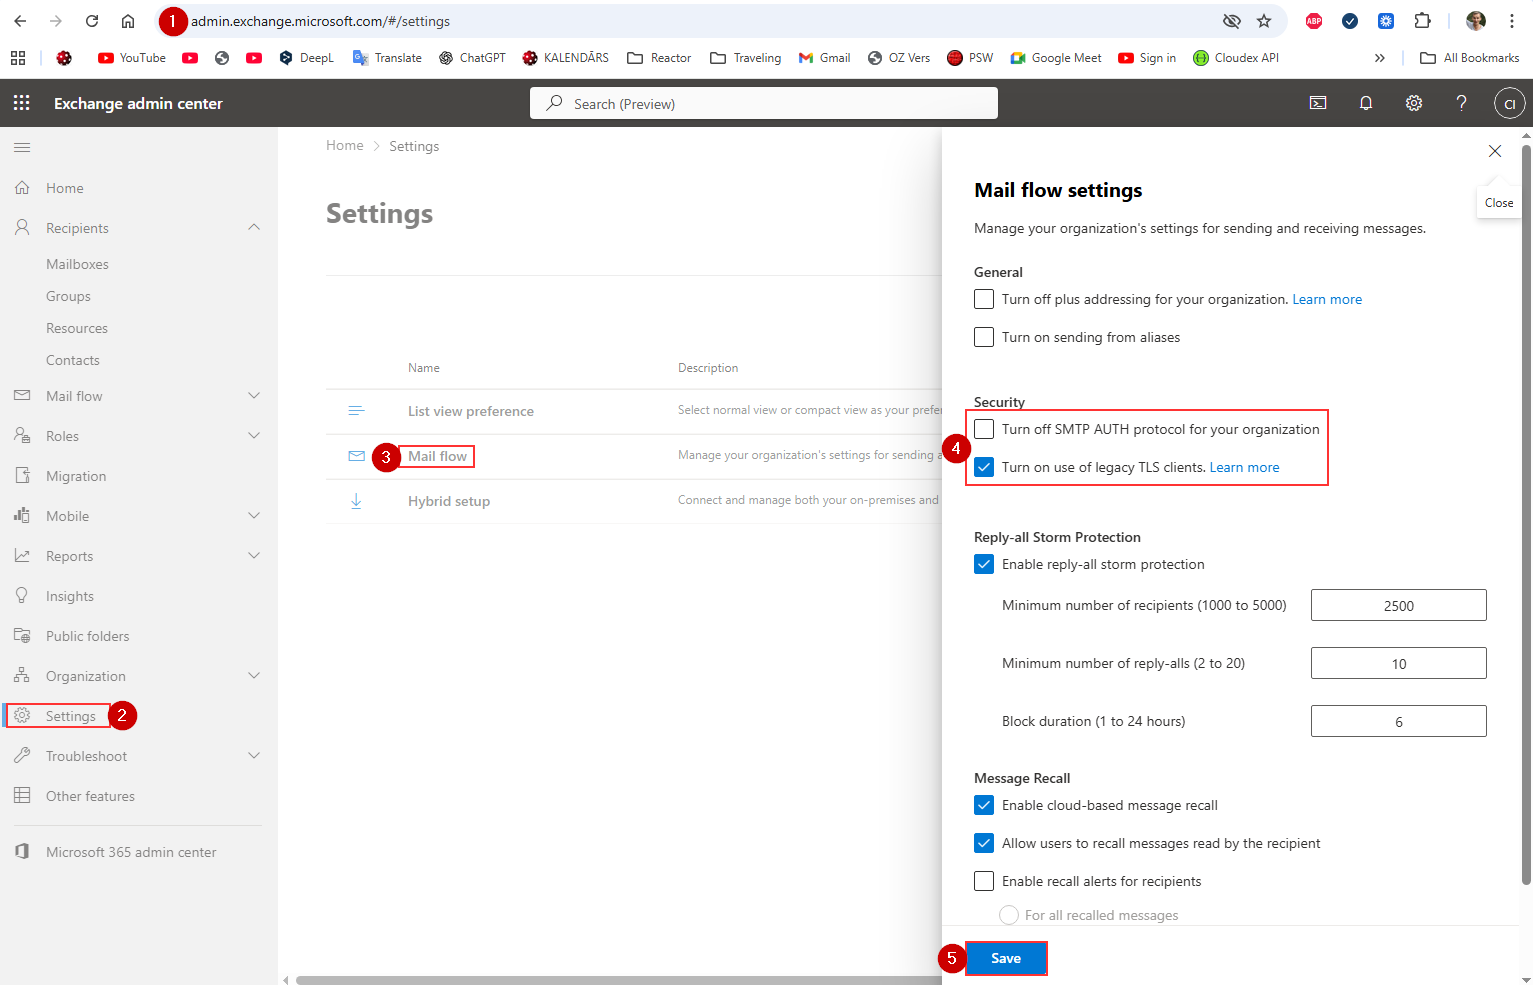
❗ What to do if “Authenticated SMTP” switch does NOT appear
- Turn off Checkbox "Turn off SMTP AUTH protocol for your organization""
- Turn on use of old legacy TLS clients.
- After enabling, wait 3–5 minutes, then check the user mailbox again.
3️⃣ Confirm the mailbox type (SMTP is NOT available for some accounts)
The Authenticated SMTP switch is available ONLY for:
User mailboxes with Exchange Online Plan 1 or 2
Shared mailboxes
Microsoft 365 E3/E5 Business Standard/Business Premium accounts
It will NOT appear for:
❌ Mailboxes with no Exchange license
❌ Accounts converted to Microsoft 365 Groups
❌ Mailboxes that were soft-deleted or recently restored
❌ Resource mailboxes (Room / Equipment)
How to check:
In Microsoft 365 Admin Center:
Users → Active users → Select user → Licenses and Apps
Make sure:
✔ Exchange Online is enabled
If Exchange Online is missing → SMTP will NOT be available.
4️⃣ Ensure modern authentication SMTP is not forced
Microsoft sometimes blocks SMTP for users with strict conditional access.
Check these items:
Conditional Access policy requiring MFA for all protocols
Legacy auth blocked at the tenant level
Security defaults enabled (this disables SMTP)
To check Security Defaults:
Go to Azure Portal
https://portal.azure.com
Search for Azure Active Directory
Open Properties
Click Manage Security Defaults
If Security defaults = Enabled, you must turn it OFF to allow SMTP.
After disabling, wait up to 15 minutes, then check Manage Email Apps again.
5️⃣ If none of the above works – your tenant may have SMTP permanently disabled
Microsoft has been turning off SMTP AUTH for security reasons.
Admins must manually re-enable it per mailbox.
To force-enable for a specific mailbox (Admin only):
Go to:
https://admin.exchange.microsoft.com
Navigate to:
Users → Active Users → select user → Mail → Email apps → Manage
If still missing, enable via PowerShell:
Set-CASMailbox -Identity user@domain.com -SmtpClientAuthenticationEnabled $true
(Admins only — if customer cannot run PowerShell, you can give them this line to pass to their IT provider.)
Summary: Why SMTP may not appear
Set-CASMailbox