Microsoft email configuration
How to Configure Microsoft 365 SMTP for CLOUDEX TMS
Follow this guide to allow CLOUDEX TMS to send emails from your own Microsoft 365 mailbox and domain (for example info@yourcompany.com). This article covers the steps you need to complete in Microsoft 365.
1. Choose or create a sendinguser mailbox
2. Enable “Authenticated SMTP” for the mailbox
CLOUDEX TMS needs a Microsoft 365 mailbox it can use to send emails such as shipment updates, invoices, and notifications. You can either:
info@yourcompany.comno-reply@yourcompany.comno-reply@yourcompany.comSteps to create a new user mailbox
no-reply@yourcompany.com2. Enable “Authenticated SMTP” for the mailbox
For security reasons, Microsoft may have SMTP disabled by default. In order for CLOUDEX TMS to send email via smtp.office365.com, Authenticated SMTP must be enabled for the mailbox.
Steps to enable Authenticated SMTP
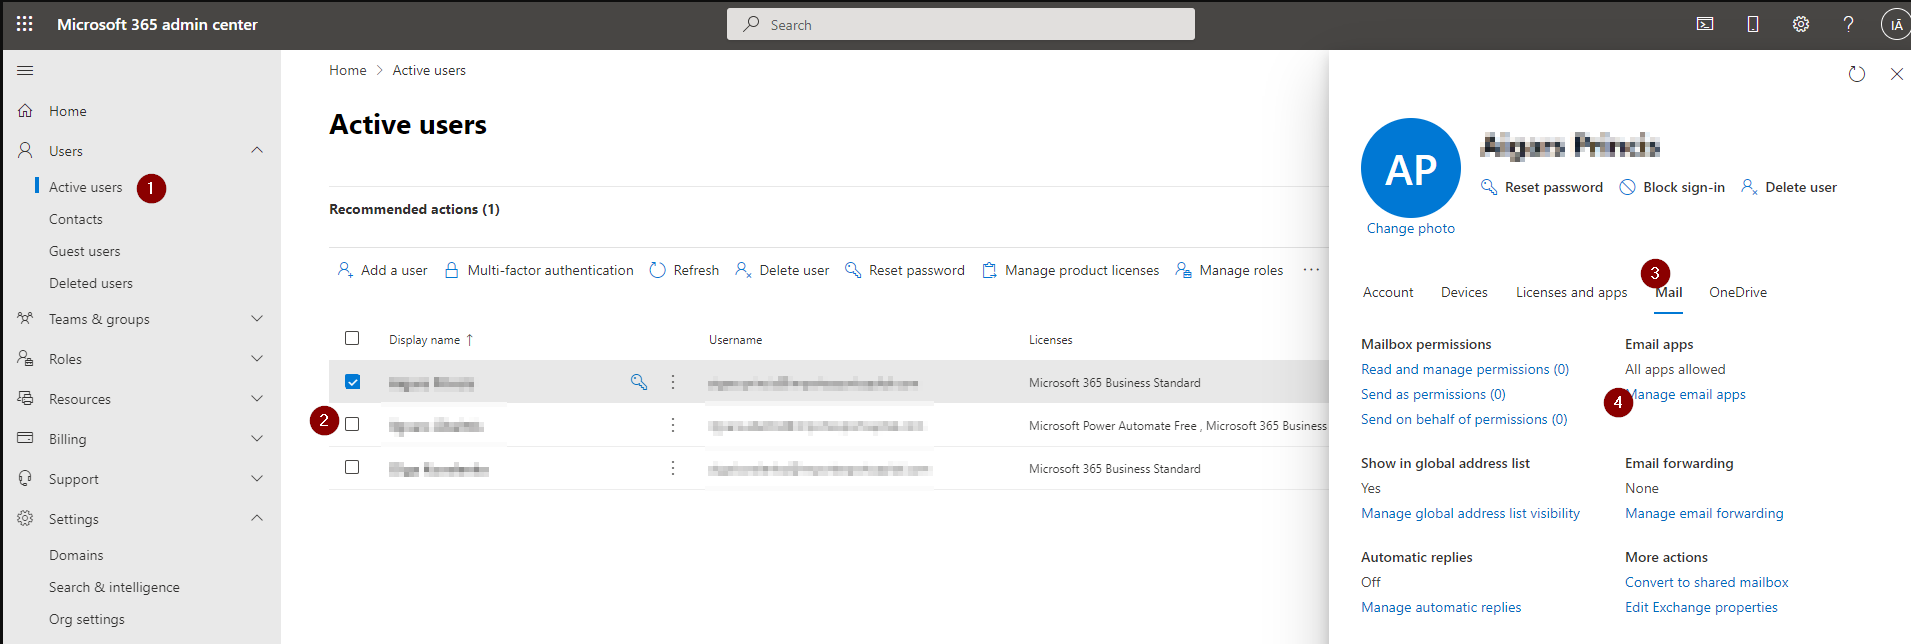
- In the
Microsoftleft365menu,Admin Center, go toclick Users → Active users. - Click on the user/mailbox you will use for CLOUDEX TMS.
- In the user details pane, go to the Mail tab.
- Click Manage email apps (or Email apps).
- In the list of email apps, find Authenticated SMTP and make sure the checkbox or toggle is ON / enabled.
- Click Save.
3. Create an app password (if MFA is enabled)
If Multi-Factor Authentication (MFA) is enabled for the mailbox you use (recommended), SMTP cannot use your normal password. In that case you must create a special app password and use it in CLOUDEX TMS.
Steps to generate an app password
- Open: https://mysignins.microsoft.com/security-info
- Sign in using the same user whose mailbox you will use for CLOUDEX TMS (for example
no-reply@yourcompany.com). - On the “Security info” page, click Add sign-in method.
- Choose App password from the list and click Add.
- Give it a recognizable name, for example CLOUDEX TMS, and confirm.
- Microsoft will show you a one-time app password. Copy this value and store it securely. You will need to paste it in the SMTP settings inside CLOUDEX TMS.
What you will enter in CLOUDEX TMS
After completing the steps above, you will have everything needed to fill in the SMTP settings in CLOUDEX TMS (according to the CLOUDEX instructions):
- SMTP server:
smtp.office365.com - Port:
587 - Encryption: TLS / STARTTLS
- Username: your full email address (e.g.
no-reply@yourcompany.com) - Password: the app password you created (or the normal password if MFA is not enabled)
Once you have entered these values into CLOUDEX TMS and run the “Test email” (as described in the CLOUDEX guide), your system emails should be successfully sent using your own Microsoft 365 domain.