These instructions apply for **installing OZOLS TMS on Windows computers!** To use OZOLS TMS on **Mackintosh** computers, please contact customer support at info@cloudex.lv
1. [Download the OZOLS TMS installation click **here**](https://cloudex.app/app/ozols_client_setup.exe) 2. Open Downloads folder and Dbl-click on "ozols\_client\_setup.exe" 3. Follow the instructions 4. OZOLS TMS is ready to use [Proceed with Logging in to OZOLS TMS fallowing instructions - click **here**.](https://ozols.lv/doc/books/coudex-tms-english/page/2-log-in)[Unable to connect - **click here**](https://ozols.lv/doc/books/coudex-tms-english/page/7-unable-to-connect-to-ozols-tms)
# 2) Log inTo log in to OZOLS TMS you need to enter in the registration window user data you received via e-mail
1. User: OZOLS TMS username received via email 2. Password: OZOLS TMS password received via email 3. Server: online3.cloudex.lv 4. Database: OZOLSABC [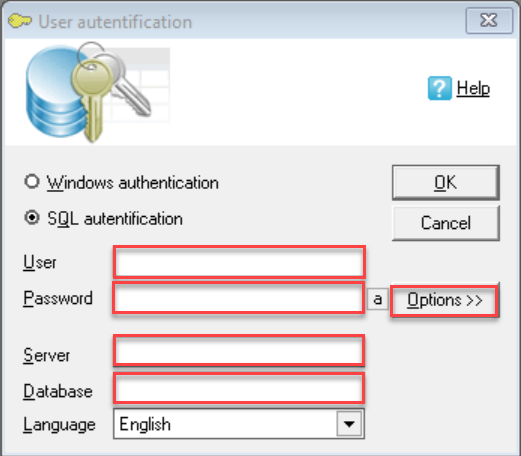](https://ozols.lv/doc/uploads/images/gallery/2022-02/login-eng.png)[Unable to connect - click here](https://ozols.lv/doc/books/coudex-tms-english/page/7-unable-to-connect-to-ozols-tms)
# 3) Changing of password and user informationWhen you start using OZOLS TMS, you receive a user password, which must be changed for security reasons. Follow these instructions to do it:
##### To change your password: 1. In menu select Configuration 2. Change password 3. Enter requested information [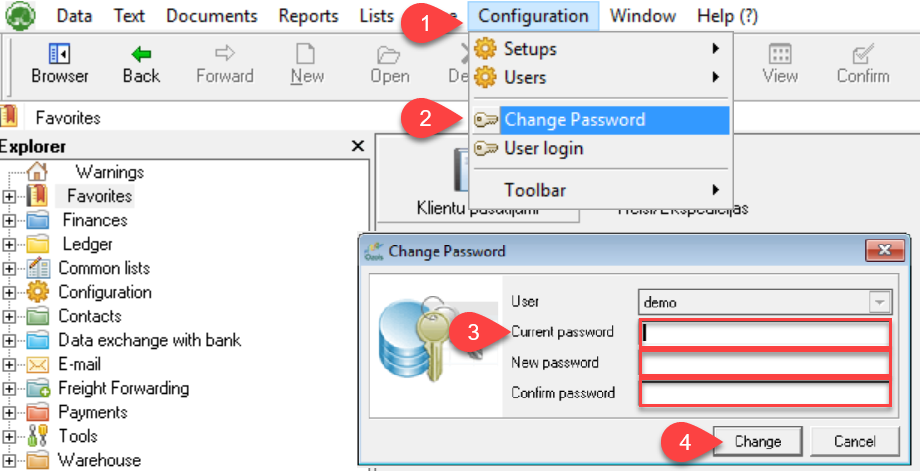](https://ozols.lv/doc/uploads/images/gallery/2022-02/change-pasw-eng.png)User data is important because it is included as your contact information in various documents generated by OZOLS TMS.
##### To add or change your user data: 1. In menu select Help(?) 2. Edit my user data 3. Add or change your user data 4. Save the changes [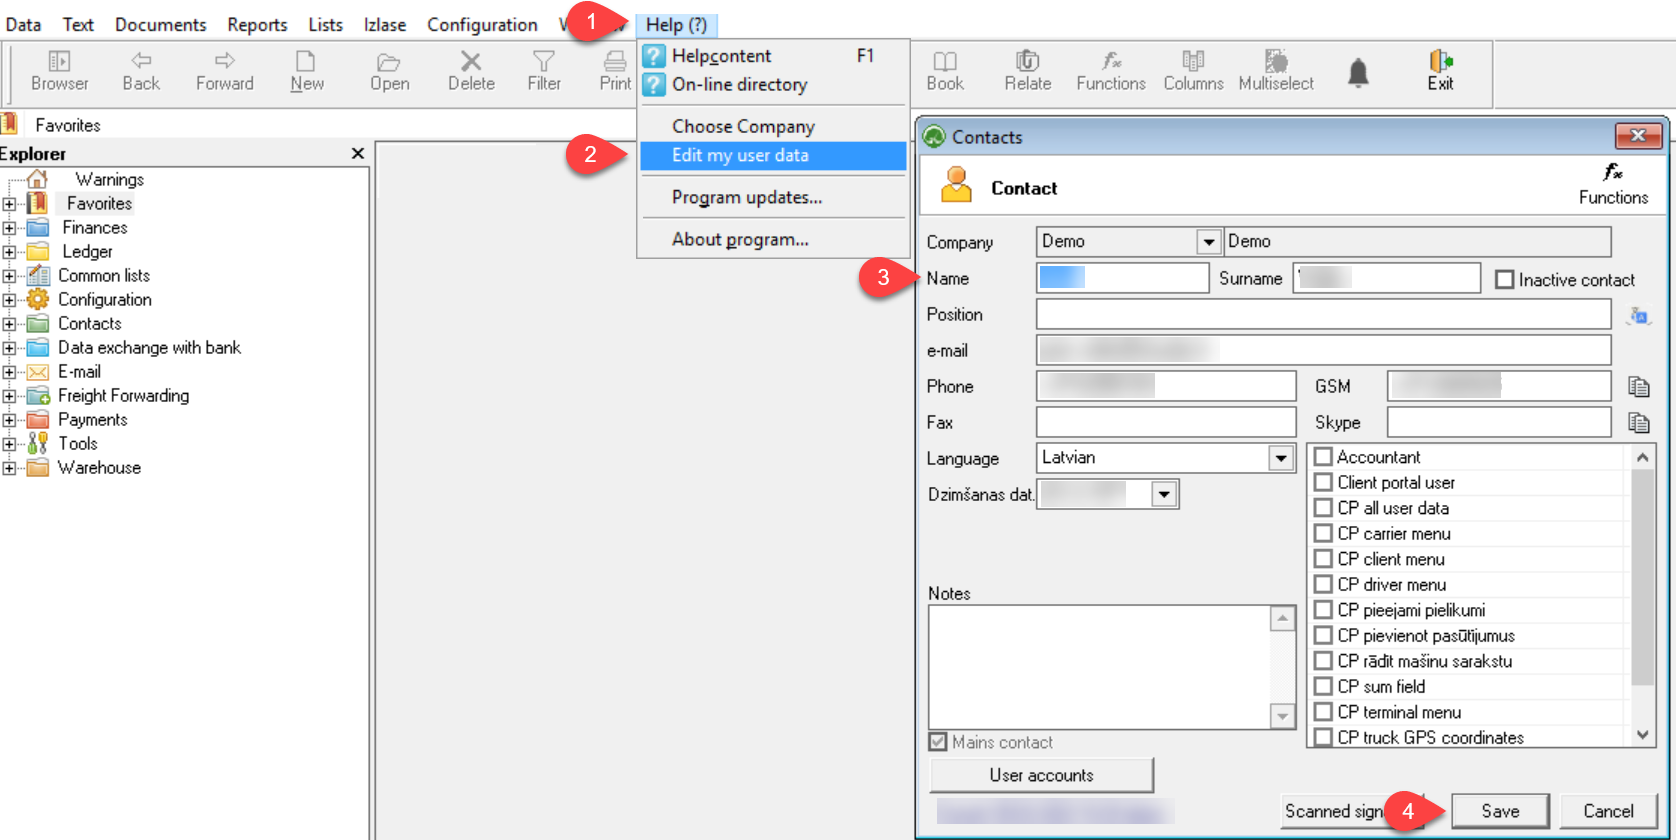](https://ozols.lv/doc/uploads/images/gallery/2022-02/change-user-ifo-eng.png)If you have questions regarding these instructions, please contact the OZOLS TMS Customer Support team: info@cloudex.lv or call +371-(283) 8 83 00
# 4) Signature with stamp on orders and invoicesA scanned stamp with signature is most commonly used for Customer Orders, Transport Orders, Payment cancellation acts and Reconciliation acts
1. Stamp and sign a white sheet of paper. The size of the signature must not exceed the bottom and top edges of the stamp. (see light blue field in sample image below). 2. Scan the sheet of paper as a JPG image and save it in your compute [](https://ozols.lv/doc/uploads/images/gallery/2022-07/image-1659084984578.png) 3. Open the document in **Paint** (see image below ). **Resize** ① and make the image as vertically narrow as possible, including the signature and the stamp 4. Using the Resize and Skew function ②, resize the image vertically to **135 Pixels** ③ ④. 5. Save the created image to your computer in **PNG** format. [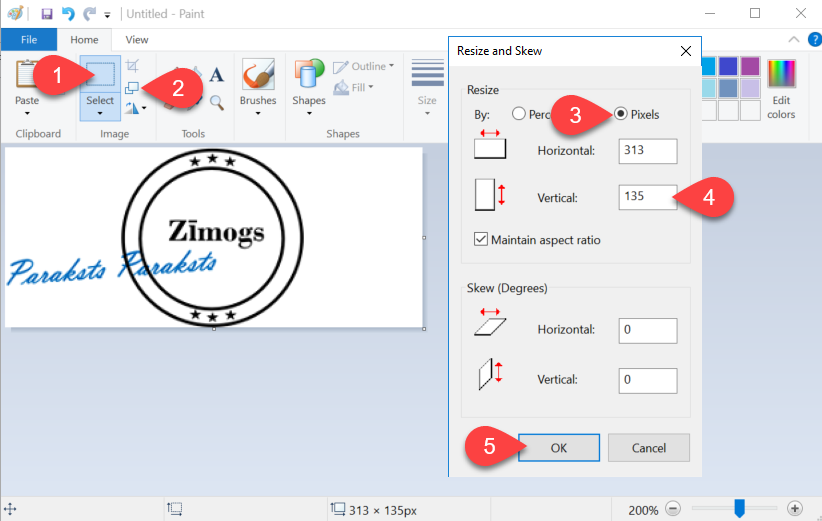](https://ozols.lv/doc/uploads/images/gallery/2022-01/paint22-12022-01-07-13-01-38.png)**Important!** **Further steps have to be done in OZOLS TMS!**
1. Open OZOLS TMS and select **Help** 2. **Edit my user data** 3. Click the button - **Scanned signature** [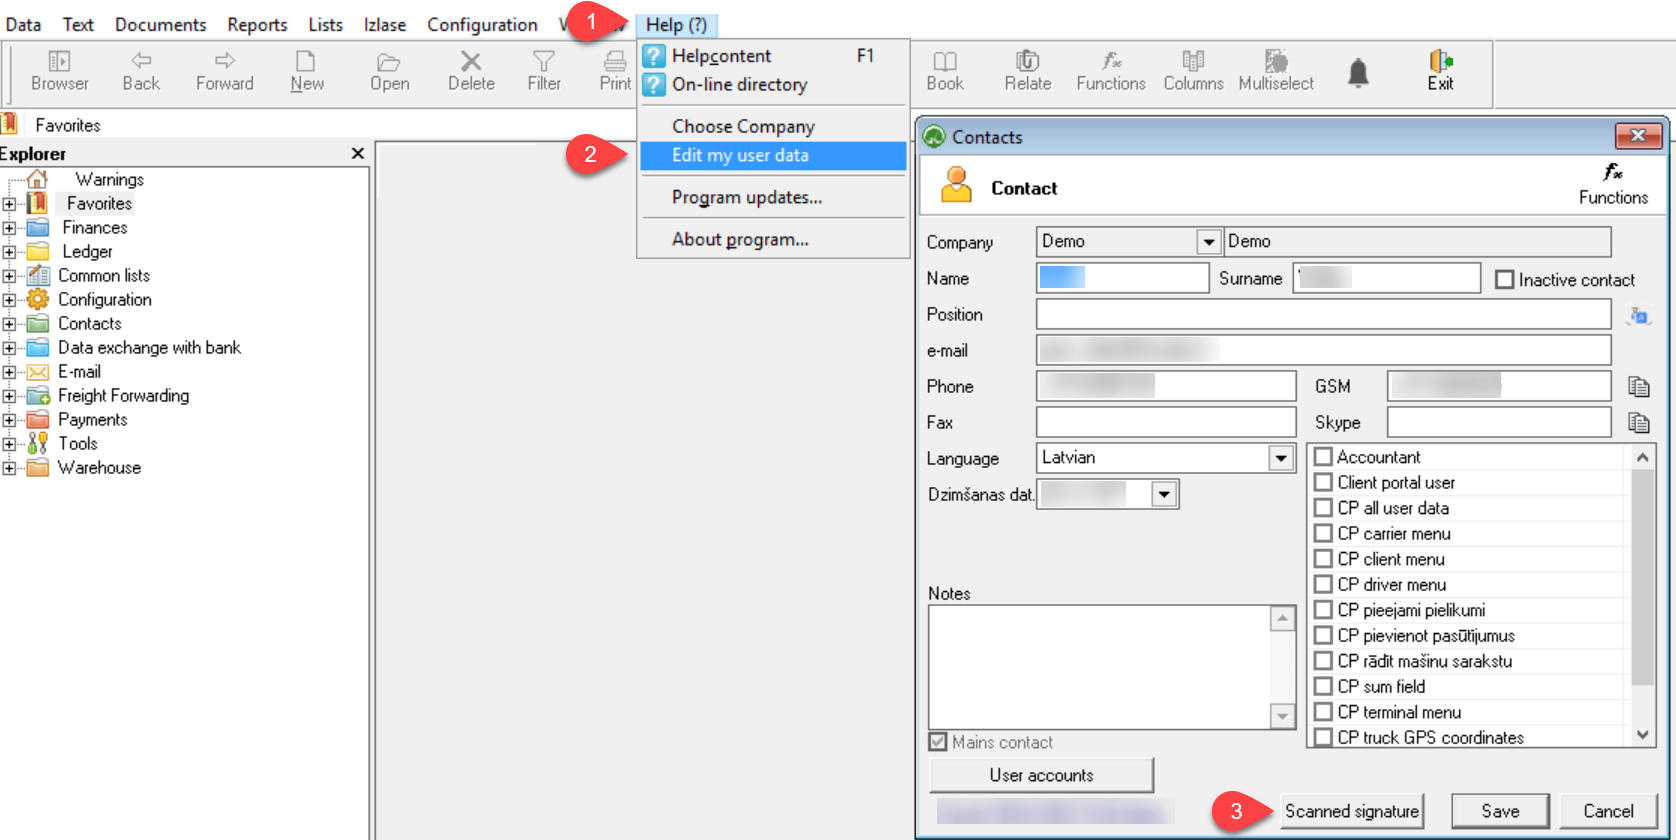](https://ozols.lv/doc/uploads/images/gallery/2022-02/sign-stump-eng-2.png) 4. Select Signature with stamp 5. Click the search button and add previously scanned and prepared image (vertical size 135px). 6. Save [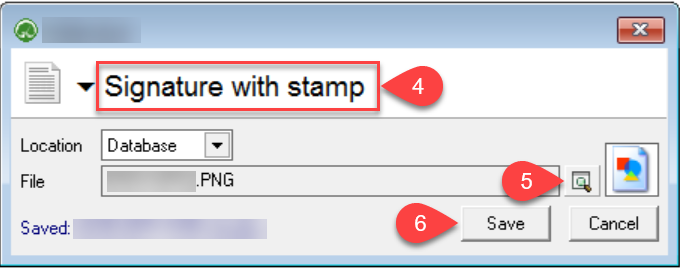](https://ozols.lv/doc/uploads/images/gallery/2022-02/sign-stump-eng-3.png)If you have questions regarding these instructions, please contact the OZOLS TMS Customer Support team: info@cloudex.lv or call +371 (283) 8 83 00
# 5) E-mail settingsTo send emails from OZOLS TMS, you need to enter your **e-mail address** and **e-mail password** in system.
If you enter the correct e-mail password but emails from OZOLS TMS are not sent, you need to configure your e-mail server. Find out who your email provider is. [Gmail and Microsoft email configuration for Ozols TMS](https://ozols.lv/doc/books/ozols-tms-english/page/8-e-mail-server-configuration-for-work-with-ozols-tms)
1. Select in Menu **Help** 2. **Edit my user data** 3. If applicable, complete the user data. **Make sure that the correct email address is provided!** 4. Click **User Accounts** 5. Select **email SMTP** [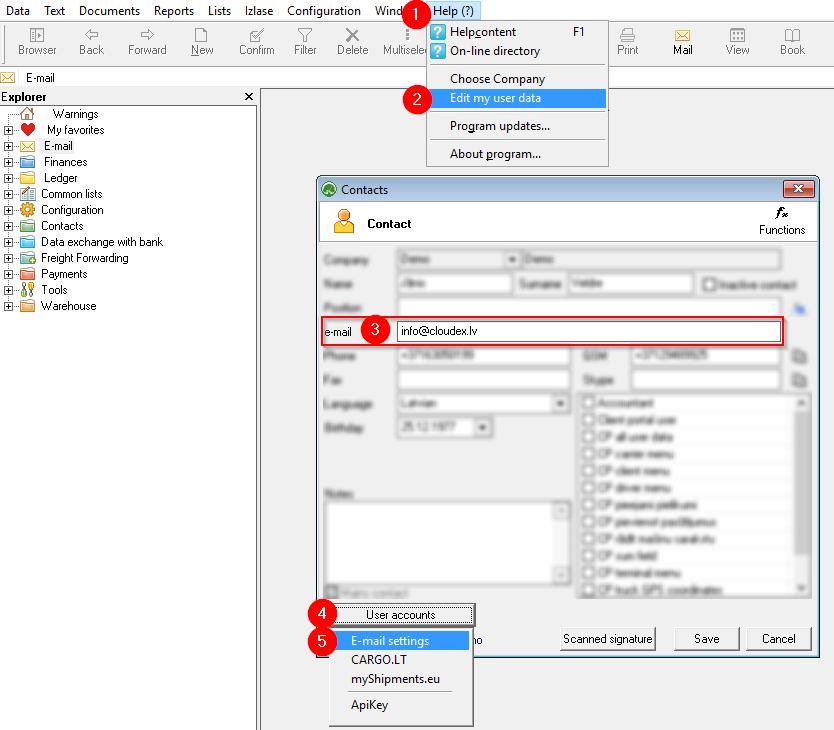](https://ozols.lv/doc/uploads/images/gallery/2022-10/image-1665063417019.png) 6. Enter your **business e-mail address** 7. Enter your **business e-mail password** 8. Save changes [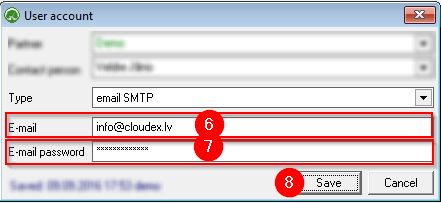](https://ozols.lv/doc/uploads/images/gallery/2022-10/image-1665063798442.png)If you have questions regarding these instructions, please contact the OZOLS TMS Customer Support team: info@cloudex.lv
# 6) Incorrect letters in your local language?If your local language characters are not correctly displayed in the Ozols TMS, please do following steps in your computer:
1. **In Windows “Start menu”** write "**Control**" or "**Panel**" 2. Choose **Control Panel** [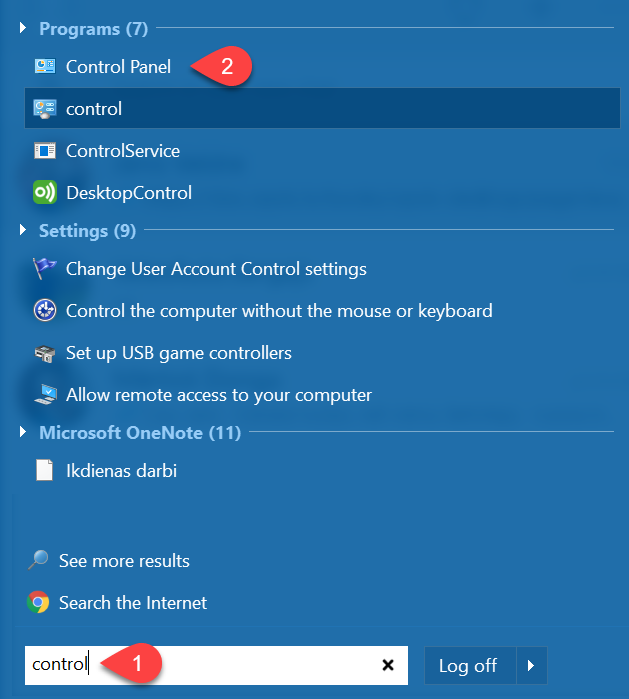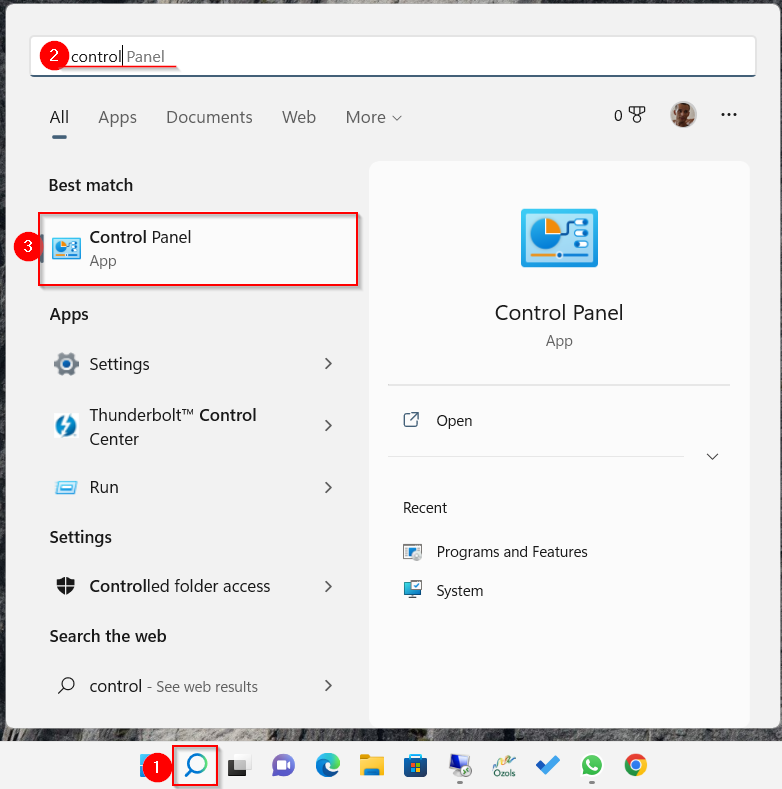](https://ozols.lv/doc/uploads/images/gallery/2022-02/regional-1.png) 3. Select **Clock, Language, and Region** 4. **Region** [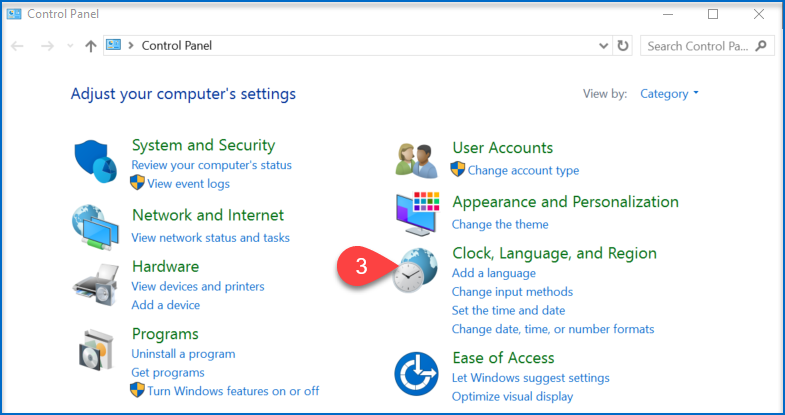](https://ozols.lv/doc/uploads/images/gallery/2022-02/regional-2a.png) [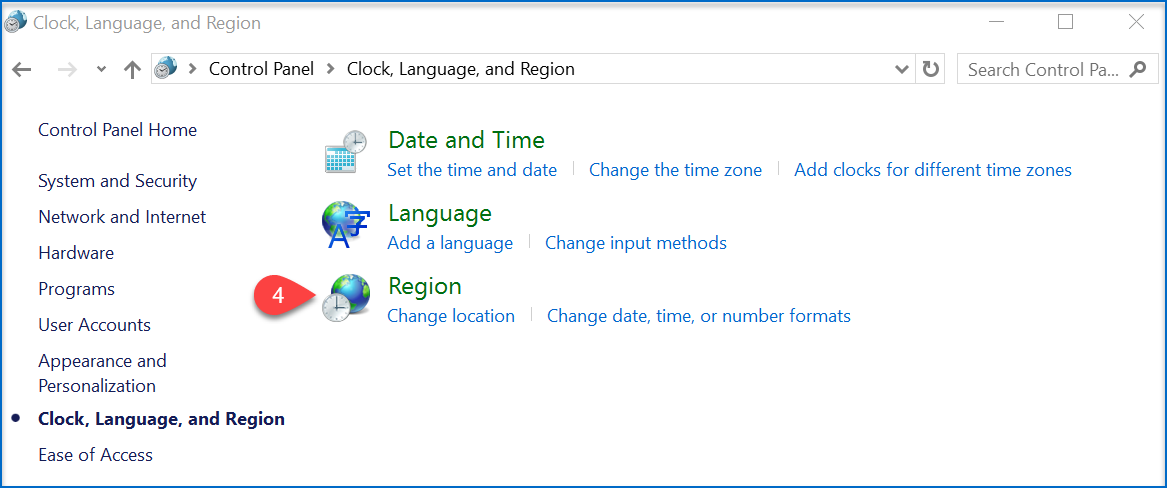](https://ozols.lv/doc/uploads/images/gallery/2022-02/regional-3a.png) 5. Open **Administrative** 6. **Change system locale... [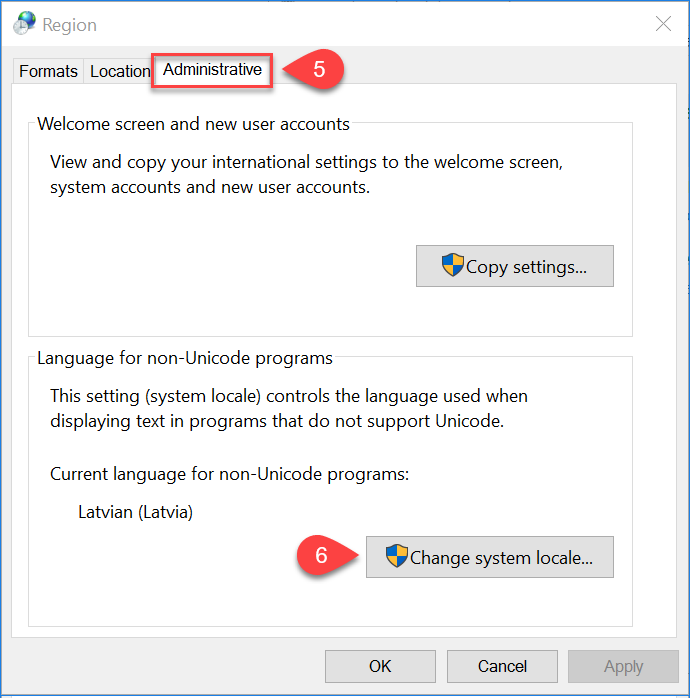](https://ozols.lv/doc/uploads/images/gallery/2022-02/regional-4a1a.png)** 7. Select your preferred **language** 8. **Save** changes [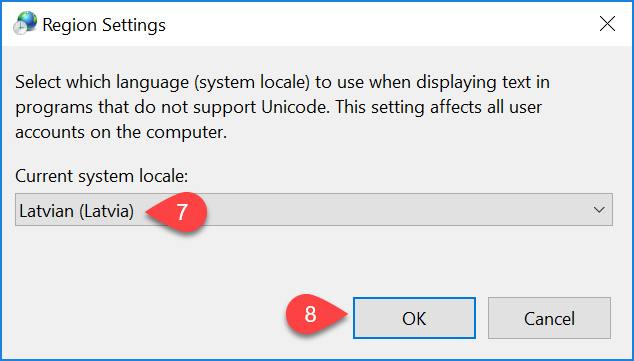](https://ozols.lv/doc/uploads/images/gallery/2022-02/regional-5a.png)If the above instructions have not solved the problem, please contact OZOLS TMS Customer Support at info@cloudex.lv or call +37 (283) 8 83 00
# 7) Unable to connect to OZOLS TMS #### If by connecting to OZOLS TMS you encounter the message: [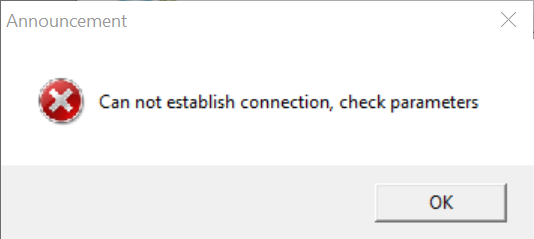](https://ozols.lv/doc/uploads/images/gallery/2022-02/wronf-parameters.png) ##### 1. If the Notification waiting time is less than ~5 seconds: Make sure you have entered the **User Name and Password correctly**. ##### 2. If waiting time for Notification is more than ~5 seconds: 1\. Press the "**Options <<**" button 2\. Check if the **server name and database name** are entered correctly 3\. Make sure the **internet connection** is working [](https://ozols.lv/doc/uploads/images/gallery/2022-02/login-eng.png)If the above instructions have not solved the problem, please contact OZOLS TMS Customer Support at info@cloudex.lv or call +371 (283) 8 83 00
# 8) E-mail server configuration for work with Ozols TMS 1. [Gmail settings](#bkmrk-1.-to-send-gmail-ema) 2. [Microsoft Settings](#bkmrk-microsoft-e-pastu-no) ##### 1. To send Gmail emails from within OZOLS TMS, follow these steps: 1\) Open a Google account and authorize: [https://myaccount.google.com/](https://translate.google.com/website?sl=lv&tl=en&hl=en-US&client=webapp&u=https://myaccount.google.com/) 2\) Opens the **Security section** [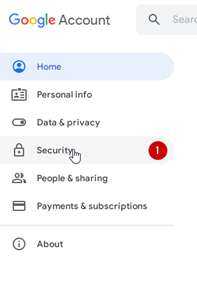](https://doc-ozols-lv.translate.goog/uploads/images/gallery/2022-06/image-1654694742407.png?_x_tr_sl=lv&_x_tr_tl=en&_x_tr_hl=en-US&_x_tr_pto=wapp) 3\) Activate **two-step** authentication (a confirmation code will be sent to the phone) [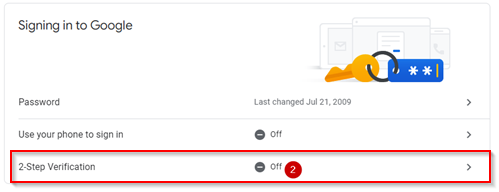](https://doc-ozols-lv.translate.goog/uploads/images/gallery/2022-06/image-1654695554505.png?_x_tr_sl=lv&_x_tr_tl=en&_x_tr_hl=en-US&_x_tr_pto=wapp) 4\) Select App passwords [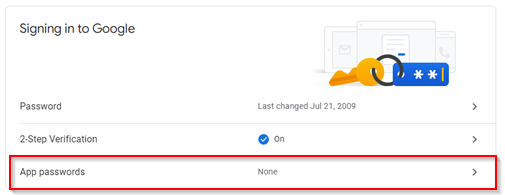](https://doc-ozols-lv.translate.goog/uploads/images/gallery/2022-06/image-1654695675663.png?_x_tr_sl=lv&_x_tr_tl=en&_x_tr_hl=en-US&_x_tr_pto=wapp) 4\) Choose Other (Custom name) [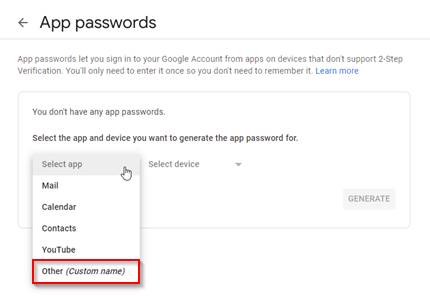](https://doc-ozols-lv.translate.goog/uploads/images/gallery/2022-06/image-1654695357907.png?_x_tr_sl=lv&_x_tr_tl=en&_x_tr_hl=en-US&_x_tr_pto=wapp) 5\) Type "Ozols" in the window and press **GENERATE** [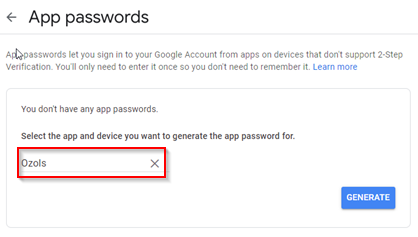](https://doc-ozols-lv.translate.goog/uploads/images/gallery/2022-06/image-1654695857759.png?_x_tr_sl=lv&_x_tr_tl=en&_x_tr_hl=en-US&_x_tr_pto=wapp) 5\) A gmail password for the OZOLS TMS system is created [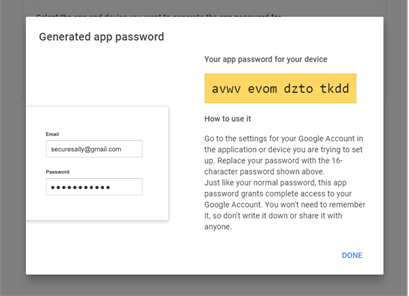](https://doc-ozols-lv.translate.goog/uploads/images/gallery/2022-06/image-1654696080380.png?_x_tr_sl=lv&_x_tr_tl=en&_x_tr_hl=en-US&_x_tr_pto=wapp) 5\) This password must be entered in the user's email settings in OZOLS TMS by following the [instructions here.](https://ozols.lv/doc/books/ozols-tms-english/page/5-e-mail-settings) ##### 2. To send Microsoft e-mails from OZOLS TMS, you must perform the following steps: 1. Open the following link and sign in to your Microsoft account: [https://mysignins.microsoft.com/security-info](https://translate.google.com/website?sl=lv&tl=en&hl=en&client=webapp&u=https://mysignins.microsoft.com/security-info) [](https://doc-ozols-lv.translate.goog/uploads/images/gallery/2022-09/image-1663850468726.png?_x_tr_sl=lv&_x_tr_tl=en&_x_tr_hl=en&_x_tr_pto=wapp) 2. [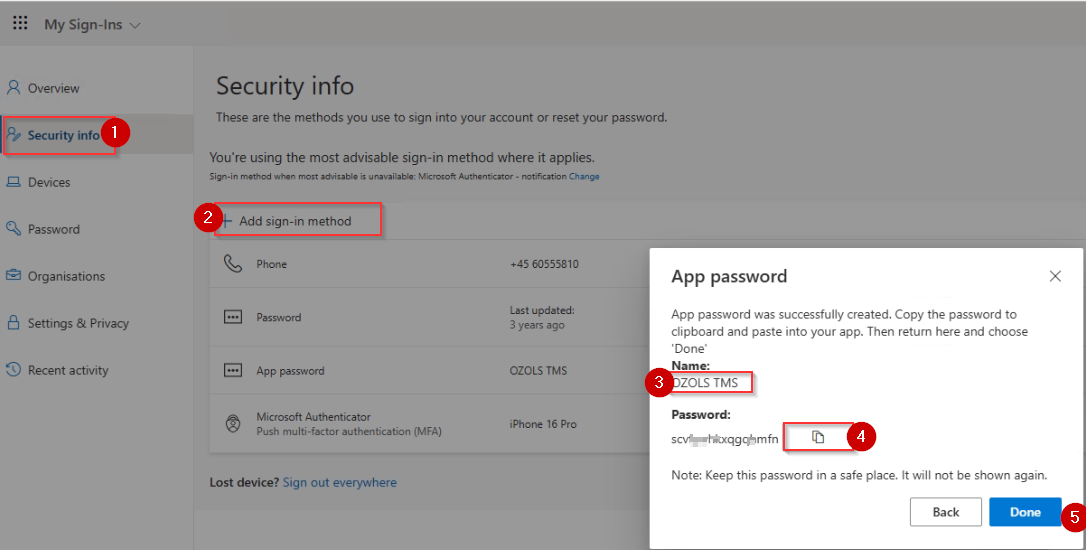](https://ozols.lv/doc/uploads/images/gallery/2025-05/image-1747052238150.png) 3. Select > Add method > App password [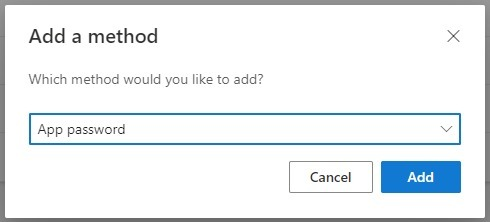](https://doc-ozols-lv.translate.goog/uploads/images/gallery/2022-09/image-1663850528591.png?_x_tr_sl=lv&_x_tr_tl=en&_x_tr_hl=en&_x_tr_pto=wapp) 4. Copy the password created by Microsoft [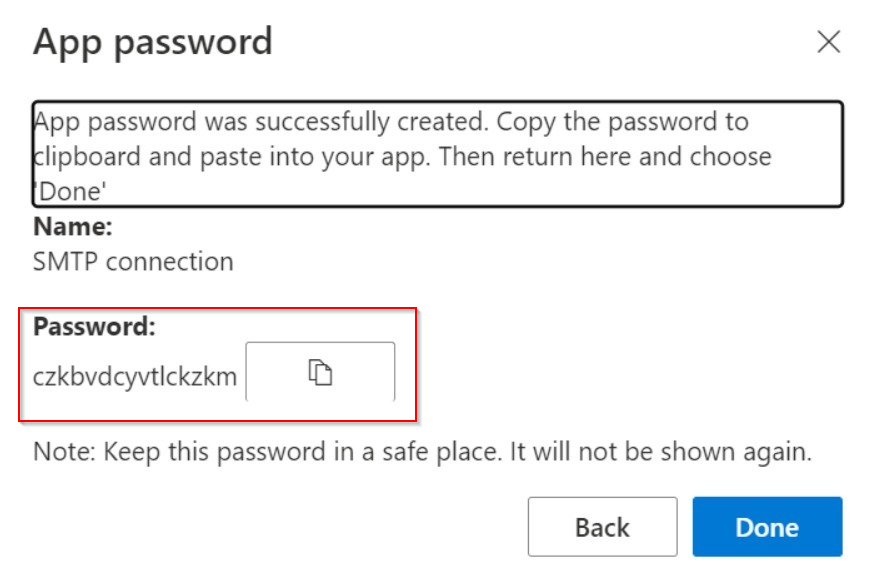](https://doc-ozols-lv.translate.goog/uploads/images/gallery/2022-09/image-1663850674227.png?_x_tr_sl=lv&_x_tr_tl=en&_x_tr_hl=en&_x_tr_pto=wapp) 5. This password must be entered in the user's email settings in OZOLS TMS by following the [instructions here.](https://ozols.lv/doc/books/ozols-tms-english/page/5-e-mail-settings) # If Windows Smart App Control blocking your app ## ✅ What you can do --- ### Option 1 — Unblock manually (safer approach) Try this first: 1. Go to C:\\Program Files (x86)\\Ozols\\ folder 2. Right-click `OZOLS.EXE` 3. Click **Properties** 4. At bottom → check **“Unblock”** 5. Click **Apply → OK** 6. Run again ### Option 2 — If you TRUST the app If this is your own or known software: 1. Click **“Ok”** 2. Go to: - **Windows Security** - → *App & browser control* - → *Smart App Control settings* 3. Turn **Smart App Control → Off** ⚠️ Important: Once turned off, you **cannot turn it back on without reinstalling Windows** (this is how Microsoft designed it). # Configuration and data import # User data import 1\) Create a user list with the following user information:| npk | Name | Surname | Phone number. | Position | Notes | |
| 1. | ||||||
| 2. | ||||||
| 3. |
To make it easier to get started with Ozols TMS, we recommend that you use this option to import existing business partners databsae by following the steps below:
1\. Create an Excel table that contains business partner information, using the following example:| Company Name | Registration number | VAT number | Address, Street | Address, City | Address, Postal code | Address, Country | Bank | SWIFT code | Account number | Name of the contact person | Surname of the contact person | Phone Number | etc | |
If you have any questions about these instructions, please contact the OZOLS TMS customer support team: **[ info@cloudex.lv](mailto:info@cloudex.lv?_x_tr_sl=lv&_x_tr_tl=en&_x_tr_hl=en&_x_tr_pto=wapp)** or call 003-71 **28-38-83-00**
# Linking car navigation to Ozols TMS (API keys)Ozols TMS allows you to add API keys (for example from Mapon) to provide real-time location of cars, as well as other data from your navigation system. Please contact the OZOLS TMS support team for details. E-mail: info@cloudex.lv
##### Benefits: - Real time car location in OZOLS TMS - Better cargo planning - Hours spent in a specific country - etc # Car data importTo make it easier to get started with Ozols TMS, we recommend that you use this option to import a list of vehicles by following the steps below:
1\) Create an Excel document with a table that contains information about vehicles:| Information | 1 | 2 | 3 | 4 | 5 | … |
| TruckNo | ||||||
| TehCertNo | ||||||
| Model | ||||||
| ChasNo | ||||||
| Year | ||||||
| Type | ||||||
| OwnerCompany | ||||||
| Notes | ||||||
| EmissionSt | ||||||
| FullWeight | ||||||
| NetWeight | ||||||
| HolderCompany | ||||||
| LeaseholderCompany | ||||||
| ExpeditionCompany | ||||||
| ADR | ||||||
| CarrierCompany | ||||||
| Color |
To make it easier to get started with Ozols TMS, we recommend that you use this option to import a list of drivers by following the steps below:
1\) Create an Excel document with a table that contains information about drivers:| Name | Surname | Phone Number | Car Number | Trailer number | Certificates | etc |
To simplify the entry of fixed costs into Ozols TMS, we recommend creating an Excel spreadsheet that can be imported into the database.
1\. Create an Excel spreadsheet containing the required information. For example: MTPL, CASCO, leasing or other fixed costs.• The data in the Excel file is grouped into 6 columns - according to the example below. • The first row must contain the column names. • There must be no other empty columns between these 6 columns. • The type names must correspond exactly to the defined position names! • Date must be in the format dd.mm.yyyy
[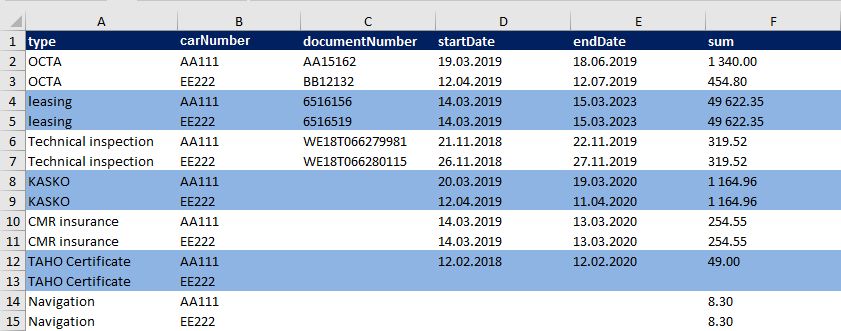](https://doc-ozols-lv.translate.goog/uploads/images/gallery/2022-02/izdevumi-fix-xls-2.png?_x_tr_sl=lv&_x_tr_tl=en&_x_tr_hl=en&_x_tr_pto=wapp) 2. The prepared Excel spreadsheet is sent to Ozols TMS specialists by e-mail:You can specify the **type of transport in client's order**. It can be added or edited.
**OZOLS > Freight forwarding > Lists > Transport types** [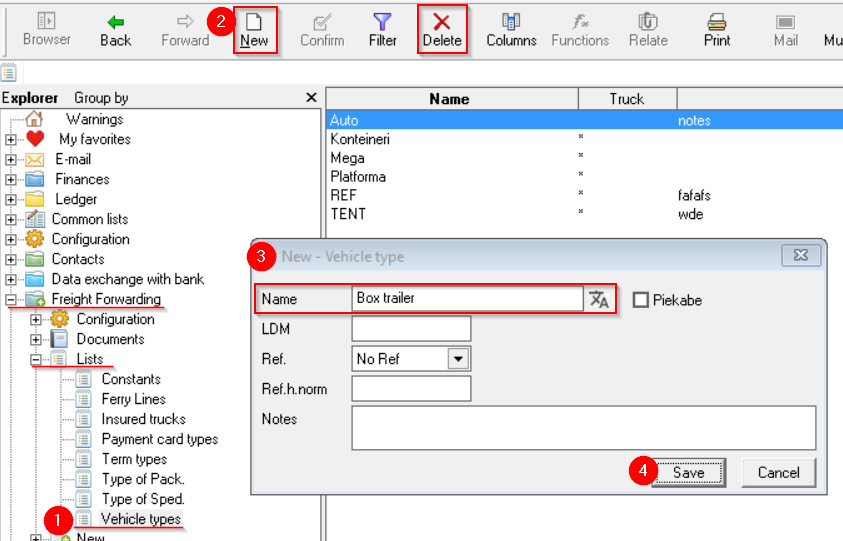](https://ozols.lv/doc/uploads/images/gallery/2022-09/image-1662028029051.png) # Basic principles # Main window layout and commands ### Browser The **Operation Mode Browser** is displayed on the left side of the screen and is used to display the available working modes. The layout of the working modes is similar to the main menu. [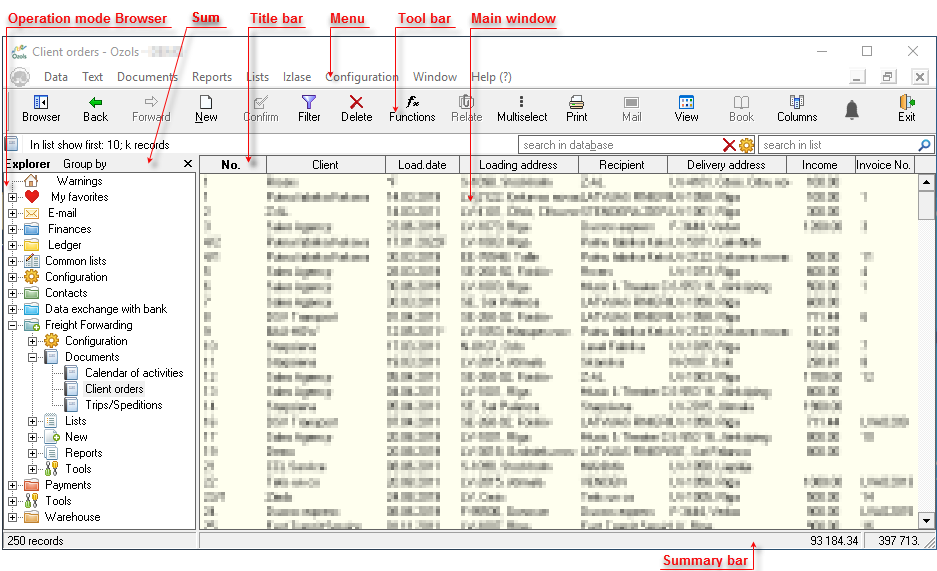](https://ozols.lv/doc/uploads/images/gallery/2022-05/image-1653310342881.png) The operating modes are displayed hierarchically in the browser. To activate the required action, you must click on the entry to open the lowest level operating modes. For example, by clicking on the Customer Orders command, the Customer Orders overview opens on the right side in the Main Window. To open the next required operating mode, click on it in the browser and the specified operating mode will open in the Main Window. You can hide or show the browser using toolbar commands [](https://doc-ozols-lv.translate.goog/uploads/images/gallery/2020-11/ico-nav-2.gif?_x_tr_sl=lv&_x_tr_tl=en&_x_tr_hl=en&_x_tr_pto=wapp)or the [](https://doc-ozols-lv.translate.goog/uploads/images/gallery/2020-11/ico-nav-1.gif?_x_tr_sl=lv&_x_tr_tl=en&_x_tr_hl=en&_x_tr_pto=wapp) button. ### Main menu Activation of all program activities is available in the main menu. The main menu is available for the entire duration of the computer program. Using the main menu is similar to using Windows programs. The operating modes in the program are grouped under the menus Data, Text, Documents, Reports, Lists, Favorites, Configuration, Window, Help. All these operating modes can also be found using the Browser. The most commonly used main menu commands are also available from the toolbar of your computer program. ### Toolbar The toolbar is a graphical layout of command buttons that allows you to perform the required action faster and more clearly. [](https://ozols.lv/doc/uploads/images/gallery/2022-05/image-1653312000456.png)**If the toolbar is not visible** , it can be set from the menu using the **ME**NU** ‣Configuration ‣ Toolbar ‣ Commands**
##### Customize Toolbar**The toolbar can be configured.** Place the mouse over the Toolbar. Click on the right button and select **Customize Toolbar.**
[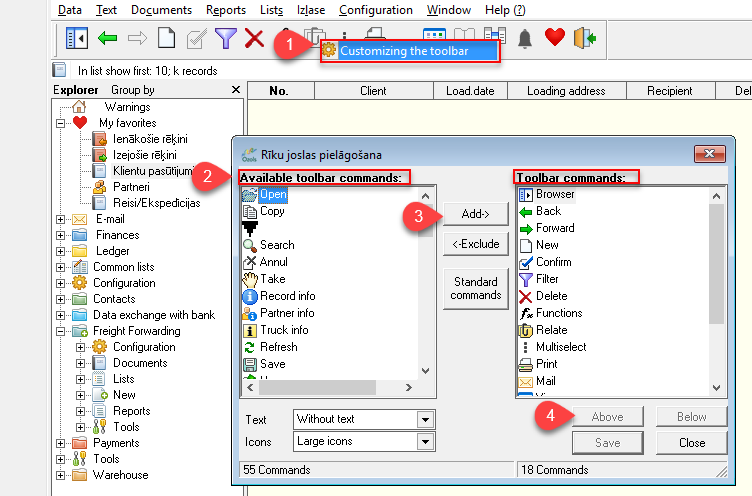](https://ozols.lv/doc/uploads/images/gallery/2022-05/image-1653313855777.png) # Open WindowsSometimes one of the open windows disappears because it has fallen behind another window. To find it:
1. To switch between open windows, press **Ctrl+F1** 2. Or from the menu, press **Window** 3. A list of **open windows** is shown **at the bottom of this window**. To open a window, click on it with the mouse. mouse. [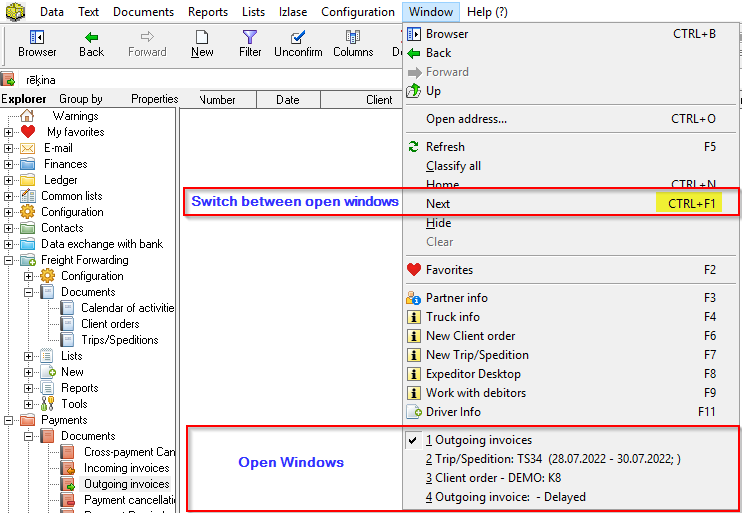](https://ozols.lv/doc/uploads/images/gallery/2022-10/image-1666682007095.png) # Shortcuts to frequently used forms 1. [Function keys](#bkmrk-1.-function-keys) 2. [Opened windows and Function key summary](#bkmrk-2.-opened-windows-an) 3. [General key combinations in OZOLS TMS](#bkmrk-3.-general-key-combi) #### 1. Function keys The function keys allow you to quickly open one of the OZOLS TMS sections [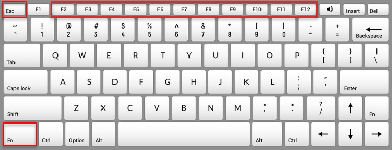](https://doc-ozols-lv.translate.goog/uploads/images/gallery/2022-05/image-1652086973713.png?_x_tr_sl=lv&_x_tr_tl=en&_x_tr_hl=en&_x_tr_pto=wapp)**The most frequently used Function keys:** **F6** - New Customer **order** **F7** - New **Voyage/Expedition** **F8** - **Forwarder** 's desktop
| Function keys | Explanation |
| F2 | [](https://doc-ozols-lv.translate.goog/uploads/images/gallery/2022-04/image-1649232419840.png?_x_tr_sl=lv&_x_tr_tl=en&_x_tr_hl=en&_x_tr_pto=wapp) My favorites - a list of working modes compiled by myself |
| F3 | [](https://doc-ozols-lv.translate.goog/uploads/images/gallery/2022-04/image-1649232497362.png?_x_tr_sl=lv&_x_tr_tl=en&_x_tr_hl=en&_x_tr_pto=wapp)Information card of the cooperation partner |
| F4 | [](https://doc-ozols-lv.translate.goog/uploads/images/gallery/2022-04/image-1649232520350.png?_x_tr_sl=lv&_x_tr_tl=en&_x_tr_hl=en&_x_tr_pto=wapp)Machine/Trailer Details |
| F5 | [](https://doc-ozols-lv.translate.goog/uploads/images/gallery/2022-04/image-1649232478036.png?_x_tr_sl=lv&_x_tr_tl=en&_x_tr_hl=en&_x_tr_pto=wapp)Redrawing (refreshing) information in the open window |
| F6 | [](https://doc-ozols-lv.translate.goog/uploads/images/gallery/2022-04/image-1649236212445.png?_x_tr_sl=lv&_x_tr_tl=en&_x_tr_hl=en&_x_tr_pto=wapp)New Customer order |
| F7 | [](https://doc-ozols-lv.translate.goog/uploads/images/gallery/2022-04/image-1649236748002.png?_x_tr_sl=lv&_x_tr_tl=en&_x_tr_hl=en&_x_tr_pto=wapp)New Voyage/Expedition |
| F8 | [](https://doc-ozols-lv.translate.goog/uploads/images/gallery/2022-04/image-1649236947008.png?_x_tr_sl=lv&_x_tr_tl=en&_x_tr_hl=en&_x_tr_pto=wapp)Forwarder desktop |
| F9 | Work with debtors |
| F11 | [](https://doc-ozols-lv.translate.goog/uploads/images/gallery/2022-04/image-1649232520350.png?_x_tr_sl=lv&_x_tr_tl=en&_x_tr_hl=en&_x_tr_pto=wapp)Saving and adding information |
| F12 | [](https://doc-ozols-lv.translate.goog/uploads/images/gallery/2022-04/image-1649232520350.png?_x_tr_sl=lv&_x_tr_tl=en&_x_tr_hl=en&_x_tr_pto=wapp)Retention and Closure of Information |
If the Function keys **do not work** , press **Fn + Esc on the keyboard**
#### 2. Opened windows and Function key summary In main menu under **Window** you can find Opened windows and Function key shortcuts and summary 1. **Update data** in the currently open window **(F5)** 2. **Arrange all** creates a cascade of open windows. This allows you to quickly switch between open windows 3. Shortcuts to **function keys** 4. Opened windows - Helps to find collapsed windows [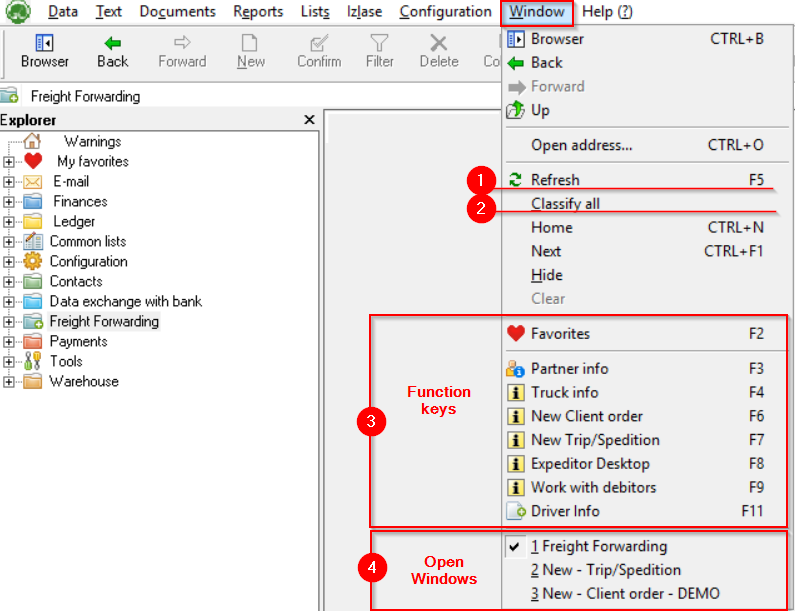](https://ozols.lv/doc/uploads/images/gallery/2022-09/image-1662031591973.png) #### 3. General key combinations in OZOLS TMS| **Key combinations** | **Explanation** |
| Tab | Navigating from field to field |
| Shift+Tab | Navigating from field to field backwards |
| Ctrl+Tab | Switch between form pages |
| Alt+Arrow Down | Opens a drop-down list for selecting a record |
| Shift+Arrow Down | Opens a drop-down extended list for selecting a record |
| Shift+Arrow Up | Opens the selected drop-down record or, if no record is selected, creates a new record |
| Alt+ underlined letter | The mouse cursor moves to the label field containing the underlined letter |
| Escape | Cancels changes to the open form |
| Enter | Saves open form data |
| Ctrl+G | Book document |
| Ctrl+P | Prints the selected document |
Almost all sections of OZOLS have the possibility to set a **Filter** for selecting the data you need. The **Filter** is located in the toolbar.
[](https://ozols.lv/doc/uploads/images/gallery/2022-09/image-1662035091447.png)If all records are not displayed when opening one of the OZOLZ TMS sections, make sure that one of the filters has not been **turned on from the previous use**.
- To find a document by number, it is enough to enter **the last two digits of the number.** - **% sign** in front of the entry enables search for partial number or name. - To select **several order numbers** , enter them in the "Search number(s)" field, **separated by a comma.** - **A checkmark[](https://doc-ozols-lv.translate.goog/uploads/images/gallery/2022-07/image-1658824626308.png?_x_tr_sl=lv&_x_tr_tl=en&_x_tr_hl=en&_x_tr_pto=wapp)** turns on the specific filter [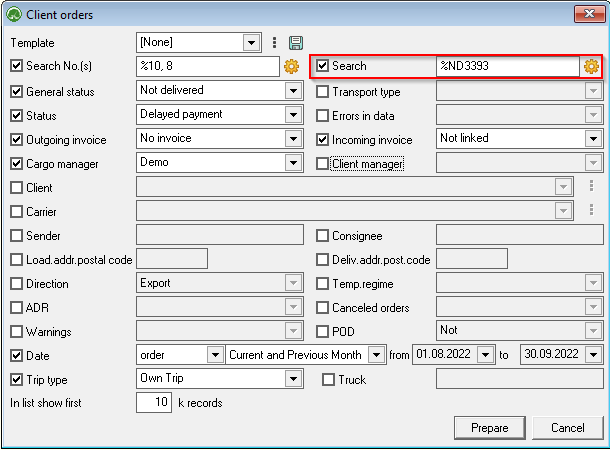](https://ozols.lv/doc/uploads/images/gallery/2022-09/image-1662105184357.png)**The additional Search** function built into the filter on the right side of window allows you to enter additional search criteria. More about search options [here.](https://ozols.lv/doc/books/ozols-tms-english/page/search-window)
# Search window #### How the search window works: - If you search for, for example, "**ECG**" the program will select all records where the field **name starts with** "ECG" - If you search " **% ECG**" the program will select all records where **the field record contains** "ECG" - If you search for “ **!** "ECG" program will select all records where the field name **does not start with** "ECG" - If there are spelling differences, the **unknown letter** is replaced by an underscore " \_ ". For example, you can search for the word "Vilnius" as "Viln\_\_s" - Square brackets \[ \] ar used to search for multiple **possible letters** . For example, searching for “ \[ CS \] heryl” will find the result for both Cherlyl and Sheryl #### Two search windows: 1. The data is searched in the OZOLS **database**; 2. Data is searched only in **the open table**. [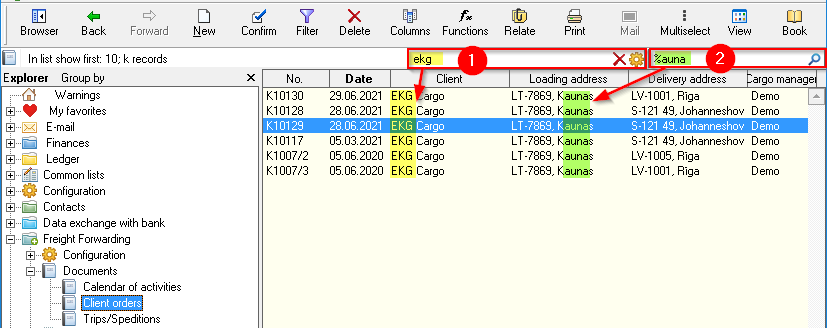](https://ozols.lv/doc/uploads/images/gallery/2022-09/image-1662109232125.png) # Recording and editing historyAlmost all records or editing made in the OZOLS TMS are logged and their history can be viewed.
##### Record history information: 1. **when and who added** the record ; 2. **when and who opened/viewed** the record ; 3. when and by whom the record has been **edited** and specifically **what** **changes** have been made. ##### To view Record history: 1. Open the desired window and **p**ress** the key combination Ctrl+i** 2. Record info displays which user created, edited or viewed the data 3. If the text "**Edited**" is next to the record, then you can open additional information about the history of the record with a double click. [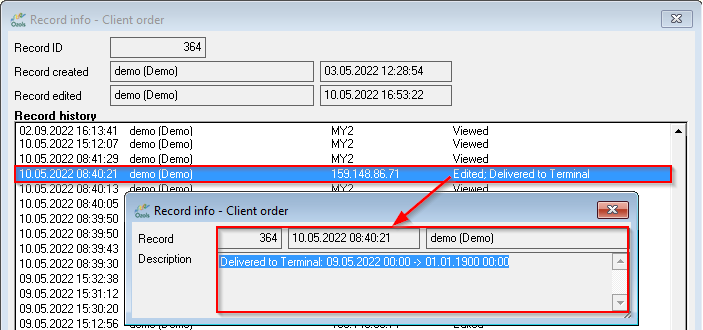](https://ozols.lv/doc/uploads/images/gallery/2022-09/image-1662125004194.png) # Columns - adjusting the design and content Read about adjusting the design and content in the following sections: 1. [How to adjust column content and order?](https://ozols.lv/doc/books/ozols-tms-english/page/customize-column-content-and-order) 2. [How to change column width?](https://ozols.lv/doc/books/ozols-tms-english/page/adjusting-column-width) 3. [How to put a colleague's column layout in your Ozols?](https://ozols.lv/doc/books/ozols-tms-english/page/customize-column-content-and-order) 4. [How to quickly change the appearance of columns? - **Defined columns**](https://ozols.lv/doc/books/ozols-tms-english/page/defined-columns) # Adjusting Column width #### To change the column width: Open the OZOLS TMS table where you want to change the width of the columns. **1. In the toolbar, select the Columns** toolbar button [](https://ozols.lv/doc/uploads/images/gallery/2022-08/image-1661778373612.gif) or press **Ctrl+K. The Column settings** window will open 2\. In **the Visible columns** section , select which column width you want to change 3\. Press the **Change column width** button 4\. In **the Column width** field, write the desired column width in pixels (informative: 1px ≈ 0.26mm; 100px ≈ 2.6cm) [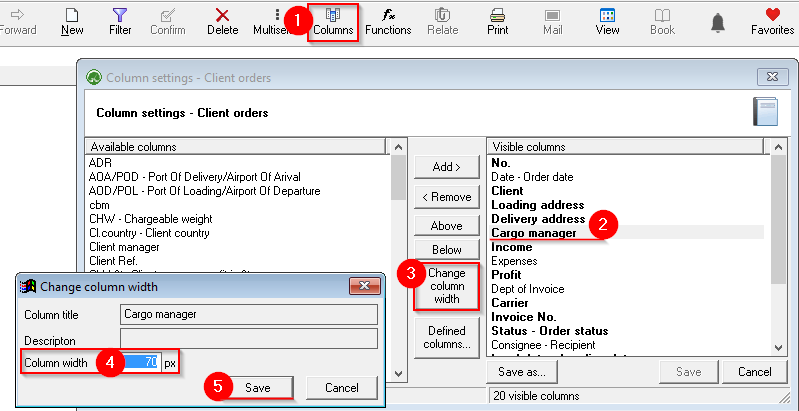](https://ozols.lv/doc/uploads/images/gallery/2022-10/image-1666267231945.png)**See also:** 1) [Customize table ](https://doc-ozols-lv.translate.goog/books/ozols-desktop/page/pielagot-tabulas-kolonnu-saturu-un-secibu?_x_tr_sl=lv&_x_tr_tl=en&_x_tr_hl=en&_x_tr_pto=wapp)**[column content and order](https://doc-ozols-lv.translate.goog/books/ozols-desktop/page/pielagot-tabulas-kolonnu-saturu-un-secibu?_x_tr_sl=lv&_x_tr_tl=en&_x_tr_hl=en&_x_tr_pto=wapp)** 2) [**Defined columns**](https://doc-ozols-lv.translate.goog/books/ozols-desktop/page/definetas-kolonnas?_x_tr_sl=lv&_x_tr_tl=en&_x_tr_hl=en&_x_tr_pto=wapp)
# Customize column content and order Open the table you want to make changes to 1. **Press the right mouse button** on any of the rows in the table 2. Or in the menu, press **Columns** (Ctrl+K) [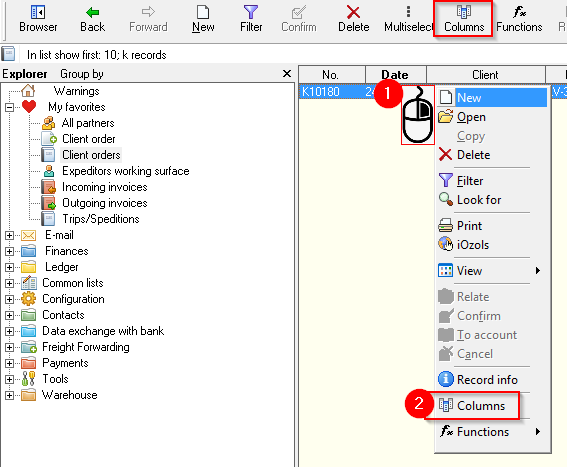](https://ozols.lv/doc/uploads/images/gallery/2022-10/image-1666268786878.png) 3. Columns are divided into **Available columns (possibly included in the table)** and 4. **Visible columns (already included in the table)** 5. Mark with the “mouse” the desired column on one or the other side and press the **Add** or **Remove buttons** as needed to adjust the table content 6. Change the order of the columns with the **Up** or **Down buttons** . Moving Up moves the column to the left in the table. Moving Below moves the column to the right in the table. [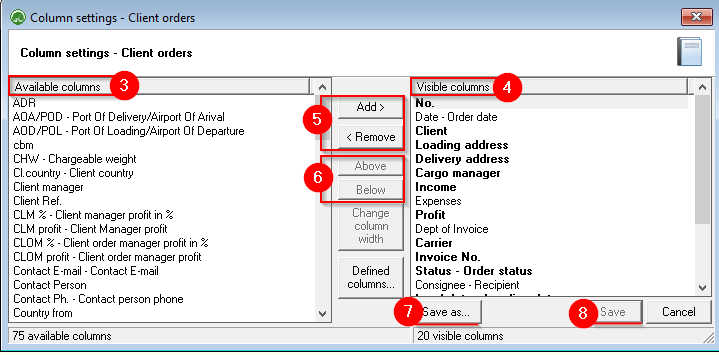](https://ozols.lv/doc/uploads/images/gallery/2022-10/image-1666269460278.png)**The Save As...** button allows you to save the selected layout as defined. This means that both you and other users of your company's OZOLS database will be able to open this table layout.
**See also:** 1) [Change ](https://doc-ozols-lv.translate.goog/books/ozols-desktop/page/kolonnu-platums?_x_tr_sl=lv&_x_tr_tl=en&_x_tr_hl=en&_x_tr_pto=wapp)**[column width](https://doc-ozols-lv.translate.goog/books/ozols-desktop/page/kolonnu-platums?_x_tr_sl=lv&_x_tr_tl=en&_x_tr_hl=en&_x_tr_pto=wapp)** 2) [**Defined columns**](https://doc-ozols-lv.translate.goog/books/ozols-desktop/page/definetas-kolonnas?_x_tr_sl=lv&_x_tr_tl=en&_x_tr_hl=en&_x_tr_pto=wapp)
# Defined columns**Defined columns** allow you to save the table column layout you create with a name. Columns saved in this way are easily available both for their own needs and for installation by other users. So, for example, defined column selections can be created within the company, which can be easily installed by new employees.
First, open the table where you want to install the defined columns. Select the  **Columns button on the toolbar ( Ctrl+K )** 1. Click the **Defined Columns… button.** 2. **Default columns** - layout recommended by OZOLS TMS 3. **Columns defined** in your company 4. Click **Save** to activate the defined columns [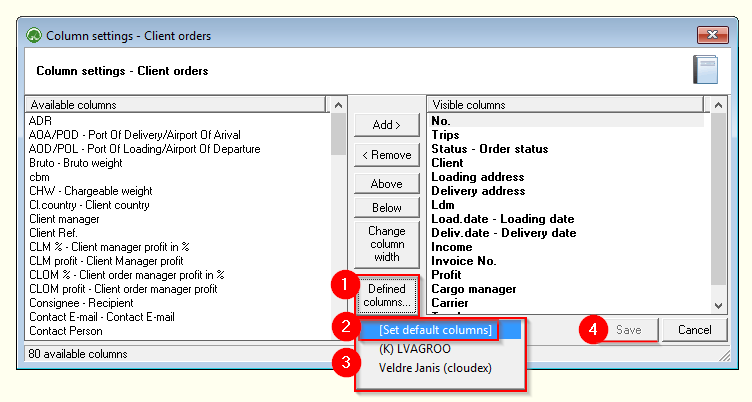](https://ozols.lv/doc/uploads/images/gallery/2022-10/image-1666273150651.png) #### To create a selection of Defined Columns 1. Adjust the columns shown in the table as needed ( [tutorial **here**](https://doc-ozols-lv.translate.goog/books/ozols-desktop/page/pielagot-kolonnu-saturu-un-secibu?_x_tr_sl=lv&_x_tr_tl=en&_x_tr_hl=en&_x_tr_pto=wapp) ) and press the button **Save as...** 2. To create a New selection of defined columns, press **New...** 3. To edit or delete previously saved defined columns, select **by name** 4. To open a selection of predefined columns, click the ****Defined Columns… button.****[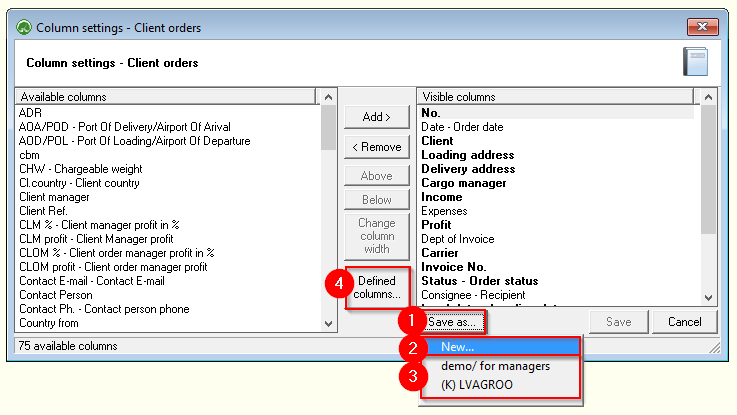](https://ozols.lv/doc/uploads/images/gallery/2022-10/image-1666273740509.png) 5. Gives a name to a selection of defined columns 6. Tick if you want the columns to be available to all users. If the "tick" is not placed, then only you will see this selection 7. Press save. The Defined Columns you have created can be found by clicking the **Defined Columns… button.** 8. If you need to delete one of the previously created selections of Defined columns, open it (5) and press the **Delete button** [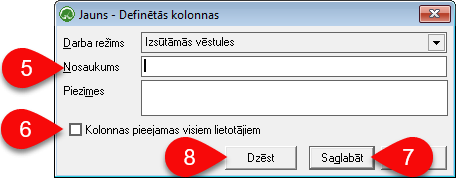](https://doc-ozols-lv.translate.goog/uploads/images/gallery/2022-03/image-1646665437129.png?_x_tr_sl=lv&_x_tr_tl=en&_x_tr_hl=en&_x_tr_pto=wapp)The Defined Columns you created can be found by clicking the **Defined Columns** button
# Multiselect - highlight the desired rowsMultiselect is used when it is necessary to select individual rows in random order. such as cargo and add to the trip.
1\) In the toolbar, select **Multi-select.** ( **Ctrl+Y)** 2\) Then, similarly to Excel, holding down the **Ctrl** or **Shift** keys with the "mouse" mark the desired rows 3\) The marked rows depending on the open window: \- The marked loads on the freight forwarder's desktop can be added to the marked flight \- [Calculator - the sums of the marked lines](https://doc-ozols-lv.translate.goog/books/ozols-desktop/page/kalkulators-iezimeto-rindu-summas?_x_tr_sl=lv&_x_tr_tl=en&_x_tr_hl=en&_x_tr_pto=wapp) \- [Print or export to Excel](https://doc-ozols-lv.translate.goog/books/ozols-desktop/page/drukat-vai-eksportet-uz-excel-tikai-jums-vajadzigos-datus?_x_tr_sl=lv&_x_tr_tl=en&_x_tr_hl=en&_x_tr_pto=wapp) \- Depending on the window, additional options are available by pressing the Functions command button [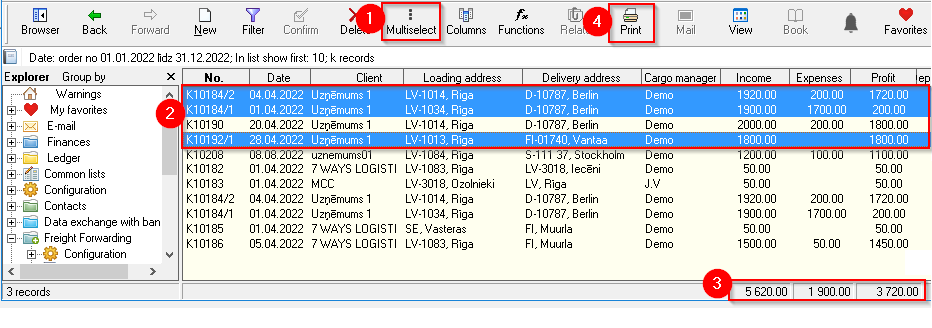](https://ozols.lv/doc/uploads/images/gallery/2022-10/image-1666361530074.png) # Calculator - sums of highlighted rowsOZOLS TMS allows you to select individual rows in the table in order to sum the numbers in these rows.
1. In the toolbar, select **Multi Select.** (shortcut **Ctrl+Y)** 2. Then, similar to Excel, holding the **Ctrl** or **Shift** keys with the "mouse" selects the desired rows 3. **The sums of the highlighted rows are shown in the lower part of the table** 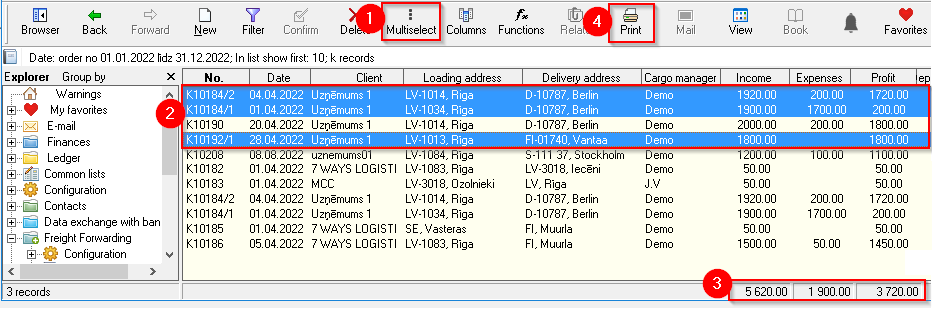**See also:** [1) Option to print or export highlighted rows **to Excel** ](https://doc-ozols-lv.translate.goog/books/ozols-desktop/page/drukat-vai-eksportet-uz-excel-tikai-jums-vajadzigos-datus?_x_tr_sl=lv&_x_tr_tl=en&_x_tr_hl=en&_x_tr_pto=wapp)[. Press Print ④ and follow the instructions.](https://doc-ozols-lv.translate.goog/books/ozols-desktop/page/drukat-vai-eksportet-uz-excel-tikai-jums-vajadzigos-datus?_x_tr_sl=lv&_x_tr_tl=en&_x_tr_hl=en&_x_tr_pto=wapp) 2) **Additional options,** depending on the opened window, by pressing the **Functions command button**
# Print or export selected data to ExcelOzols TMS enables you to select the desired data in tables and print or save in Excel:
1. Choose **Filter [](https://ozols.lv/doc/uploads/images/gallery/2022-05/image-1651585606852.png)** (shortcut **Ctrl+F** ) from the toolbar and select the data you want to select. 2. On the toolbar, choose **Columns** [](https://ozols.lv/doc/uploads/images/gallery/2020-11/ico-columns.gif)(shortcut **Ctrl+K** ) and choose the columns you need. There is an option to save this column selection in the [**Defined Columns section.**](https://doc-ozols-lv.translate.goog/books/ozols-desktop/page/definetas-kolonnas?_x_tr_sl=lv&_x_tr_tl=en&_x_tr_hl=en&_x_tr_pto=wapp) 3. If you need to select only some rows, select **Multi select [](https://ozols.lv/doc/uploads/images/gallery/2022-06/image-1654595946120.png) from the toolbar.** (shortcut **Ctrl+Y)** 4. Similar to Excel, holding the **Ctrl** or **Shift** keys with the mouse selects the desired rows 5. Choose **View [ ](https://ozols.lv/doc/uploads/images/gallery/2022-08/image-1661781212158.png)**from the toolbar (shortcut **Ctrl+H** ). At this point, a table with the selected data will be displayed in the main window. 6. **Right-** click anywhere in the newly created table and select **print or export to Excel** [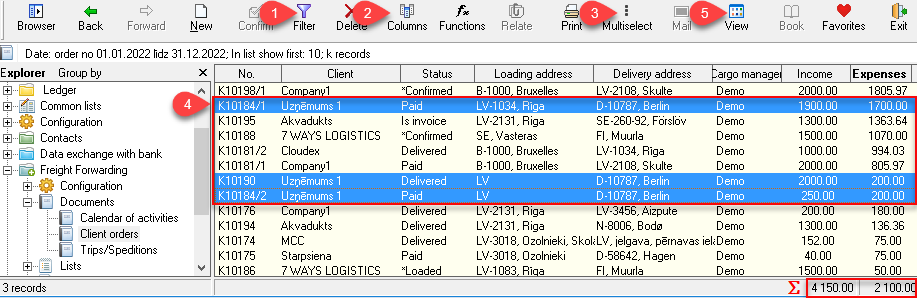](https://ozols.lv/doc/uploads/images/gallery/2022-08/image-1661937902064.png)To send the data to a **printer** or export to **Excel** , click **View** and follow the instructions.
**See also:** 1) [**Calculator** - sums of highlighted rows](https://doc-ozols-lv.translate.goog/books/ozols-desktop/page/kalkulators-iezimeto-rindu-summas?_x_tr_sl=lv&_x_tr_tl=en&_x_tr_hl=en&_x_tr_pto=wapp) 2) [**Column width**](https://doc-ozols-lv.translate.goog/books/ozols-desktop/page/kolonnu-platums?_x_tr_sl=lv&_x_tr_tl=en&_x_tr_hl=en&_x_tr_pto=wapp)
# Own Transport # New Trip with own transport ##### 1. **Create a New Trip (F7)**Registration of a **new Trip** in OZOLS TMS is started by pressing the function key **F7** or **OZOLS > Freight transportation > New > Trip/Spedition
1. Choose **Own trip - Trip with own transport** (see picture below) OZOLS TMS also gives the opportunity to create: - **Spedition** - Expedition (cargo sale) - **Agreement** - long-term contract with the carrier - **Domestic** - Local deliveries 2. Determine the **Status** : - **Export** \- **Transfer**/ **Round trips** - **Import** - **Local deliveries**- **When the trip is completed:** in this window you will change the Status to **delivered** or **invoices have been issued**
3. Enter **the Truck number** . If the specific Truck has already been entered in OZOLS TMS, when entering its number, both the driver's name and the Carrier company name are automatically filled in. This database can be also [imported](https://ozols.lv/doc/books/ozols-tms-english/chapter/configuration-and-data-import).If information about insurance and technical inspection has also been entered, OZOLS will warn about the expiration of the terms. Open the truck registration card by double-clicking on the **Truck No.** field.
4. If necessary, enter the name of the driver and the name of the Carrier. In case of own trip, it will be your company name. 5. Add Export or Import **Ferry line** as needed by pressing [](https://ozols.lv/doc/uploads/images/gallery/2022-04/image-1651154858190.png). Instructions [here](https://ozols.lv/doc/books/ozols-tms-english/page/3-adding-a-ferry-ticket). 6. If necessary, write internal notes. [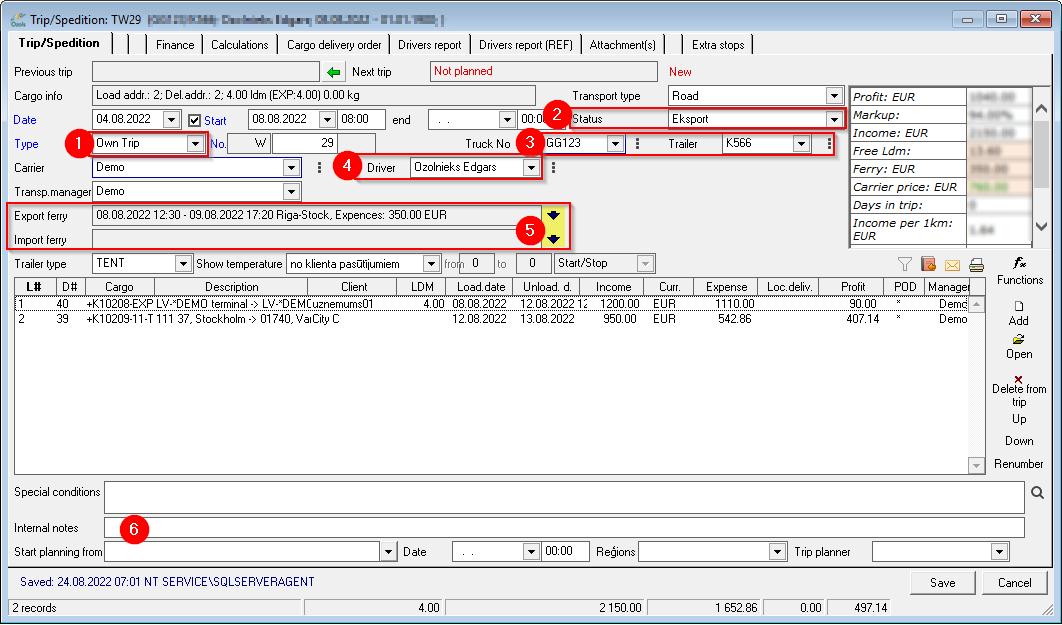](https://ozols.lv/doc/uploads/images/gallery/2022-08/image-1661949751701.png) ##### 2. **Adding cargo orders to the trip** 1. To add Cargo - Client order to the trip, press the Add button [](https://ozols.lv/doc/uploads/images/gallery/2022-08/image-1661946417031.png) 2. Choose to add an **existing** order or create **a new** order. 3. If the order has already been created, select it **from the list of orders** and double-click to add the cargo to the trip. 4. If you need to create **a new order** , follow the instructions [here ](https://ozols.lv/doc/books/ozols-tms-english/page/1-new-client-order).If the Customer also uses OZOLS TMS and has sent a Transport order - contract, then the number of this contract is the reference number of the order. **When entering the Customer's name** and **reference number in** the New Order window, the option to automatically fill in the information of this order will be offered. More about it [here ](https://ozols.lv/doc/books/ozols-tms-english/page/6-exchanging-the-cargo-information-in-ozols-tms).
5. **IMPORTANT** **- An invoice** must be issued for each order. Instructions[ here.](https://ozols.lv/doc/books/ozols-tms-english/page/61-outgoing-invoice-with-cmr) #### 3. **Adding costs to the trip**OZOLS significantly simplifies cost accounting and profitability calculations for companies using their own transport.
**Instructions for adding travel expenses[ here ](https://ozols.lv/doc/books/ozols-tms-english/page/adding-the-costs-of-the-trip).** # Adding the costs of the tripTo control the cost-effectiveness of a trip, it is necessary to add all eligible costs to it.
For companies that use their own transport, OZOLS TMS makes cost accounting and profitability calculations much easier.
### Trip with your own vehicle 1\. [**Fixed** costs](#bkmrk-1.fiks%C4%93t%C4%81s-izmaksas1) 1.1. [Adding fixed costs from an Excel file](#bkmrk-2.1.2.-fiks%C4%92to-izmak) 2\. [**Variable** costs](#bkmrk-2.2.%C2%A0main%C4%AAg%C4%80s-izmaks) 2.1. [Adding variable costs manually](#bkmrk-2.2.1.-main%C4%AAgo-izmak) 2.2. [Importing variable costs from an Excel file](#bkmrk-2.2.2.-main%C4%AAgo-izmak) 2.3. [New import template of variable costs (cheques)](#bkmrk-2.2.3.-jauns-main%C4%AAgo) 3\. [**Driver** 's net salary and salary taxes](#bkmrk-2.3.-%C5%A0ofera-neto-alg) 3.1. [Driver's net salary](#bkmrk-2.3.1.-%C5%A0ofera-neto-a) 3.2. [Salary taxes](#bkmrk-2.3.2.-algas-nodok%C4%BBi) 4\. [**Advance** payments](#bkmrk-2.4.%C2%A0avansa-nor%C4%92%C4%B6ini) 5\. [**Repair** expenses](#bkmrk-2.5.%C2%A0-remontu-izdevu) ### 1. FIXED COSTSThe fixed costs are calculated for each car separately and only a part of them is applied to the trip - for the period from the end date of the previous trip to the end date of the current trip.
1\. OZOLS TMS fixed costs are added for a certain term, therefore they can be found in the "Term Types" list: **OZOLS > Freight forwarding > Lists > Term types** 2\. Deadlines not related to costs can be added here: **OZOLS > Freight forwarding > Reports > Vehicles**A reminder function is available for all deadlines, which will prevent you from forgetting the dates when contracts, insurance, car technical inspection, etc. must be renewed.
[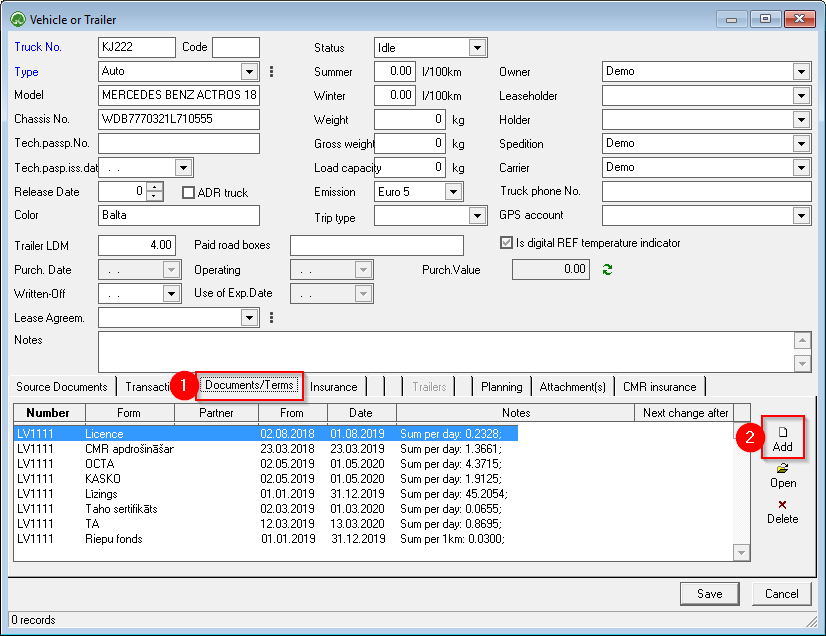](https://ozols.lv/doc/uploads/images/gallery/2022-10/image-1666784979734.png) [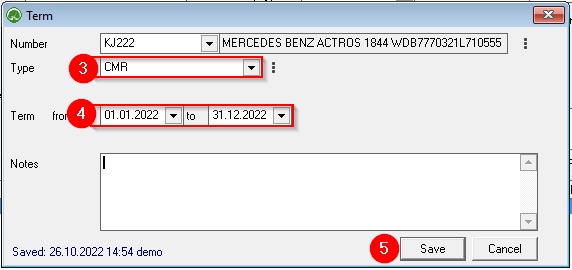](https://ozols.lv/doc/uploads/images/gallery/2022-10/image-1666785361366.png) #### 1.1. ADDING FIXED COSTS FROM EXCEL FILE ##### **First step:** check the import template.A template configured as in the image below must be used!
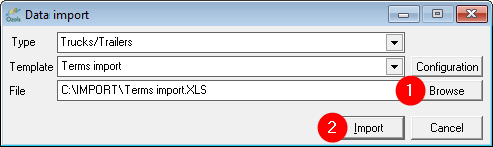
1. **OZOLS > Freight > Tools > Data Import** 2. Click **Configuration** [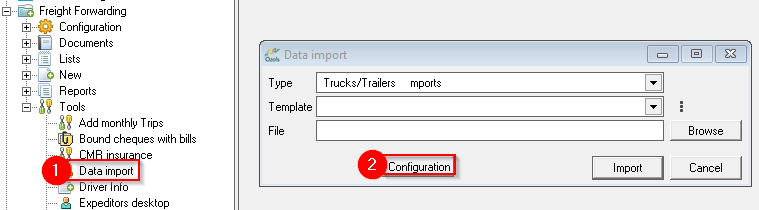](https://ozols.lv/doc/uploads/images/gallery/2022-10/image-1666787940047.png) [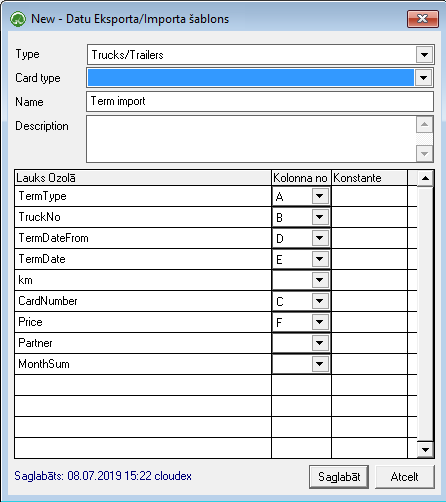](https://ozols.lv/doc/uploads/images/gallery/2022-10/image-1666786896219.png) ##### **Step Two:** Organize the data in an Excel file ##### **Important** : - the data in the Excel file is grouped into 6 columns - according to the sample shown below. - the first row should contain column names - there should be no other empty columns between the said 6 columns - the names of the types must exactly match those defined: - dates must be formatted in the format – dd.mm.yyyy [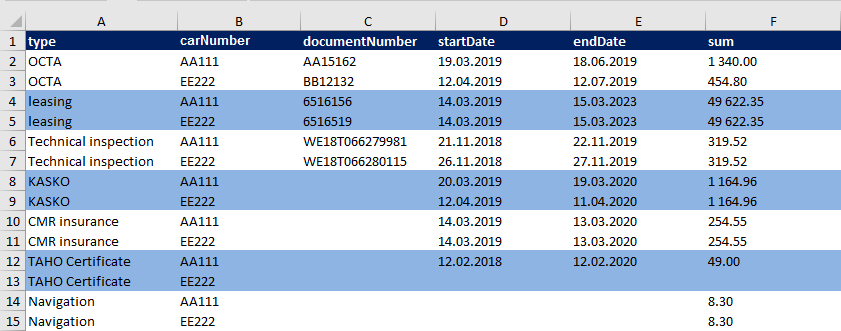](https://doc-ozols-lv.translate.goog/uploads/images/gallery/2022-06/image-1655813148446.png?_x_tr_sl=lv&_x_tr_tl=en&_x_tr_hl=en-US&_x_tr_pto=wapp) ##### **Step three:** Data importwhen everything is ready, it remains to specify the location of the file to be imported on the computer (Browse) and perform the data import.
[](https://ozols.lv/doc/uploads/images/gallery/2022-10/image-1666787500397.png) ### 2. VARIABLE COSTS Variable costs mostly consist of checks received from gas stations: - Fuel - AdBlue - Tolls for roads - etc #### 2.1. ADDING VARIABLE COSTS MANUALLYVariable costs can also be added manually or can be imported from Excel.
**OZOLS > Freight Forwarding > Documents > Trips/Speditions > \[DRIVER'S REPORT\]** [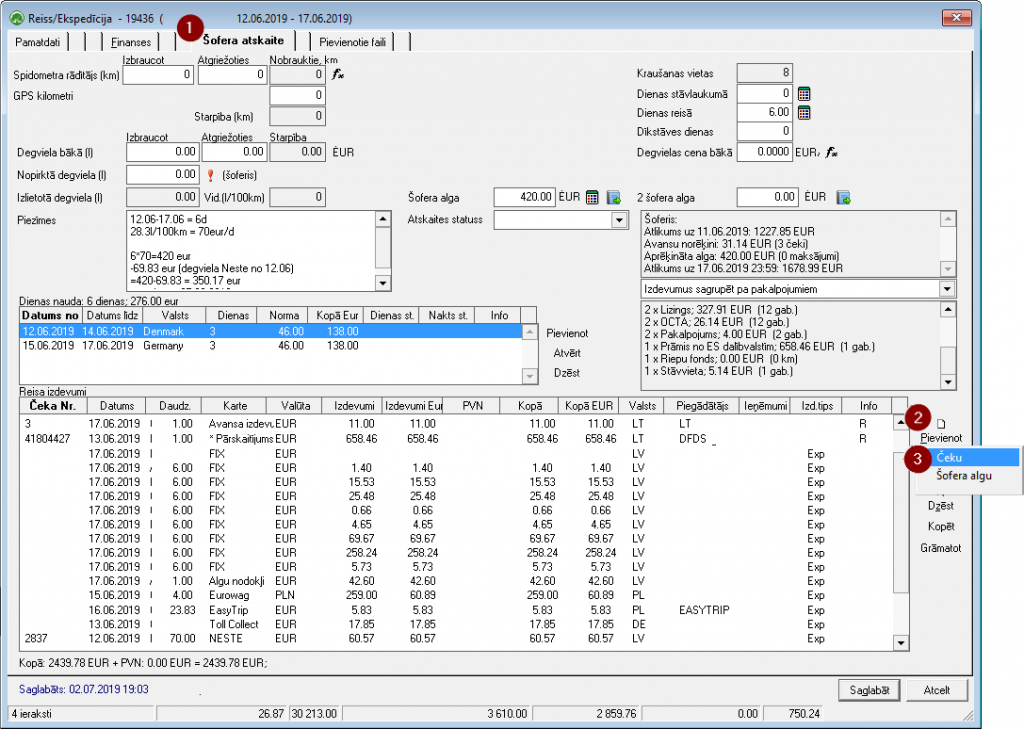](https://doc-ozols-lv.translate.goog/uploads/images/gallery/2022-06/image-1655813164807.png?_x_tr_sl=lv&_x_tr_tl=en&_x_tr_hl=en-US&_x_tr_pto=wapp) #### 2.2. IMPORT OF VARIABLE COSTS FROM EXCEL FILE ##### **First step:** Prepare the templateCheck the import tool (template). If necessary, corrections should be made so that the corresponding column for each data field is specified in the template.
**Mandatory fields in the template:** - for the car number plate (if the car has a fuel card, then the card number is enough) - check/transaction date - country of transaction - type of product/service (fuel, roads, AdBlue, etc.) - the amount - sum - currency **To perform template configuration in OZOLS TMS:** **OZOLS > Freight > Tools > Import Receipts** [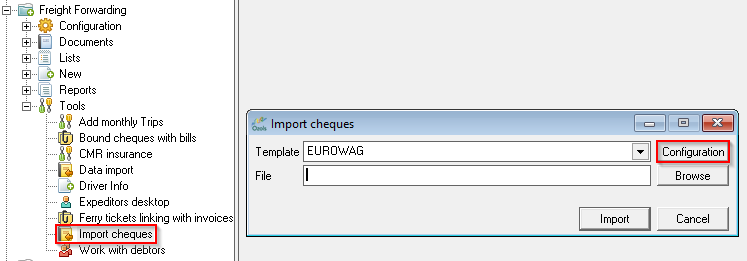](https://ozols.lv/doc/uploads/images/gallery/2022-10/image-1666788910088.png) [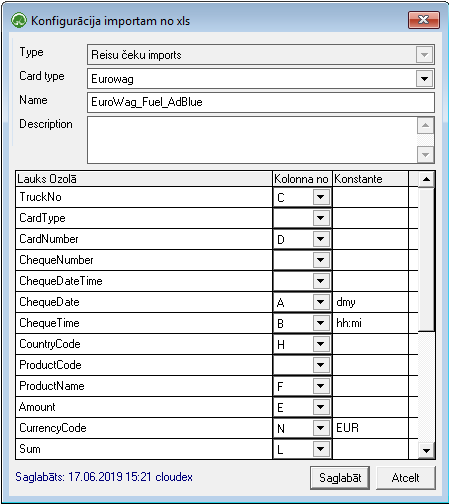](https://ozols.lv/doc/uploads/images/gallery/2022-10/image-1666788985989.png)The template must be configured according to the Excel file.
In the example, you can see that the column name 'L' is specified for the data field 'SUM' in the template, and also in the imported Excel file 'Total price (excl VAT)' can be found in the column 'L'. This is how all required fields must be aligned. [](https://doc-ozols-lv.translate.goog/uploads/images/gallery/2022-06/image-1655813193458.png?_x_tr_sl=lv&_x_tr_tl=en&_x_tr_hl=en-US&_x_tr_pto=wapp)Purchase reports prepared for gas stations often contain many columns and redundant information, so the template should be created carefully!
In order for all expenses to be successfully linked to flights, the following must be specified in **each** cost line in the Excel file: - car license plate OR purchase card number (the card must be linked to the specific car) - check/transaction date - country of transaction - type of product/service (fuel, roads, AdBlue, etc.) - the amount - sum - currencyThe program recognizes when refined documents are re-imported. In this case, no duplicates are created, but the values of previously imported checks are restored.
At the same time, care should be taken that all newly imported checks are uniquely different and that the Ozols program does not consider them as clarifications of previously imported checks.
##### **Step two:** Import checkques When everything is ready, it remains to specify the location of the file to be imported on the computer (Browse) and import checks. [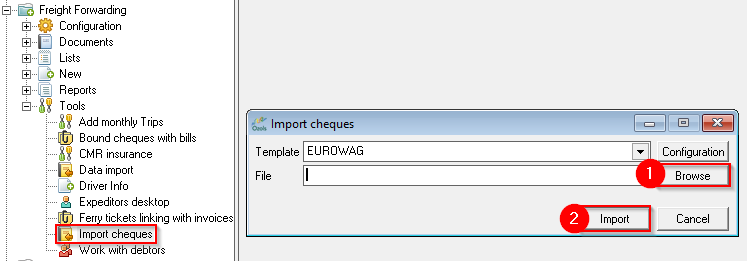](https://ozols.lv/doc/uploads/images/gallery/2022-10/image-1666789094386.png) #### 2.3. NEW VARIABLE COST (CHECK) IMPORT TEMPLATE Most often, transport companies use more than one gas station, and also pay for toll roads with the help of various intermediaries. Each service provider prepares check reports differently, so it is necessary for each one to define its own cost card and its own template. ##### **First step:** Make sure the card type exists and create a new one if necessary. **Ozols > Freight transportation > Lists > Types of payment cards** [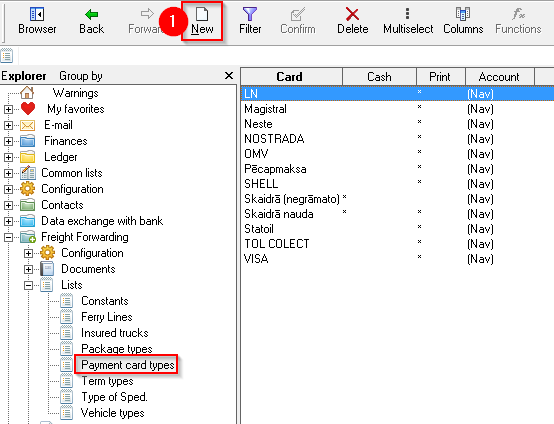](https://ozols.lv/doc/uploads/images/gallery/2022-10/image-1666789207481.png) [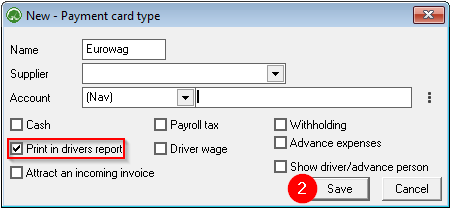](https://ozols.lv/doc/uploads/images/gallery/2022-10/image-1666789369430.png) When the name and the mark for inclusion in the Driver's Report have been specified, select 'Save'. ##### **Step two:** Create a new template **OZOLS > Freight > Tools > Import Receipts** To create a new import template, double-clicking the empty "Template" box. [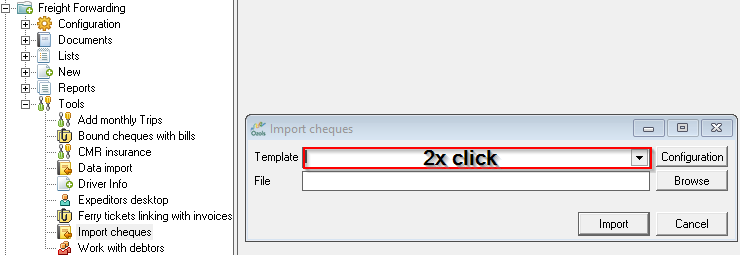](https://ozols.lv/doc/uploads/images/gallery/2022-10/image-1666790639273.png) Next, you must specify the type of template - **Import of travel checkques and confirm it with 'Yes'** in the additional question box . [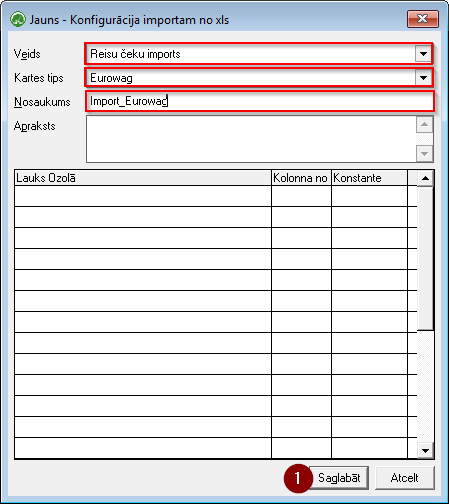](https://doc-ozols-lv.translate.goog/uploads/images/gallery/2022-06/image-1655813261797.png?_x_tr_sl=lv&_x_tr_tl=en&_x_tr_hl=en-US&_x_tr_pto=wapp) When the card type and the name of the new template are selected, press the **Save button.** ##### **Step Three:** Configure the new template You need to open the newly created template again and indicate in which Excel column the *product name* , *car number* , *currency* , etc. are indicated. [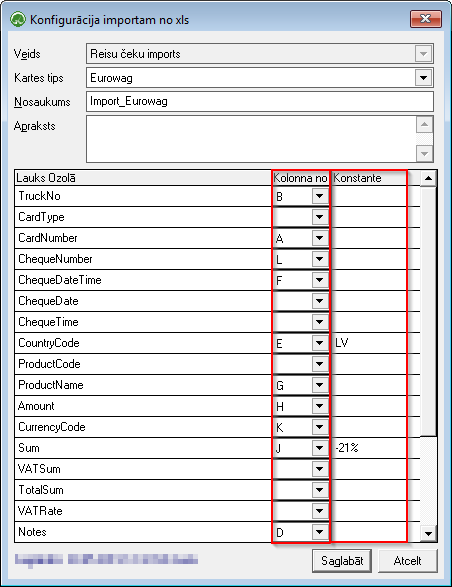](https://doc-ozols-lv.translate.goog/uploads/images/gallery/2022-06/image-1655813270306.png?_x_tr_sl=lv&_x_tr_tl=en&_x_tr_hl=en-US&_x_tr_pto=wapp) The 'constants' of the template **are optional** , but useful when the imported Excel file does not meet industry standards, or some rows are missing data, for example: - If the country code is not specified in several lines in the Excel file, specify the constant ' **LV ' in the CountryCode** template and, therefore, the country code 'LV' will be specified for ALL imported checks. - If the purchase amount without VAT is not specified in the Excel file – the constant ' **-21%** ' must be added to the **Sum field in the template** [](https://doc-ozols-lv.translate.goog/uploads/images/gallery/2022-06/image-1655813286817.png?_x_tr_sl=lv&_x_tr_tl=en&_x_tr_hl=en-US&_x_tr_pto=wapp) **TruckNo** – vehicle number plate. Based on this field, the program determines to which car the costs should be applied. **CardNumber** – if a purchase card is attached to the car, the program can identify the car by this number. **ChequeDateTime** – This is used when the check date and time are in one common Excel cell.| Possible constants | Example | Explanation |
| dmys | 12.07.2019 09:16:35 | Date and time in one box |
| xls\_number | 43658.5590277778 | Date and time encrypted in Excel style |
| Possible constants | Example | Explanation |
| dmy | 25012019 or 25.01.2019 | |
| etc | 20190125 or 2019.01.25 | |
| mdy | 01252019 or 01.25.2019 | |
| ddmonyy | 25 Jan 19 | |
| xls\_number | 43658 | Date encrypted in Excel style |
| shortYear | 250119 or 25.01.19 |
| Possible constants | Example | Explanation |
| hh:miAMPM | 01:30 PM | |
| hh: mi | 1:30 p.m | |
| hmm | 1330 |
| Possible constants | Explanation |
| LV, LT, PL, …. | Abbreviations of country names |
| Possible constants | Explanation |
| OZOLS > Payments > Lists > Services | Specifying the constant next to the product/service name will apply it to ALL records in the excel file. |
| Possible constants | Explanation |
| 1 | In billing for toll roads, the purchase amount is always **1.** |
| Possible constants | Explanation |
| EUR, CZK, PLN, … | Only one currency code can be specified in the constant field. |
| Possible constants | Explanation |
| -21% | If only the purchase amount with VAT is indicated in the Excel file, then these entries can be reduced by 21% by adding a constant. |
As a separate expense category, wages for drivers are allocated. These expenses are most often added manually for each trip separately, and the drivers' net salary and payroll taxes are added separately.
#### 3.1. NET SALARY OF THE DRIVER *(salary after taxes)* **Ozols > Freight Forwarding > Documents > Trips/Speditions > \[DRIVER'S REPORT\]**Wages are added in the same way as purchase receipts are added – open the specific flight, select the Driver's report and use the button Add / Driver's salary.
At the time of adding the driver's salary, the system displays the average fuel consumption for the trip, as well as the fuel norms. In this way, the manager can evaluate the driver's performance and, if necessary, add bonuses or deductions. [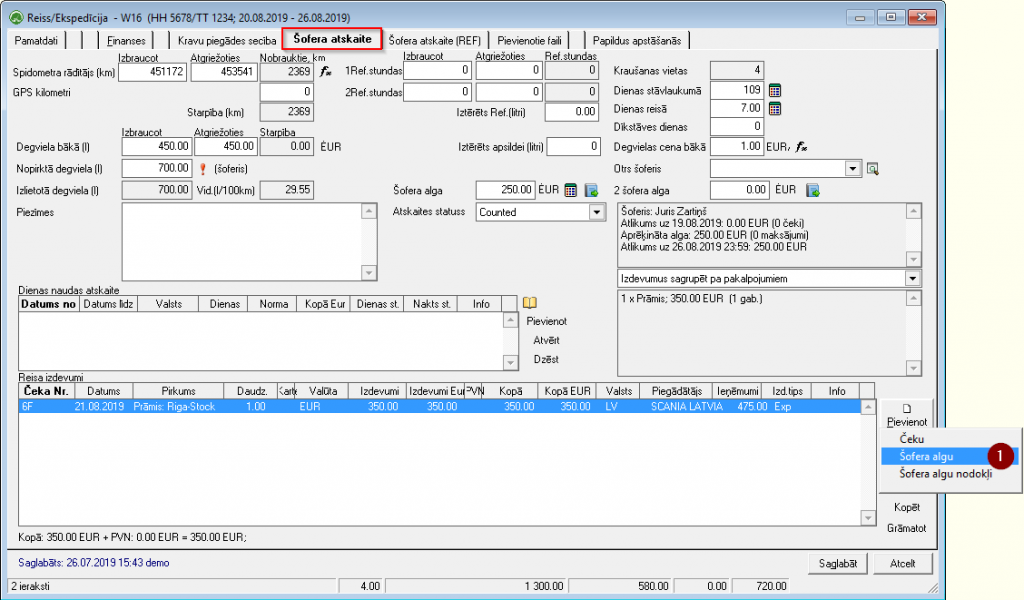](https://doc-ozols-lv.translate.goog/uploads/images/gallery/2022-06/image-1655813303668.png?_x_tr_sl=lv&_x_tr_tl=en&_x_tr_hl=en-US&_x_tr_pto=wapp) All basic information is filled in automatically, all you have to do is specify the amount of the daily salary and **save** . [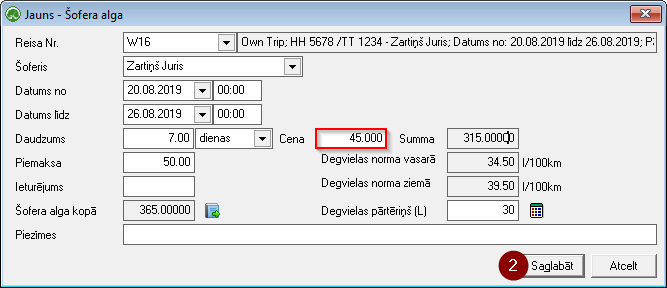](https://doc-ozols-lv.translate.goog/uploads/images/gallery/2022-06/image-1655813310339.png?_x_tr_sl=lv&_x_tr_tl=en&_x_tr_hl=en-US&_x_tr_pto=wapp) #### 3.2. PAYROLL TAXES **Ozols > Freight Forwarding > Documents > Trips/Speditions > \[DRIVER'S REPORT\]** Similarly, payroll taxes are added, as these expenses also affect the profitability of the trip. [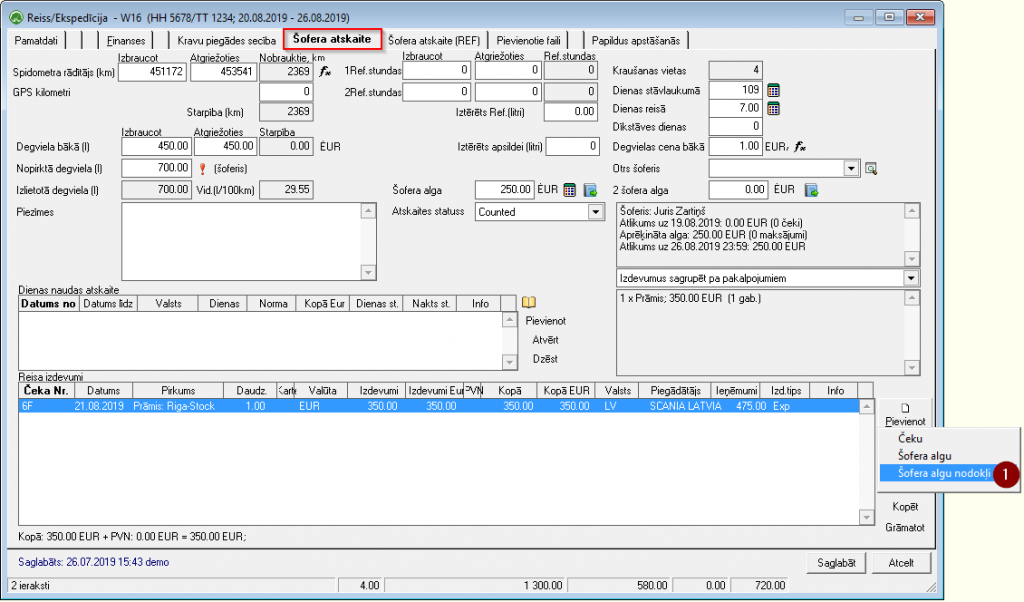](https://doc-ozols-lv.translate.goog/uploads/images/gallery/2022-06/image-1655813323384.png?_x_tr_sl=lv&_x_tr_tl=en&_x_tr_hl=en-US&_x_tr_pto=wapp) All basic information is filled in automatically. Make sure that the type of card is specified: **Payroll taxes** and the amount of payroll taxes. [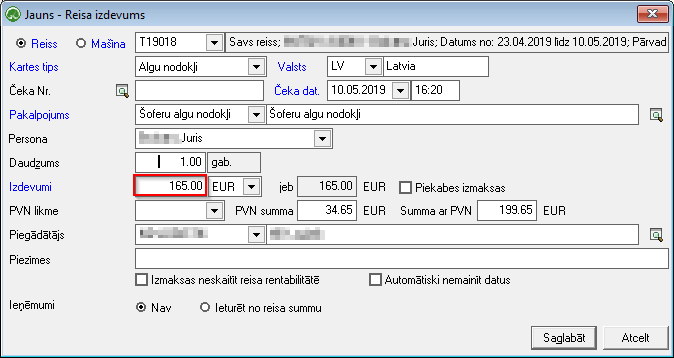](https://doc-ozols-lv.translate.goog/uploads/images/gallery/2022-06/image-1655813328759.png?_x_tr_sl=lv&_x_tr_tl=en&_x_tr_hl=en-US&_x_tr_pto=wapp) ### 4. ADVANCED EXPENSESThe total amount payable to the driver can be viewed in the **Drivers report**: **Ozols > Freight Forwarding > Reports > Drivers report**
Cash purchases are most often compensated to the driver together with the salary payment. Expenses are added to the **Driver Report** .
**Ozols > Freight Forwarding > Documents > Trips/Speditions > \[DRIVER'S REPORT\]** [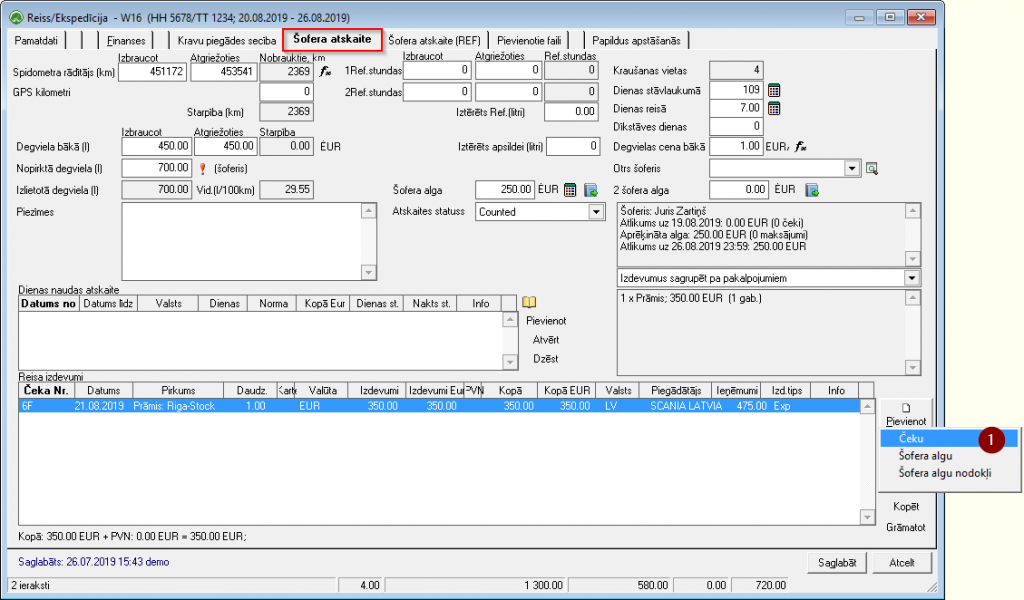](https://doc-ozols-lv.translate.goog/uploads/images/gallery/2022-08/image-1659522165895.png?_x_tr_sl=lv&_x_tr_tl=en&_x_tr_hl=en-US&_x_tr_pto=wapp) Make sure that the type of card is specified: **Advance issue** and fill in at least the mandatory fields (field names in blue) [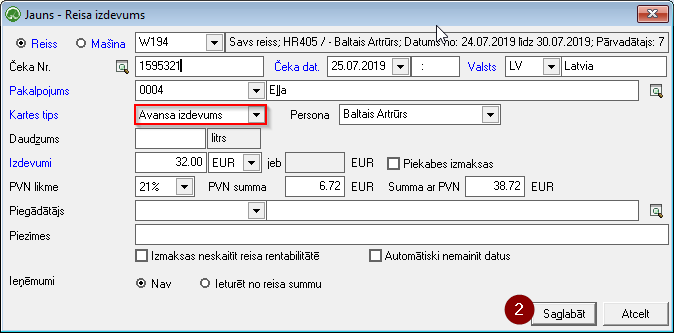](https://doc-ozols-lv.translate.goog/uploads/images/gallery/2022-08/image-1659522194441.png?_x_tr_sl=lv&_x_tr_tl=en&_x_tr_hl=en-US&_x_tr_pto=wapp) ### 5. REPAIR EXPENSESRoad transport repair expenses can also be added to the travel expenses. This can be done by opening the driver report and selecting **Add - Receipt** .
**OZOLS > Freight transportation > Documents > Trips/Speditions** [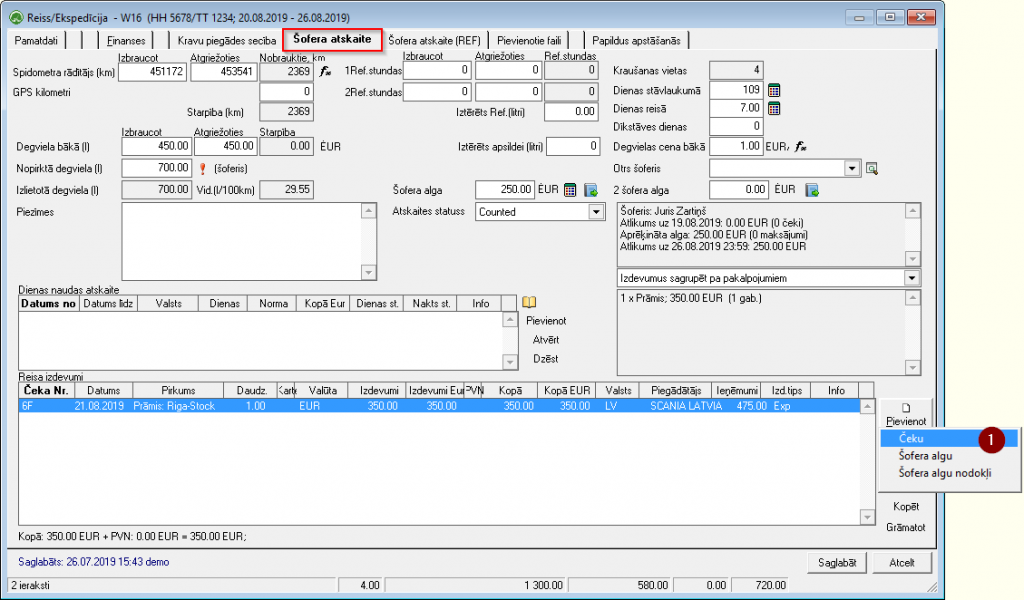](https://doc-ozols-lv.translate.goog/uploads/images/gallery/2022-06/image-1655813600096.png?_x_tr_sl=lv&_x_tr_tl=en&_x_tr_hl=en-US&_x_tr_pto=wapp)It is important to indicate the card type – **Repairs** .
[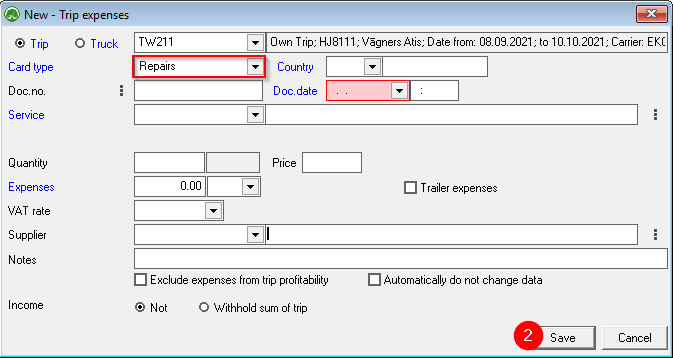](https://ozols.lv/doc/uploads/images/gallery/2022-10/image-1666791482047.png) The profitability of the trip can be evaluated both **with** and **without** car repair expenses. If you do not want to include Repair expenses in the calculation, you must indicate this when preparing the printout of the report.A quick way to open new **Client order** is by pressing the **Function key F6** on keyboard
#### The client order page "Cargo" is divided into 6 information zones 1. **[Basic Order information](#bkmrk-1.-pas%C5%ABt%C4%ABjuma-apraks) 1.1. [Client and Cargo manager](#bkmrk-1.1.-klienta-un-kont) 1.2. [Multiple loading or delivery addresses - Multibooking](#bkmrk-1.2.-vair%C4%81kas-uzkrau)** 2. **[Entering Loading and Delivery Addresses and Information](#bkmrk-2.-uzkrau%C5%A1anas-un-pi) 2.1. [Searching the loading or delivery address](#bkmrk-2.1.%C2%A0-adreses-mekl%C4%93%C5%A1)** 3. **[Income from the client](#bkmrk-3.-r%C4%93%C4%B7ina-inform%C4%81cij)** 4. [**Cargo description**](#bkmrk-%C2%A0-9) 5. [**Description of services related to the cargo**](#bkmrk-5.pakalpojuma-apraks) 6. [**Adding cargo to a new or existing Trip / Expedition**](https://ozols.lv/doc/books/ozols-tms-english/page/new-tripspedition) [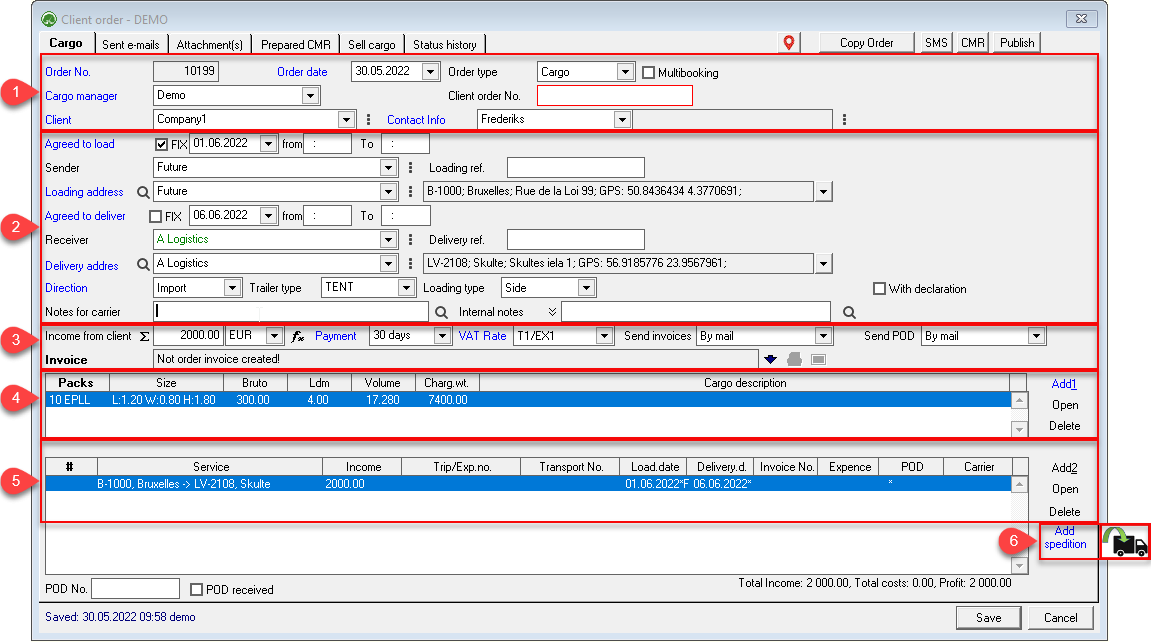](https://ozols.lv/doc/uploads/images/gallery/2022-05/image-1653896744178.png) #### 1. Basic order information - main principles: 1. A new **Client order** opens: **OZOLS > Menu> Window> New Client order (or key F6). 2. Enter the required information in the fields. Fields with **Blue** descriptions are **required.** 3. **Double-clicking on empty fields** opens the information entry window or press the command button [](https://doc-ozols-lv.translate.goog/uploads/images/gallery/2022-04/image-1649079581950.png?_x_tr_sl=lv&_x_tr_tl=en&_x_tr_hl=en&_x_tr_pto=wapp)next to the field. #### 1.1. Client and Cargo Manager **Cargo Manager:** The person responsible for this order. **Client:** The Client (or partner) who orders the delivery of the cargo. [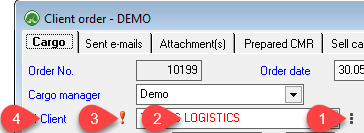](https://ozols.lv/doc/uploads/images/gallery/2022-05/image-1653897605728.png) 1\. **To add or find a Client,** click the command button [](https://doc-ozols-lv.translate.goog/uploads/images/gallery/2022-04/image-1649079581950.png?_x_tr_sl=lv&_x_tr_tl=en&_x_tr_hl=en&_x_tr_pto=wapp) next to the field. 2\. When one of the existing Clients is selected, **the color of the name** changes depending on the client's status (according to the traffic light principle - green, yellow, red). 3\. **!** The exclamation mark appears if there are remarks on the Client's card. 4\. The " **Client** " field changes color, like a traffic light, depending on the payment status of the invoices of a particular clientThe function key **F3** opens the Client / **Partner** **information card** , with information about cooperation with this partner
**Client order number.** If you have received an order from a partner who uses OZOLS TMS, after entering the partner's company name and order number, you will have option to import the information for this order.
**Contact info:** The client's contact person who places the cargo order. If this data is entered correctly, it will be convenient both to re-add it to orders and, for example, to send e-mails (cargo status, invoice, payment reminder). #### 1.2. Multiple loading or delivery addresses - Multibooking**Multibooking** is used when there are several loading or delivery addresses in one client order.
#### 2. Loading and Delivery Address and information **Agreed to load or deliver:** Enter the date and time when the load is to be loaded or delivered: \- **FIX** mark if the exact time is specified. \- If you need to specify the time interval **from which the** cargo must be loaded or delivered, click on the text "**Agreed to load**" or "**Agreed to deliver**". A window will open in which you can enter the scheduled date **from** (1) and enter the date **until** (2) in the date field. [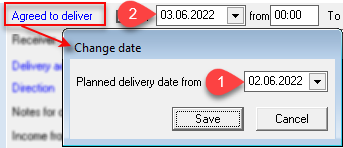](https://ozols.lv/doc/uploads/images/gallery/2022-05/image-1653900899866.png) **Sender and Receiver:** \- To add or find pres command button [](https://doc-ozols-lv.translate.goog/uploads/images/gallery/2022-04/image-1649079581950.png?_x_tr_sl=lv&_x_tr_tl=en&_x_tr_hl=en&_x_tr_pto=wapp)next to the field. \- A double-click in an empty field opens a new client (partner) input window. **Loading address:** Enter a new address or choose from database. #### 2.1. Searching the loading or delivery address[ ](https://doc-ozols-lv.translate.goog/uploads/images/gallery/2022-04/image-1649682095781.png?_x_tr_sl=lv&_x_tr_tl=en&_x_tr_hl=en&_x_tr_pto=wapp) [](https://ozols.lv/doc/uploads/images/gallery/2022-05/image-1653901221176.png)The Address Search window is used to quickly find and add a new or update an existing address in the database.
**1. Address search field** : \- In this field you can freely enter or paste the information you have. \- In this window entered information can be sorted and edited. **2. Addresses found** : \- The program searches for the Company address in the internal database and Google maps. **3. Selected address** : \- If one of the Found addresses is selected, the fields in this section will be filled in automatically. \- If the program does not find the desired address, enter it manually. \- If you enter a new Company and Address, it will be saved and you will not need to enter it again next time. \- Double click on Company name will open "Partner card" \- In the "Latitude" and "Longitude" fields, the program automatically imports GPS coordinates from Google maps. - You can check the address in Google maps by pressing [](https://doc-ozols-lv.translate.goog/uploads/images/gallery/2022-04/image-1649749799285.png?_x_tr_sl=lv&_x_tr_tl=en&_x_tr_hl=en&_x_tr_pto=wapp) [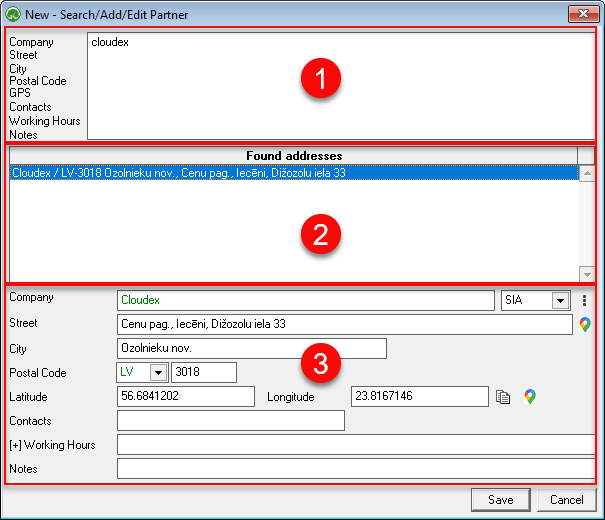](https://ozols.lv/doc/uploads/images/gallery/2022-05/image-1653902013540.png)The address must be entered accurately and in the corresponding fields!
[](https://ozols.lv/doc/uploads/images/gallery/2022-05/image-1653902142284.png) **Direction, Trailer Type, Loading Type** - This information will be important when planning Trip / Expedition. **Notes for carrier:** Additional cargo-related information: \- These notes are defined as templates for quick use. \- Press [](https://doc-ozols-lv.translate.goog/uploads/images/gallery/2022-04/image-1649079855868.png?_x_tr_sl=lv&_x_tr_tl=en&_x_tr_hl=en&_x_tr_pto=wapp)to create a new template. **Internal Notes:** Cargo-related notes that are not disclosed outside your company: \- These notes are defined as templates for quick use. \- Press [](https://doc-ozols-lv.translate.goog/uploads/images/gallery/2022-04/image-1649079855868.png?_x_tr_sl=lv&_x_tr_tl=en&_x_tr_hl=en&_x_tr_pto=wapp)to create a new template. #### 3. Income from the client: [](https://ozols.lv/doc/uploads/images/gallery/2022-05/image-1653902223127.png) \- Enter the total amount of revenue **without VAT** and the currency to be paid to the customer. \- **If changes occur during the processing of the order,** e.g. an additional customs declaration is purchased, the value of the "Revenue from customer" field **must be manually updated.** \- If a **Credit Invoice** has been issued to the customer, the amount of the '**Revenue from customer' must be manually reduced** by the amount of the Credit Invoice. **Aggregation** [](https://doc-ozols-lv.translate.goog/uploads/images/gallery/2022-04/image-1649141607526.png?_x_tr_sl=lv&_x_tr_tl=en&_x_tr_hl=en&_x_tr_pto=wapp) \- If pressed, the field " **Revenue from the client"** will be filled in automatically by summing the amount entered in the services. \- If this feature is enabled, it is not possible to manually change the value **of the 'Client Revenue ' field.** **Payment:** Outgoing invoice payment term in days. \- The customer's default payment term can be defined: Partner / Customer> Other data page> Payment term **VAT rate:** - Selecting the VAT rate and then pointing with mouse on the field shows the VAT rate Article. \- VAT rates can be changed in the list: General lists> Tax list #### 4. Cargo descriptionA single customer order may include several different items. In this case, the items are entered on separate lines. As a result, the number of different items in the order is the number of lines in the Shipment Description.
[](https://ozols.lv/doc/uploads/images/gallery/2022-05/image-1653902831194.png)To add a cargo description click **Add1** Double-click to open an existing load description.
[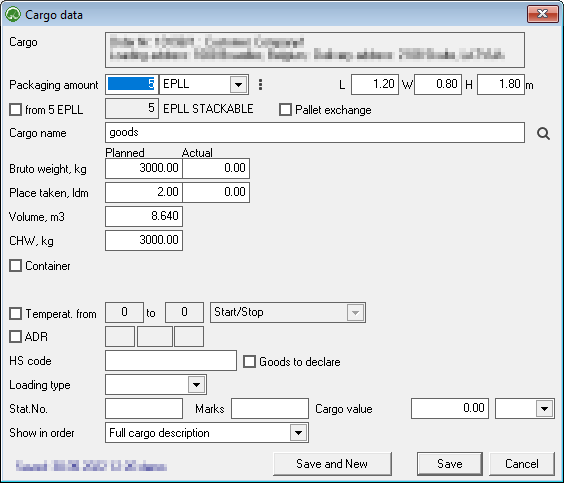](https://ozols.lv/doc/uploads/images/gallery/2022-05/image-1653902951916.png) **The list of packaging types** **can be changed** (EPLL, BOX, etc.) according to the needs of the order by clicking [](https://doc-ozols-lv.translate.goog/uploads/images/gallery/2022-04/image-1649079581950.png?_x_tr_sl=lv&_x_tr_tl=en&_x_tr_hl=en&_x_tr_pto=wapp) and selecting **Add new** defined packaging type and its dimensions. **Package size:** The dimensions of the package must be given in meters. For defined packages such as EPLL, the default dimensions can be entered in the description of the package type, then when the package type is selected the package size fields will automatically fill in. **Stackable:** If pallets can be stacked on top of each other, mark how many pallets can be stacked on top of each other. This information will also be reflected in the order to the carrier. It will also be taken into account when automatically calculating the load space ldm. **Cargo name:** Contents of packaging. These titles are predefined by pressing [](https://doc-ozols-lv.translate.goog/uploads/images/gallery/2022-04/image-1649079855868.png?_x_tr_sl=lv&_x_tr_tl=en&_x_tr_hl=en&_x_tr_pto=wapp) **Bruto weight, kg** : If available, specify the bruto weight of the cargo in kg. **Place taken, ldm:** For standard packages, the default ldm value can be specified in the Package size classifier. In this case, the field will be filled in automatically when selecting the quantity and type of packages. Also, the program will take into account the value of the Stackable packages and will reduce the ldm value. **Volume, m3** : When entering the package dimensions, the volume field is calculated automatically. **CHW, kg:** Chargeable Weight is used to calculate your income and expenses. The software automatically calculates and selects the larger weight by comparing the gross weight and the volumetric weight. The gross weight of a load is the actual weight, while the volumetric weight is the dimensional weight, where 1ldm = 1850kg and 1m3 = 300kg). **Stat.No .: "**Statistical number" is displayed in CMR column 10 if you are printing from a OZOLS TMS. **Temperature from… to:** Temperature range required by the client during delivery. **ADR :** check if a dangerous goods permit is required. **Save and New:** You can save time and choose this command button if you need to enter several cargo items in one order.Depending on the configuration, if there are several loads in one car/trip, but there are total expenses for the whole trip, the expenses will be divided among the customer's orders in proportion to the entered Chargeable Weight!
#### #### 5. Description of servicesThis section of the order automatically generates the main service description from the information entered above.
[](https://ozols.lv/doc/uploads/images/gallery/2022-05/image-1653904839972.png) **The main service number is "0"** and this number is not displayed. All additional services are numbered. For example: \- Delivery from loading address to terminal (pick up) # -1 \- Main Trip / Spedition # 0 \- Delivery from terminal to unloading address (domestic) # 1 \- Additional services (eg customs) # 10**Additional services:** If additional services are provided as part of the client's order, e.g. Terminal Delivery, Cargo Insurance, Handling Services, Export Declaration, Customs Services, Downtime, Warehousing, etc.
Additional services are added by clicking the **Add2** command button
**Travel / Expedition. no:** for more information read: Selecting the trip / forwarding number. **Order in the trip:** this will be the order if there are several services to be provided in one trip/spedition/order. **Service: You** must select a service from the classifier that will appear on the invoice. For more information on selecting a value, see Working with drop-down lists. When adding a new service, it must be translated into the languages in which the invoice is issued, see the section on translation: **Service Notes:** Additional text to be included in the outgoing invoice **Service period from… to:** The service period is displayed on the invoice printout **Include the service in the outgoing invoice:** If you want the provided service to be included in the customer's invoice, then you must fill in the fields for the outgoing invoice **Apply the revenue and expenses of the service to the main freight forwarding:** By default, the revenue and expenses specified in the service are attributed to the Voyage Forwarding in which the service is placed. If the revenue and expenses need to be attributed to the main flight / forwarding of the Customer's order (marked with No. 0), then this “ckeckbox” must be ticked **Incoming Invoice:** You must fill in the planned spend fields. #### 6. Once the order has been entered, it must be added to the [Trip / Expedition that will deliver it!](https://ozols.lv/doc/books/ozols-tms-english/page/new-tripspedition) [](https://ozols.lv/doc/books/ozols-tms-english/page/new-tripspedition) # Multiple loading or delivery addresses - Multibooking**Multibooking** is used when there are several loading or delivery addresses in one client order.
1. Check Multibooking [ ](https://doc-ozols-lv.translate.goog/uploads/images/gallery/2022-04/image-1649076856190.png?_x_tr_sl=lv&_x_tr_tl=en&_x_tr_hl=en&_x_tr_pto=wapp); 2. Click [](https://doc-ozols-lv.translate.goog/uploads/images/gallery/2022-04/image-1649076970307.png?_x_tr_sl=lv&_x_tr_tl=en&_x_tr_hl=en&_x_tr_pto=wapp)to add additional **loading addresses** ; 3. Click to add additional **unloading addresses** ; 4. The order number is assigned a sub-number. You can switch between multibooking orders by pressing [](https://ozols.lv/doc/uploads/images/gallery/2022-06/image-1654262701607.png). [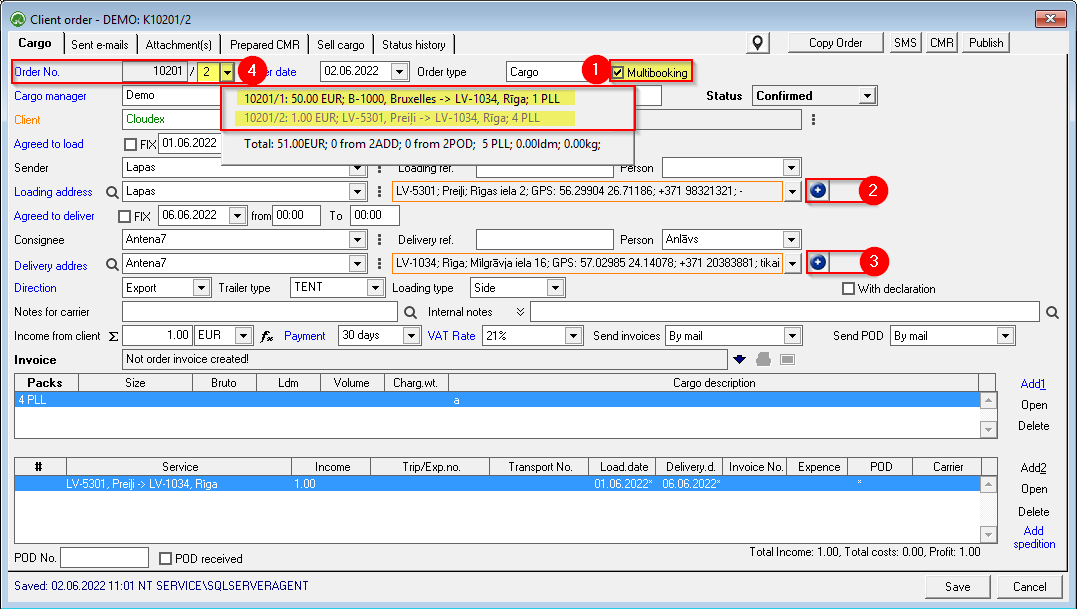](https://ozols.lv/doc/uploads/images/gallery/2022-09/image-1662127072437.png)The following **must be done for each Multibooking cargo** separately: 1. **Description of the Cargo** 2. Added to existing or new **Trip/Spedition** 3. If Multibooking order is fulfilled by **several carriers**, the **income** from the customer must be **specified** for each shipment. 4. Once the Multibooking order has been entered, **every part of it must be added to the Trip / Expedition** that will deliver it!
[](https://doc-ozols-lv.translate.goog/uploads/images/gallery/2022-04/image-1649420968740.png?_x_tr_sl=lv&_x_tr_tl=en&_x_tr_hl=en&_x_tr_pto=wapp)Additional services are added in the lower part of the Client's order window on the right side by pressing the command button **Add2** and choose **Additional service**
[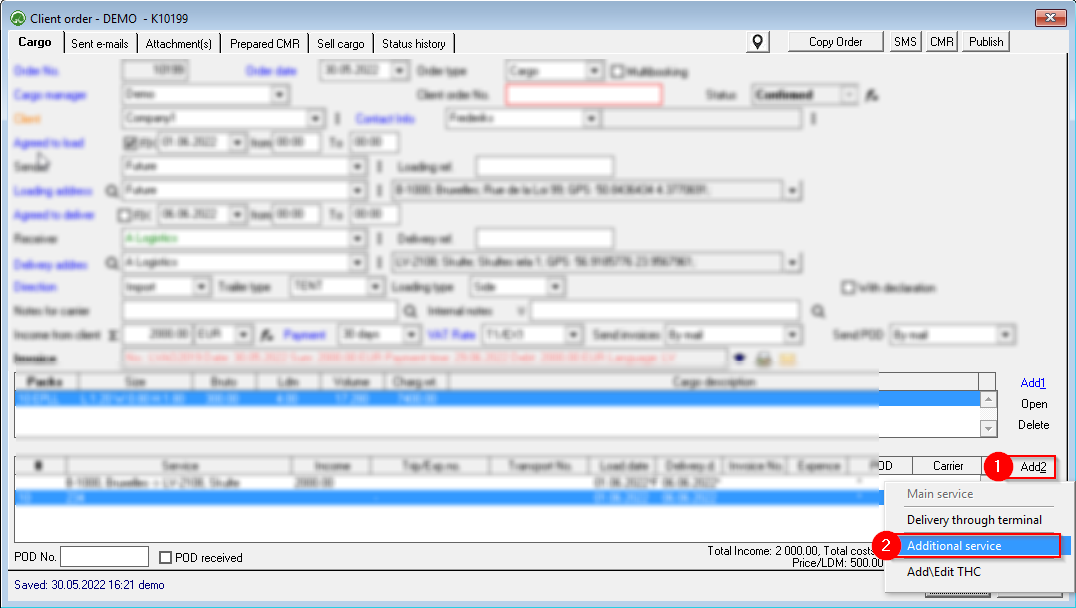](https://ozols.lv/doc/uploads/images/gallery/2022-08/image-1660143039927.png) In addition, there are 2 information areas in the service window: 1\) Information for the Service **recipient** ; 2\) Information to **the service provider,** such as the carrier. [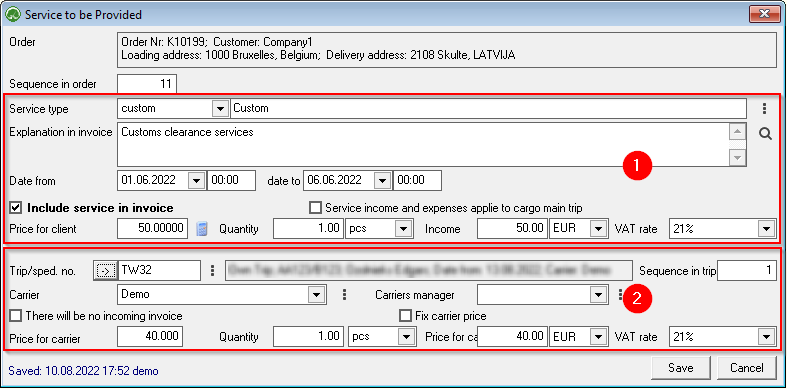](https://ozols.lv/doc/uploads/images/gallery/2022-08/image-1660143663900.png) **Customer Order:** Summary of customer order information. **Sequence in order:** Additional service sequence number from 10 upwards. Learn more [here](https://doc-ozols-lv.translate.goog/link/130?_x_tr_sl=lv&_x_tr_tl=en&_x_tr_hl=en&_x_tr_pto=wapp#bkmrk-1.-pamata-pakalpojum) . ##### 1) Information for the recipient of the service **Type of service: You** must select a service from the classifier, which will be visible on the invoice. When adding a new service, it must be translated into the languages in which the invoice is issued, for translation see the point:[ Translation of records.](https://doc-ozols-lv.translate.goog/books/ozols-desktop/page/informacija-klienta-valoda-svesvaloda?_x_tr_sl=lv&_x_tr_tl=en&_x_tr_hl=en&_x_tr_pto=wapp) **Explanation of the service in the invoice:** Additional text that must be included in the outgoing invoice **Service period from ... to ... :** filled in if the Service is displayed in the invoice printout **Include the service in the outgoing invoice:** mark[](https://doc-ozols-lv.translate.goog/uploads/images/gallery/2022-04/image-1649756016703.png?_x_tr_sl=lv&_x_tr_tl=en&_x_tr_hl=en&_x_tr_pto=wapp)if the service should be included in the customer's invoice. **Allocate service revenues and expenses to the main shipment of the cargo: Check** here[](https://doc-ozols-lv.translate.goog/uploads/images/gallery/2022-04/image-1649756016703.png?_x_tr_sl=lv&_x_tr_tl=en&_x_tr_hl=en&_x_tr_pto=wapp), if the service will be applied to the main voyage/expedition of the Customer's order. After the default, the service's revenues and expenses are attributed to the separately created Trip / Expedition. **Price to the customer; The amount; Revenue; VAT rate:** filled in according to the amount of additional service ##### 2) Information for the service provider **Trip/ spedition no.:** Voyage/ Expedition number to which the service is applicable. If not known, do not fill in. **Sequence in Trip**: The sequence of service on the Trip. **Carrier:** If unknown, do not fill in. **Carrier manager:** If not known, do not fill in. **There will be no incoming bill:** if there will be no bill for the additional service. **Record expenses/carrier price:** if checked, the carrier who also works in the OZOLS TMS system, when entering** the order reference** , will see the agreed price. **Price to the carrier:** The price for which the Carrier has agreed to deliver the cargo.[ ](https://doc-ozols-lv.translate.goog/books/ozols-desktop/page/reiss-ekspedicija-pamatprincipi?_x_tr_sl=lv&_x_tr_tl=en&_x_tr_hl=en&_x_tr_pto=wapp) **Quantity:** The amount of additional service. **Costs and VAT rate:** Additional service costs. # Delivery via TERMINAL #### 1) How to create Terminal**The Cooperation Partner** who provides terminal/warehouse services must have the **"Terminal" mark** in the Partner's card.
**OZOLS > Contacts > Lists > All partners > Partner card** 1. In the partner card 2. Open Other data 3. Mark the group "Terminal" [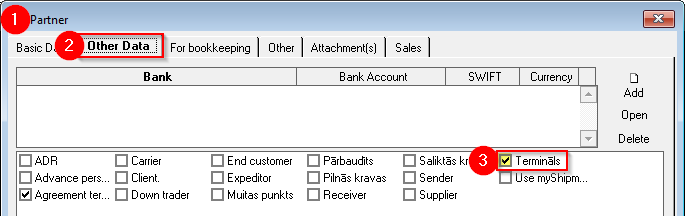](https://ozols.lv/doc/uploads/images/gallery/2022-08/image-1660907678508.png) #### 2) Delivery via terminal 1\. Open the **Client's order**, which must be sent through the terminal 2\. In the list of services, select the command button Add2 **(** 1) > **Delivery through the terminal** (2) **The numbers of the Services included in the order** 1) **The number of the main Trip/spedition, is " 0 " and is not shown (Its field is empty)** ; 2) Additional **transportation before the main** trip is with **minus** sign; - Delivery from the loading address to the terminal **(pick up)** # -1; #-2 3) Additional **shipments after the main** trip are positive numbers - Delivery from the terminal to the delivery address **(domestic)** # 1; # 2 4) Additional **services** , such as customs, insurance, etc. are numbered from ten # 10; #11...
3\. **Choose** at which part of delivery the terminal will be used: A. Delivery from the loading address **to the terminal** (1) B. Delivery from the terminal **to the delivery address** (2) 4\. For the terminal: \- **Terminal:** Name and address; \- **Planned delivery to the terminal:** Date, time; \- **Revenue** : the amount that is diverted from the main trip revenue to this local trip. \- **Local delivery expenses:** If the expenses are not yet known, then this amount can be entered later. 5\. **Trip/sped. no.:** If possible, add the Cargo to a new or existing local Trip/Expedition.[here](https://doc-ozols-lv.translate.goog/link/112?_x_tr_sl=lv&_x_tr_tl=en&_x_tr_hl=en&_x_tr_pto=wapp#bkmrk-page-title) . [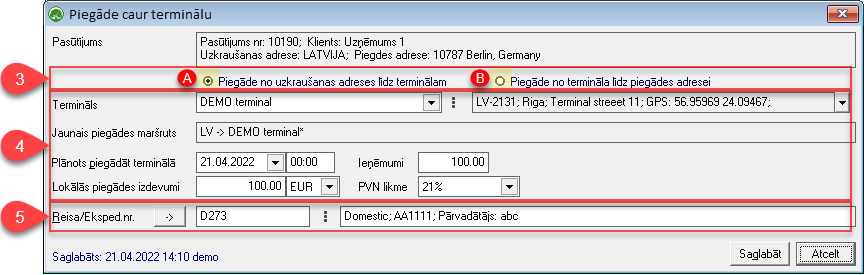](https://doc-ozols-lv.translate.goog/uploads/images/gallery/2022-04/image-1650632367081.png?_x_tr_sl=lv&_x_tr_tl=en&_x_tr_hl=en&_x_tr_pto=wapp)**How to simultaneously mark several loads for delivery through the terminal?** A. In the **Trip/spedition window** > Hold the Ctrl key with the mouse to mark the loads that will go through one terminal > Add > Delivery through the terminal B. **Expeditor's desktop** (F8) > "General planning" page > Right mouse button on the selected load > Delivery through the terminal
# How to delete a Client order?Before deleting the Client order, make sure that it would not be more correct to change the order status to - **Cancelled**. Read more about changing the order status [here](https://ozols.lv/doc/books/ozols-tms-english/page/cargo-status) .
1. Open the Client order you want to delete. 2. Press Delete and select **Delete Client Order No ...** [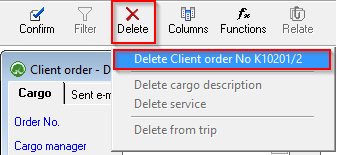](https://ozols.lv/doc/uploads/images/gallery/2022-09/image-1662464731480.png)If **an invoice has already been created** for the Client order, program will not allow the order to be deleted!
##### To delete the order with invoice: 1. **Open the prepared invoice,** 2. **Cancel the confirmation of invoice** 3. **Delete the Invoice**. 4. Now it is possible to **delete a customer's order.** # Exchanging the cargo information in OZOLS TMSCompanies that use OZOLS TMS can exchange order information automatically using reference number.
#### 1) Sending cargo information to partner 1. Press **Mail** or **Print** 2. Choose – **Order for carrier** 3. The system will prepare e-mail, with attached CARGO TRANSPORTATION ORDER – AGREEMENT [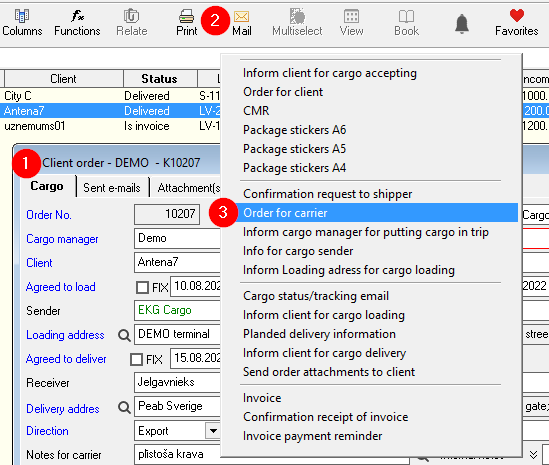](https://ozols.lv/doc/uploads/images/gallery/2022-08/image-1660651157650.png) 4. The **number** of CARGO TRANSPORTATION ORDER – AGREEMENT **is the cargo reference number**[](https://ozols.lv/doc/uploads/images/gallery/2022-08/image-1660651224464.png)Number of this agreement is the **reference number for the cargo information**
#### 2) Receiving of cargo information from partner 1. When creating **new client order**, 2. Enter the name of the **Client**, 3. Enter the number of Cargo Transport order - agreement = **Client order No** 4. OZOLS TMS will offer you to fill the information from Partner automatically. [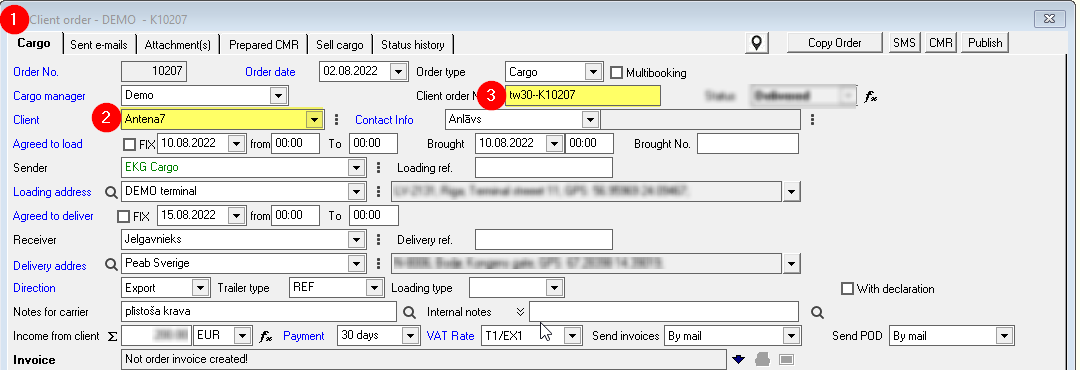](https://ozols.lv/doc/uploads/images/gallery/2022-08/image-1660651502881.png)ATTENTION! Some OZOLS TMS user companies have disabled this option.
#### 3) To check the status of Cargo information exchange: [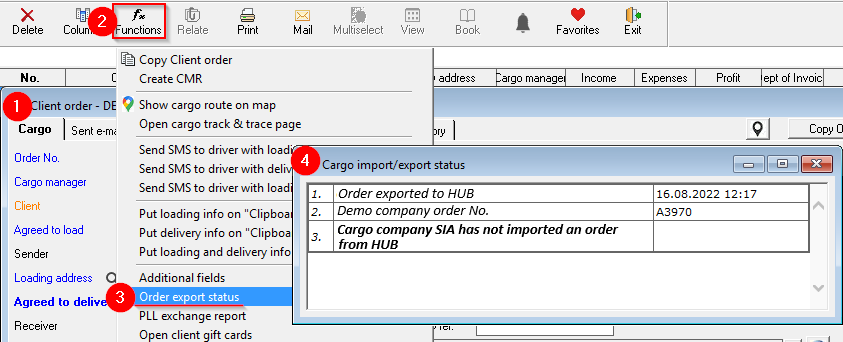](https://ozols.lv/doc/uploads/images/gallery/2022-08/image-1660655243960.png) # 2) Confirmation of order to client # Info to Client - order acceptedOnce the order is registered in OZOLS TMS, you must send the Client a Shipping Order Confirmation or a TRANSPORT ORDER - AGREEMENT confirming that the order has been accepted.
OZOLS TMS prepares these documents automatically, based on the information entered in the order and the information defined by your company. It is possible to add your signature and company seal to the contract ( [instructions here](https://ozols.lv/doc/books/ozols-tms-english/page/4-signature-with-stamp-on-orders-and-invoices)[ ](https://ozols.lv/doc/books/ozols-tms-english/page/4-signature-with-stamp-on-orders-and-invoices)). To send confirmation, open the specific customer's order, then: 1. **press Mail** [](https://doc-ozols-lv.translate.goog/uploads/images/gallery/2022-03/image-1647260281529.png?_x_tr_sl=lv&_x_tr_tl=en&_x_tr_hl=en&_x_tr_pto=wapp) on the toolbar 2. **Order to client or** 3. **Inform Client for cargo acceptance** 4. Make sure that the automatically generated e-mail contains the desired information and press **Send**. [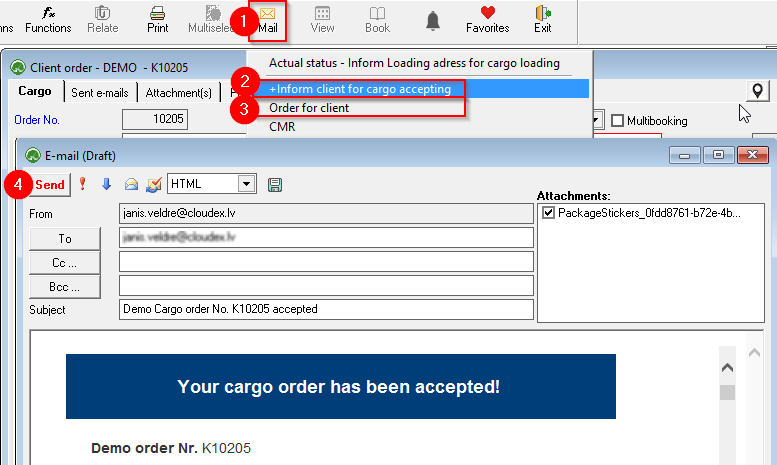](https://ozols.lv/doc/uploads/images/gallery/2022-08/image-1660052923669.png)**The sender's signature and stamp can be automatically added to the customer's order - contract. Instructions for adding a signature and seal [here.](https://ozols.lv/doc/books/ozols-tms-english/page/4-signature-with-stamp-on-orders-and-invoices)**
# Informal order confirmation to the clientIf the customer has sent the order informally (Whatsapp, Skype, e-mail, phone call), you can prepare and place the client's order on the client's behalf. To do this, you must first enter the **Client's order** you have received in OZOLS and then you can send it to the Client:
**The sender's signature and stamp** can be automatically added to the client's order - contract . Instructions for adding a signature and stamp are [here .](https://ozols.lv/doc/books/ozols-tms-english/page/4-signature-with-stamp-on-orders-and-invoices)
# 3) Planning of shipment # Trip/ spedition basic principles ##### There are two approaches to organizing cargo shipment in OZOLS TMS: 1. **Creates a new Trip/spedition** for the cargo: One or more cargoes for which a transport has to be organised. 2. **Add Cargoes to a Trip/spedition:** cargoes are added to a transport on a specific route. ##### Cargo transportation can be provided by: 1. **Spedition** – Expedition, or sale of cargo 2. **Agreement** – Trip with a long-term contract carrier 3. **Own trip** – Trip with own transport 4. **Domestic** – Local transportationThe planning of a new **trip/spedition** can be started in two ways: 1. In the created **client order** with the command button **Add trip/exp.** 2. By Pressing the **F7** function key on the keyboard - opens the **New Trip/spedition window**
**Additional services** such as Cargo **Insurance, Handling Services, Export Declaration, Customs Services, Idle Time, Warehousing**, etc. are also registered as Trip/spedition. Find out more here.. [Learn more here.](https://doc-ozols-lv.translate.goog/books/ozols-desktop/page/papildus-pakalpojumi?_x_tr_sl=lv&_x_tr_tl=en&_x_tr_hl=en&_x_tr_pto=wapp)
# New Expedition #### 1. Open Client order window **OZOLS > Freight transportation > Documents > Client orders > \[Open the required Order\]** 1. Select the **cargo** for which the trip/spedition is to be created. 2. Press **Add spedition**. 3. Select **New** if creating a new trip/spedition. 4. Select **Existing** if the trip/spedition has already been created > A window opens where you select the corresponding trip. [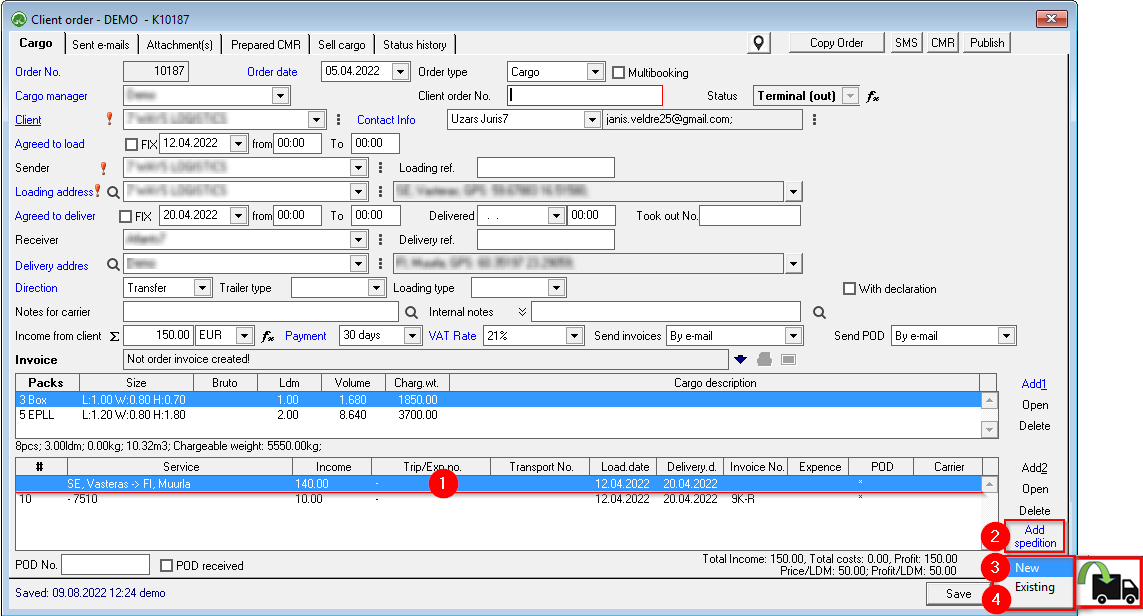](https://ozols.lv/doc/uploads/images/gallery/2022-08/image-1660038186101.png) #### 2. The window **New - Trip/spedition** opens 1. Choose the **type of carrier: Spedition** - classic expedition (cargo sale)**You can also create Trip/spedition:** - **Agreement** - Long-term contract with the carrier - **Own trip** - Trip with own transport - **Domestic** - Local transport
2. If the haulier's car has already carried cargo, entering its number will automatically fill in the Carrier name. 3. Enter the Carrier company name, if you have it. Double-click to enter a new Carrier. 4. If you know, enter Carrier Manager. Double-click to enter a new one. 5. Carrier Price: The amount that will be paid to the Carrier. Specify the VAT rate and payment term 6. Mark the trailer type (For example – TENT) 7. Internal notes if needed 8. Save and close. With that, the Expedition is created. [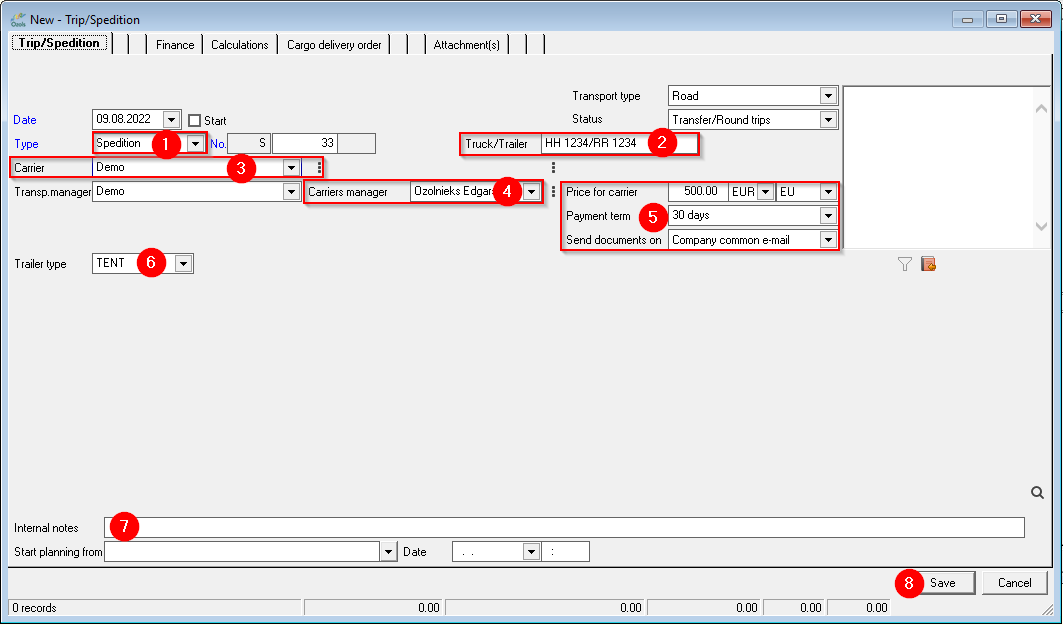](https://ozols.lv/doc/uploads/images/gallery/2022-08/image-1660038864115.png) ##### Next steps: ##### [**Transport Order** to cargo carrier](https://ozols.lv/doc/books/ozols-tms-english/page/2-transport-order-to-carrier) ##### [**Invoice** to Client](https://ozols.lv/doc/link/166#bkmrk-page-title) # Adding a ferry ticketFerry tickets can be added to a **specific trip** or sold as **a additional service**
#### 1. Adding a ferry ticket **to a Trip/Spedition** 1\) Open the Trip/Spedition to which you need to add ferry tickets; 2\) Select **Export ferry** as needed and click [](https://doc-ozols-lv.translate.goog/uploads/images/gallery/2022-04/image-1651154858190.png?_x_tr_sl=lv&_x_tr_tl=en&_x_tr_hl=en&_x_tr_pto=wapp) to **add ferry** or o**pen an existing** one; 3\) Select **Import ferry** as needed and press [](https://doc-ozols-lv.translate.goog/uploads/images/gallery/2022-04/image-1651154858190.png?_x_tr_sl=lv&_x_tr_tl=en&_x_tr_hl=en&_x_tr_pto=wapp)to **add ferry** or **open an existing** one.[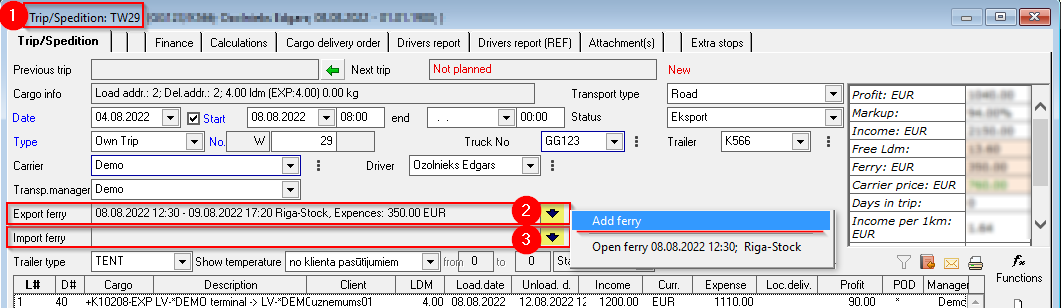](https://ozols.lv/doc/uploads/images/gallery/2022-08/image-1661950374675.png) #### 2. Filling in the **Ferry** window: 1\) **Attach ferry to a trip** : complete if the ferry tickets are for a specific Trip; 2\) **Car/Trailer number: mandatory;** 3) Ferry route: **mandatory**; With a double click, the **Ferry Route** window opens , where you enter the required information. If the information has already been entered, press [](https://doc-ozols-lv.translate.goog/uploads/images/gallery/2022-04/image-1651154764507.png?_x_tr_sl=lv&_x_tr_tl=en&_x_tr_hl=en&_x_tr_pto=wapp), and select previously defined ferry; 4\) **!!! IMPORTANT:** indicate the direction of the ferry - **Import, Export or Crossing** ; 5\) **Sale price:** This window is filled in if the ferry ticket is not attributed to Trip, but is sold as additional service for which an invoice must be issued; 6\) **SMS to the driver:**copy Ferry ticket information for sending to the driver (Clipboard) 7\) When the **Invoice** for tickets is available, add it by clicking here[](https://doc-ozols-lv.translate.goog/uploads/images/gallery/2022-04/image-1651154858190.png?_x_tr_sl=lv&_x_tr_tl=en&_x_tr_hl=en&_x_tr_pto=wapp); - The other fields are filled depending on the available information. [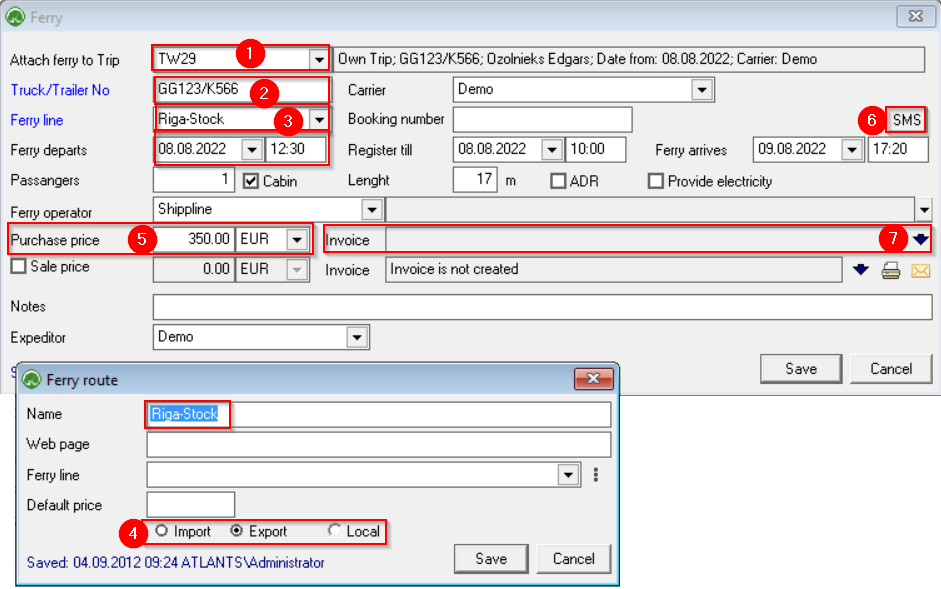](https://ozols.lv/doc/uploads/images/gallery/2022-09/image-1662374214041.png)[How to add Invoice for Ferry tickets?](https://doc-ozols-lv.translate.goog/books/ozols-desktop/page/rekins-par-pramja-biletem?_x_tr_sl=lv&_x_tr_tl=en&_x_tr_hl=en&_x_tr_pto=wapp)
# What is the benefit of linking to a navigation system? 1. **Trip Planning Window Information:** - Access to the truck's location (postcode and city). - Real-time data on the time and distance to the next loading address. - Visual representation of the trip route on the map, along with the machine's current location. - Details about the start time of the working day and the hours driven on that day. - Automatic load status updates. - When approaching a loading or delivery address, the load status is changed to "Approaching loading address" or "Approaching delivery address." - Upon arrival at a loading or delivery address, the load status is automatically updated to "Arrived at loading address" or "Arrived at delivery address." - Monitoring the duration the truck has spent at loading or delivery addresses. - GPS date and time of arrival at the loading address. 2. **Driver App:** - Display of the truck's current location. - Information on the time and distance to the next stacking address. 3. **Customer Portal:** - Customers can track real-time status changes online. - Option to view the location of the load or machine. The truck utilizes the MAPON navigation system, enabling features such as: - Recording trip speedometer readings at the beginning and end of each trip, along with GPS-tracked kilometers traveled during the trip. - Calculation of allowances per trip based on the country. - Assignment of the correct driver to each vehicle at the start of the day through the Ozols system. This integration with the navigation system enhances operational efficiency and provides valuable insights into the status and progress of deliveries. # 4) Order to carrier # Transport order to CarrierWhen the Cargo is registered to Expedition, the Cargo Manager sends a Transport Order - agreement to the carrier by e-mail. This Contract is the basis for the transportation service.
OZOLS TMS prepares the agreement automatically, based on the information entered in the order and the information defined by your company. It is possible to add your signature and company stamp to the contract ( [instructions here](https://ozols.lv/doc/books/ozols-tms-english/page/4-signature-with-stamp-on-orders-and-invoices)[ ](https://ozols.lv/doc/books/ozols-tms-english/page/4-signature-with-stamp-on-orders-and-invoices)). #### To send a Transport order - agreement to Carrier:Usually, the Order is sent to the carrier by **e-mail** , but it is also possible to print it and send it in paper format. To view a preview of the invoice in PDF format, choose **Print** .
1. Open the client's order for which you want to order carrier service and click Print or Mail in the toolbar. 2. Choose **Order for carrier** 3. In the case of an e-mail, open the attachment and verify the correctness of the information. 4. Send the email to the carrier with Transport order in attachment. [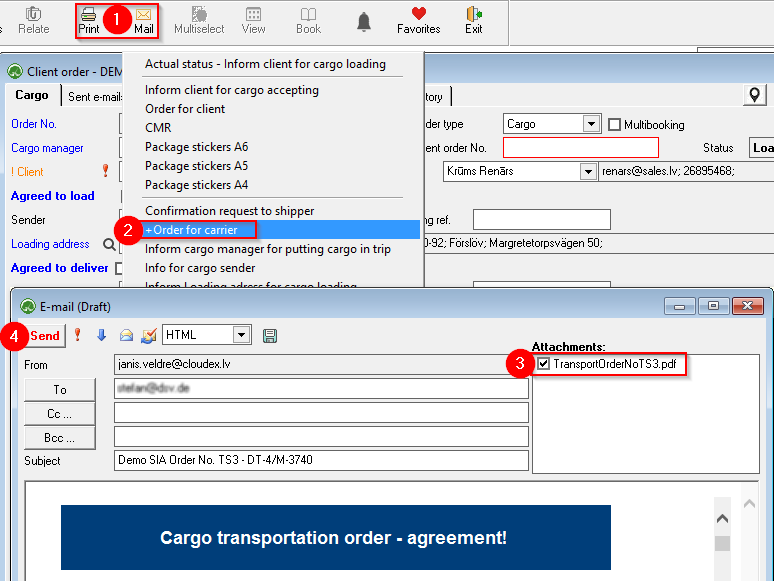](https://ozols.lv/doc/uploads/images/gallery/2022-08/image-1660047960316.png) # Terms of the transport order – contract OZOLS TMS automatically prepares Transport order contracts for both the Client and the Carrier. The terms of the carrier can be changed and translated into foreign languages (LV, EE, LT, EN, RU, DE, DK, FR). 1.Conditions of the Transport Order - Contract for the Carrier **OZOLS > Freight forwarding > Configuration > Agreement rules for carrier** 2.Conditions of the Transport Order - Contract for the Client **- Terms of the contract OZOLS > Freight forwarding > Configuration > Agreement rules for client** [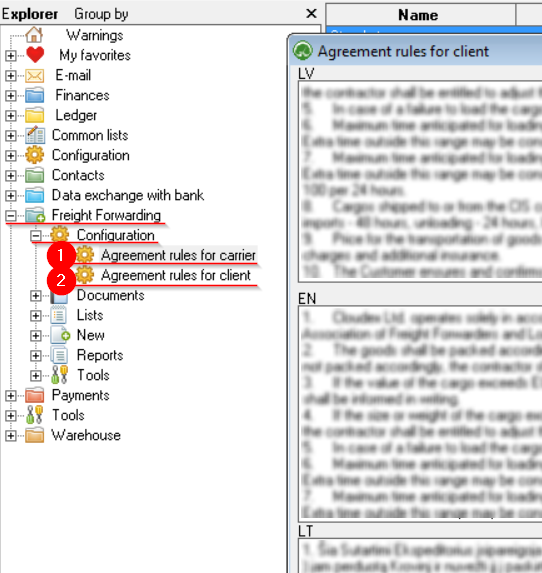](https://ozols.lv/doc/uploads/images/gallery/2022-09/image-1662368695751.png) #### See also: - [Order information in foreign language](https://ozols.lv/doc/books/ozols-tms-english/page/order-information-in-foreign-language) - [Client address in foreign language](https://ozols.lv/doc/books/ozols-tms-english/page/client-address-in-foreign-language) # 5) In delivery # How to select current orders? 1. In the **Client order** filter[](https://doc-ozols-lv.translate.goog/uploads/images/gallery/2022-07/image-1658324999001.png?_x_tr_sl=lv&_x_tr_tl=en&_x_tr_hl=en&_x_tr_pto=wapp) 2. Check **Status**[](https://doc-ozols-lv.translate.goog/uploads/images/gallery/2022-07/image-1658824626308.png?_x_tr_sl=lv&_x_tr_tl=en&_x_tr_hl=en&_x_tr_pto=wapp) 3. Select the desired order statuses 4. Close 5. Prepare the report [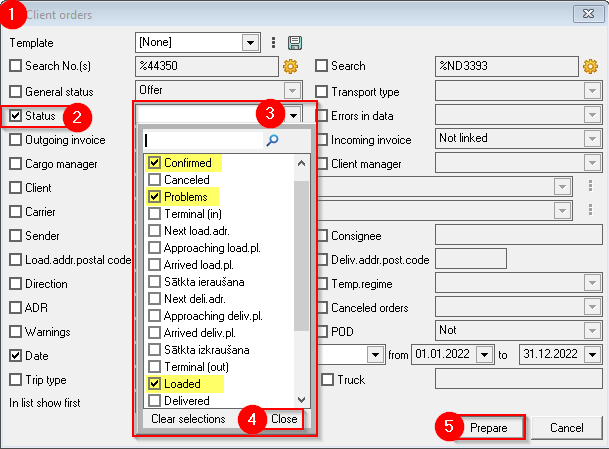](https://ozols.lv/doc/uploads/images/gallery/2022-09/image-1662466991387.png) # Cargo Status **The cargo status** allows you to follow the progress of the order. The following Cargo statuses are distinguished: 1. **Confirmed** – There is an agreement with the client and the carrier that the cargo will be shipped; 2. **Problems** – There are some problems in the cargo delivery process; 3. **Loaded** – Cargo is on its way; 4. **Delivered** – this status can be entered manually but it will be set automatically when the actual date of the last delivery is passed; 5. **Paid** – An invoice has been issued and paid; 6. **Canceled** – The order has been cancelled. [](https://ozols.lv/doc/uploads/images/gallery/2022-09/image-1662467377997.png)Information about the cargo status changes both manually and automatically depending on the settings in OZOLS TMS chosen by your company.
1. **Automatically:** - Based on the car's location (by loading data from the car's GPS navigation system). More info [here](https://translate.google.com/website?sl=lv&tl=en&hl=en&client=webapp&u=http://help.cloudex.lv/%23online-kravas-statusu-atjaunosana) . - Based on loading/delivery dates (Ozols or iOzols) entered by the manager. 2. **Manually:** - The status can be set in the **Client order** window by clicking. - Through the driver's application ( [MyOzols](https://translate.google.com/website?sl=lv&tl=en&hl=en&client=webapp&u=https://help.cloudex.lv/myozols-instrukcija/) ), which can be used by both the driver and the manager of the carrier. More info [here](https://translate.google.com/website?sl=lv&tl=en&hl=en&client=webapp&u=http://help.cloudex.lv/myozols-instrukcija/%23datu-ievade-par-uzkrausanu-piegadi) # SMS message to the driverYou can quickly send an **SMS to the driver with information about the cargo** from the Client's order and from the Trip/ Spedition windows.
1\) **Client order** in the window on the upper right side, press the button " **SMS** " **Trip/Spedition** in the window on the right side, press the button " **Functions** " 2\) **Select** the necessary information for SMS 3\) Send cargo information in the **Driver application (No installation of application is required!)** #### 1. SMS from the Customer's order window [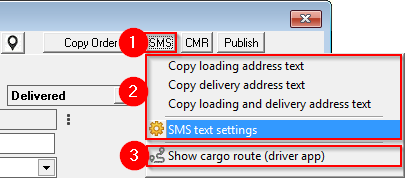](https://ozols.lv/doc/uploads/images/gallery/2022-09/image-1662467879468.png) #### 2. SMS from the Trip/Spedition window [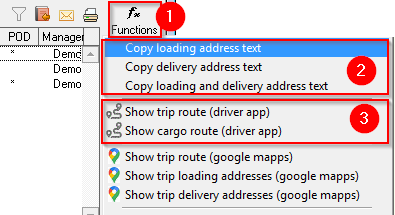](https://ozols.lv/doc/uploads/images/gallery/2022-09/image-1662469157659.png) #### 3. SMS text settings It is possible to customize the information that is sent to the driver: 1\. Language of the text message; 2\. **Show:** what information to include; 3\. Message text **preview** ; 4\. Tick here to set as default and not reopen this window next time; 5\. **Copy and close.** Freight delivery information has been copied. Open your desired application (whats-app etc.) and press "Paste" or ctrl+v to paste. [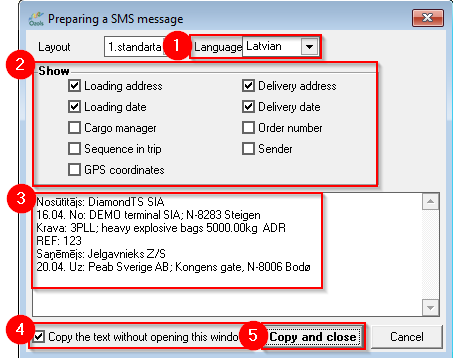](https://ozols.lv/doc/uploads/images/gallery/2022-09/image-1662469540161.png) # CMR how to create and print itHow to create and print the **CMR for the Client's order?**
1. Open the **Client's order** for which the CMR will be prepared 2. From the toolbar, select **Functions** 3. **Create CMR** [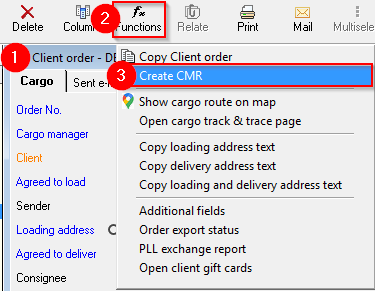](https://ozols.lv/doc/uploads/images/gallery/2022-09/image-1662465537510.png) 4. Based on the Client's order information, the program automatically fills in the CMR fields [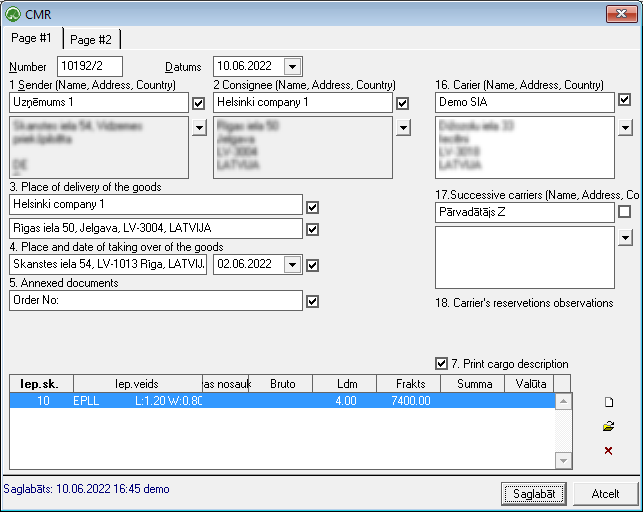](https://doc-ozols-lv.translate.goog/uploads/images/gallery/2022-06/image-1654868804743.png?_x_tr_sl=lv&_x_tr_tl=en&_x_tr_hl=en&_x_tr_pto=wapp) 5. If any of the fields have not been filled in automatically, you can do so by manually filling in the fields in the form 6. Use the toolbar command [](https://doc-ozols-lv.translate.goog/uploads/images/gallery/2022-07/image-1657700495704.png?_x_tr_sl=lv&_x_tr_tl=en&_x_tr_hl=en&_x_tr_pto=wapp) to print the CMR # 6) Outgoing Invoices (debtors) # Outgoing invoice with CMR 1. [**Income from the client**](#bkmrk-3.1.-ie%C5%86%C4%93mumi-no-kli) 2. [**Issuing of invoice**](#bkmrk-3.2.-r%C4%93%C4%B7ina-izveido%C5%A1) 3. [****Correcting an** Invoice **](#bkmrk-3.3.-r%C4%93%C4%B7ina-labo%C5%A1ana) 4. [**Invoice by email or mail (with CMR)**](#bkmrk-%C2%A0-0)**The invoice is issued and sent together with CMR in the Client's order window**
[](https://ozols.lv/doc/uploads/images/gallery/2022-05/image-1653996378050.png) ### 1. Income from the client: In the field **Income from the client** field enter the total amount excluding VAT and the currency to be paid by the client. \- If the amount changes during the processing of the order, e.g. the customs declaration is purchased in addition, then the field "**Income from client**" must be updated accordingly. \- If a Credit Invoice has been issued, the "**Income from client**" **must be manually reduced by its amount.** **Summing up** [](https://doc-ozols-lv.translate.goog/uploads/images/gallery/2022-04/image-1649141607526.png?_x_tr_sl=lv&_x_tr_tl=en&_x_tr_hl=en&_x_tr_pto=wapp) - If pressed, the field "**Income from client**" will be filled in automatically, summing up the services related to this client order. - If this function [](https://ozols.lv/doc/uploads/images/gallery/2022-05/image-1653916660500.png) is enabled, it is not possible to fill in the field "**Income from client**" **manually.** **Payment:** Outgoing invoice payment term. \- The client's default payment term can be defined: Ozols > Contacts > Lists > All partners > Open the card of the partner you want to edit > choose page **Other data** > set **Term of payment** **VAT rate:** - Selecting the VAT rate and then hovering over the field shows the VAT rate Article. \- VAT rates can be changed in the list: General lists> Tax list ### 2. Issuing of invoice Once the order is entered, click [](https://doc-ozols-lv.translate.goog/uploads/images/gallery/2022-04/image-1649143460017.png?_x_tr_sl=lv&_x_tr_tl=en&_x_tr_hl=en&_x_tr_pto=wapp) to create Invoice for client \- Selects the invoice type or choose from already created invoice list [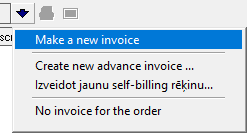](https://ozols.lv/doc/uploads/images/gallery/2022-05/image-1653997088187.png) **The invoice template** window allows you to: \- Check the information included in the invoice; \- Write notes that will be included in red at the bottom of the invoice; \- Print or Email invoice; -Accept or cancel invoice confirmation. [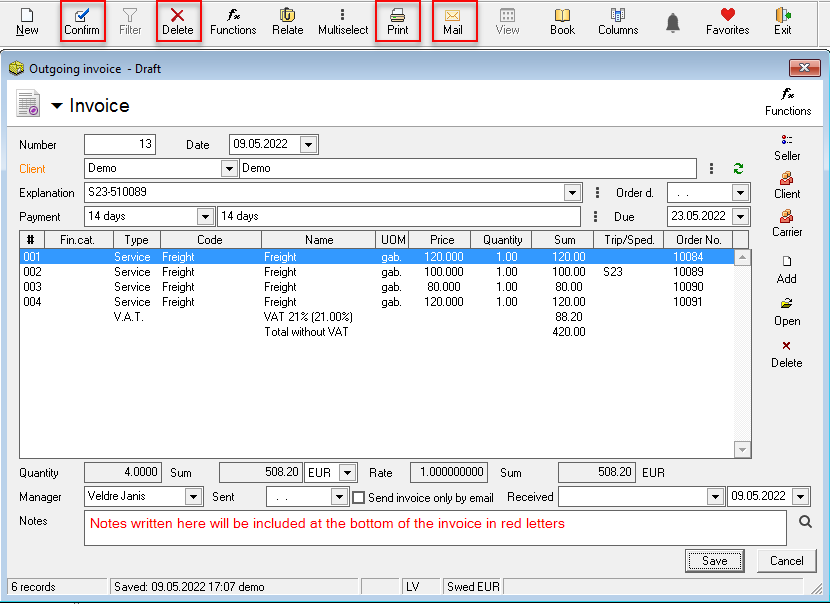](https://ozols.lv/doc/uploads/images/gallery/2022-06/image-1654070273126.png) -**Important! If you make any changes , press F5 to overwrite the contents of the invoice.**
### 3. Correcting an InvoiceThe content of the invoice is formed from the information entered in the client's order. Therefore, if you need to correct the invoice, you must correct the order and then regenerate the invoice.
If the income from client changes or additional services are added after creating the invoice, select**[](https://doc-ozols-lv.translate.goog/uploads/images/gallery/2022-04/image-1649143460017.png?_x_tr_sl=lv&_x_tr_tl=en&_x_tr_hl=en&_x_tr_pto=wapp)**and **regenerate the content of the invoice.**
To delete an invoice, open the invoice template, then 1\. Cancel confirmation; 2\. Click Delete Invoice. [](https://ozols.lv/doc/uploads/images/gallery/2022-06/image-1654070649062.png) ### 4. Invoice with CMROZOLS TMS has option to add CMR to clients order. If CMR is added, it is easy to e-mail it together with Invoice
The default invoice sending method is defined in the Client / Partner card.
**POD or CMR** \- CMR is added to the Client's order page **"Attachment(s)"** in pdf, png or jpg format [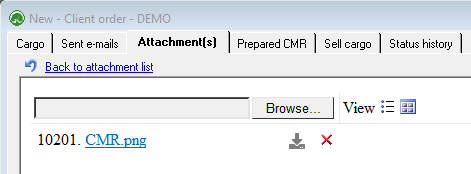](https://ozols.lv/doc/uploads/images/gallery/2022-06/image-1654070926246.png) ### 4.1. Sending an invoice by e-mail: [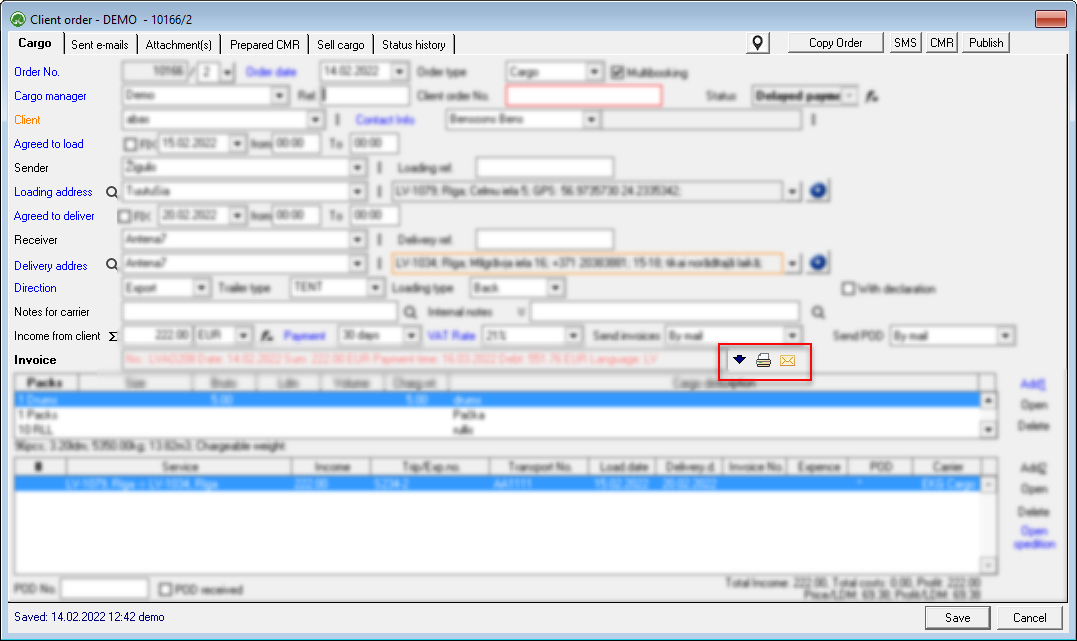](https://ozols.lv/doc/uploads/images/gallery/2022-06/image-1654071458563.png) \- In the Client Order window, open the Invoice by clicking [](https://doc-ozols-lv.translate.goog/uploads/images/gallery/2022-04/image-1649143460017.png?_x_tr_sl=lv&_x_tr_tl=en&_x_tr_hl=en&_x_tr_pto=wapp) \- To send an email: click [](https://doc-ozols-lv.translate.goog/uploads/images/gallery/2022-04/image-1649156523858.png?_x_tr_sl=lv&_x_tr_tl=en&_x_tr_hl=en&_x_tr_pto=wapp) \- The email window opens. Make sure the information is correct and if needed, the CMR is added to email. Then click **send**. \- Print the invoice by clicking [](https://doc-ozols-lv.translate.goog/uploads/images/gallery/2022-04/image-1649152583657.png?_x_tr_sl=lv&_x_tr_tl=en&_x_tr_hl=en&_x_tr_pto=wapp). The invoice will open in pdf format in your computer's web browser. \- After sending the email, the status of the Order automatically changes to **Invoice sent**.If the Invoice is to be emailed together with the CMR, it must be checked in the attachment before sending!
### 4.2. Sending an invoice by mail: \- In the Client Order window, open the Invoice by clicking [](https://doc-ozols-lv.translate.goog/uploads/images/gallery/2022-04/image-1649143460017.png?_x_tr_sl=lv&_x_tr_tl=en&_x_tr_hl=en&_x_tr_pto=wapp) \- Click [](https://doc-ozols-lv.translate.goog/uploads/images/gallery/2022-04/image-1649152583657.png?_x_tr_sl=lv&_x_tr_tl=en&_x_tr_hl=en&_x_tr_pto=wapp)to open the invoice in a web browser in pdf format and then send it to the printer for printing in paper format \- When the Invoice is sent by post, the status of the order **must be manually set to "Invoice sent"!**If the invoice is sent by e-mail and post, this is handled as a postal mailing and the status **"Invoice sent"** must be entered manually!
# One invoice for many orders If necessary to issue one invoice for several Client orders, there are 2 approaches: 1. One invoice for several selected orders 2. [Add each order one by one to the outgoing invoice](#bkmrk-pas%C5%ABt%C4%ABjuma-log%C4%81-piev) #### 1. One invoice for several selected orders 1. Open **the Client order filter;** 2. Mark **Outgoing invoice - Not issued;** 3. Selects **the Client to whom invoices for orders must be issued;** 4. Confirm the filter. [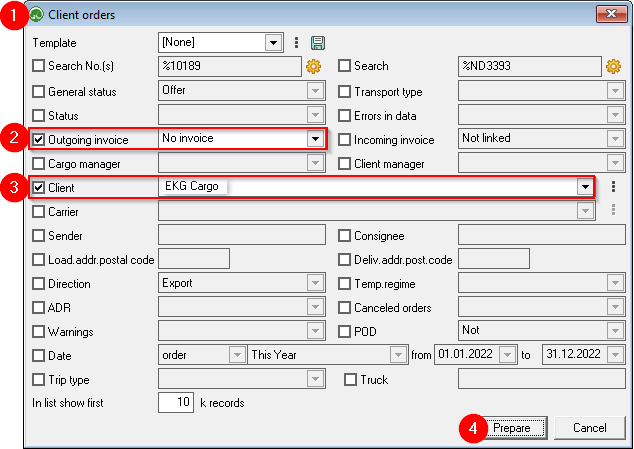](https://ozols.lv/doc/uploads/images/gallery/2022-09/image-1662550258220.png) 5. Press the **Muti select**[](https://ozols.lv/doc/uploads/images/gallery/2022-06/image-1654595946120.png) button ; 6. While holding the **Ctrl key with the mouse**, mark the orders for which an invoice must be created; 7. Press the **Functions** [](https://ozols.lv/doc/uploads/images/gallery/2022-05/image-1651737125163.png)button ; 8. Chooses to create an outgoing invoice for marked orders; 9. Selects **New invoice**, if a new invoice needs to be created, or selects an invoice **already created** for this **client**; 10. **Save** - a prepared invoice will open. Read about further steps [here .](https://ozols.lv/doc/books/ozols-tms-english/page/61-outgoing-invoice-with-cmr) [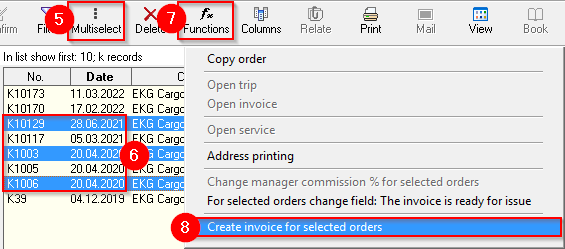](https://ozols.lv/doc/uploads/images/gallery/2022-09/image-1662550798150.png) [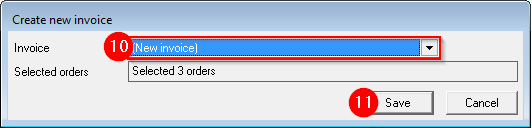](https://ozols.lv/doc/uploads/images/gallery/2022-09/image-1662550911159.png) #### 2. Add each order one by one to the outgoing invoice 1. Open the **Client order** , which will be added as the first in the combined invoice to the Client. 2. Selects **Create a new invoice** and save. 3. Open the next **order of the same Customer** , which must be added to the combined invoice, and select Add to invoice no. .... (this time the invoice previously created for the Customer will be visible here). [](https://ozols.lv/doc/uploads/images/gallery/2022-09/image-1662551224208.png) # Selecting a bank account in an outgoing invoiceIf your company has several bank accounts, you can choose which one(s) to show on your outgoing invoices. You can set it in Partner's card.
To add new Bank account or make changes to existing ones, you have to contact OZOLST TMS support team.
#### There are 3 options: 1. [**Default**, when your company's **main bank account or accounts** are used for all Partners;](#bkmrk-2.-exceptional---alw) 2. [**Exceptional** , when Partner must **ALWAYS** have **specific bank account**;](#bkmrk-2.-exceptional---alw) 3. [**Variable , when Partner **SOMETIMES** needs **specific bank account**.](#bkmrk-da%C5%BDreiz-j%C4%81nor%C4%81da-cit) #### 1. Standard or Default account in invoices - This is your company's Bank Account Number, which is defined for all transactions by default. - Several bank account numbers may be included here and will appear on the invoice - If the transaction is in a different currency, e.g. USD, then Ozols will automatically include the account that works with USD. #### 2. Exceptional - ALWAYS specific Bank account for selected Partner **Ozols > Contacts > Lists > All Partners > Open the Partner card** 1. Choose the page **Other data;** 2. find ****Bank account group and select desired Bank account, that will be ****ALWAYS**** used for this Partner.**** [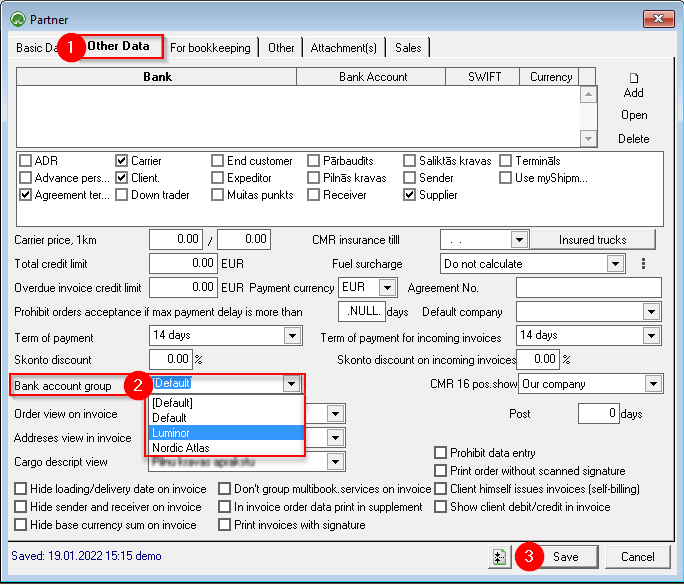](https://ozols.lv/doc/uploads/images/gallery/2022-09/image-1662553489809.png) #### 3. Variable - SOMETIMES a different bank account must be specified 1\) Open the outgoing invoice. For example: **OZOLS > Payments > Documents > Outgoing invoices > open invoice.** 2) If the invoice is closed, **cancel the confirmation** (1) 3\) Press the **Client** (2) and select **the Bank account** from the list (3) [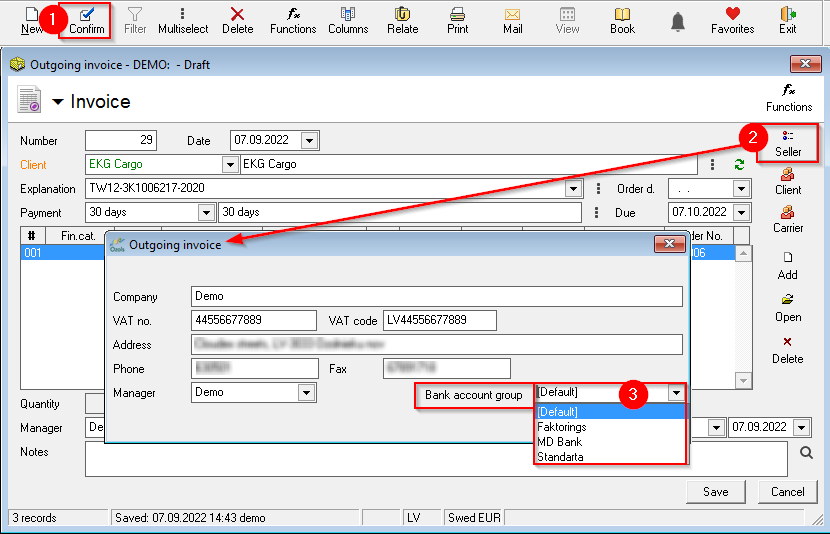](https://ozols.lv/doc/uploads/images/gallery/2022-09/image-1662553981153.png) # Outgoing invoice paymentImportant! OZOLS TMS provides two options - automated and manual outgoing invoice.
Only one of options can be used for the accounting period!
#### Contents: 1. [Payment of outgoing invoices - automated data import from the bank](#bkmrk-1.-payment-of-outgoi) 2. [Linking outgoing invoices with incoming bank payments](#bkmrk-4.-ien%C4%81ko%C5%A1o-bankas-m) 3. [Payment of outgoing invoices - manual data entry](#bkmrk-3.-outgoing-invoice-) #### 1. Payment of outgoing invoices - automated data import from the bank 1.1. Export Account report from your Bank Open your company's **internet bank** > prepare **the Bank Account report** for the desired period > **export it in FidaVista or ISO format.** > **Save this document to your computer.** 1.2. Open OZOLS TMS 1. **Finance > Documents** 2. **Bank incomings** 3. **Functions** 4. **Import payments from a bank** [](https://ozols.lv/doc/uploads/images/gallery/2022-09/image-1662628603969.png) 1.3. Import bank payments 1. Choose **Import from file** 2. Specify the location of the document to be imported on the computer. 3. Press **Import** 4. **Close** [](https://doc-ozols-lv.translate.goog/uploads/images/gallery/2022-03/image-1647521443054.png?_x_tr_sl=lv&_x_tr_tl=en&_x_tr_hl=en&_x_tr_pto=wapp) #### 2. Linking incoming bank payments with outgoing invoices 1. **OZOLS** > **Finances** > **Documents** > **Bank incomings** 2. Filter [](https://ozols.lv/doc/uploads/images/gallery/2022-05/image-1651585606852.png)> choose which documents to include 3. **Set** the desired filter. For example, **Show only uncovered payments** 4. Select the first payment and press the [](https://doc-ozols-lv.translate.goog/uploads/images/gallery/2022-03/image-1647522540789.png?_x_tr_sl=lv&_x_tr_tl=en&_x_tr_hl=en&_x_tr_pto=wapp) "Relate" button (Ctrl+D) [](https://ozols.lv/doc/uploads/images/gallery/2022-09/image-1662629357125.png)**Settlement - Incoming payment** window consists of 3 areas: A) Incoming bank payment B) Covered invoices C) Uncovered invoices
5\) In the lower list (C) we have unpaid invoices. To relate payment with invoice Press the "Blue arrow up" (1) or double-click on invoice to relate it. If there are several invoices, select them by holding the Ctrl key 6\) With green arrows (1) switch between incoming payment documents 7\) With the filter (3), you can quickly find the required invoice by number, amount, etc. [](https://ozols.lv/doc/uploads/images/gallery/2022-09/image-1662630566554.png)When the Incoming Payment is linked to the corresponding invoice, the amount in the "Uncovered" column in the Bank incomings list will be zero.
#### 3. Outgoing invoice payment - manual data entry 1. Open the outgoing invoice to which the incoming payment should be linked > **Payments** > **Documents** > **Outgoing invoices** 2. **Mark the desired entry and press Functions [](https://ozols.lv/doc/uploads/images/gallery/2022-05/image-1651737125163.png)** in the toolbar 3. Select **Create bank incoming payment** 4. Select **Incoming Payment** 5. Enter the required information manually 6. Save [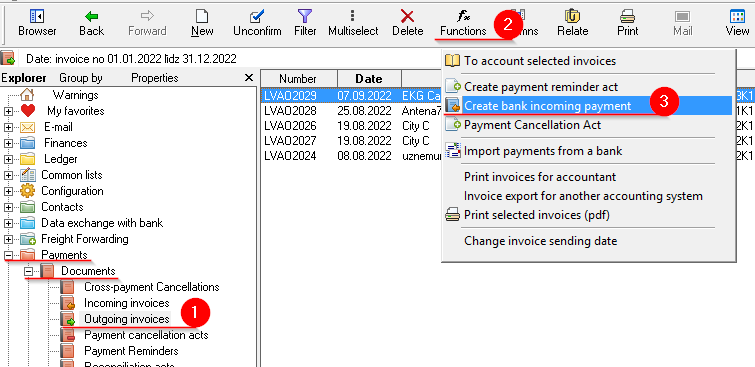](https://ozols.lv/doc/uploads/images/gallery/2022-09/image-1662631383730.png) [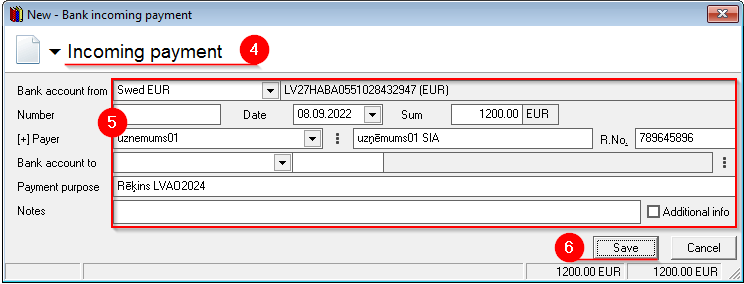](https://ozols.lv/doc/uploads/images/gallery/2022-09/image-1662631654303.png) # Unpaid outgoing invoices #### Two ways to select unpaid outgoing invoices 1\. **List of all unpaid** outgoing invoices: **OZOLS > Payments > Reports > Unpaid outgoing invoices** 2\. Outgoing invoices **grouped by Partners** : **OZOLS > Payments > Reports > Unpaid outgoing invoices (totals)** [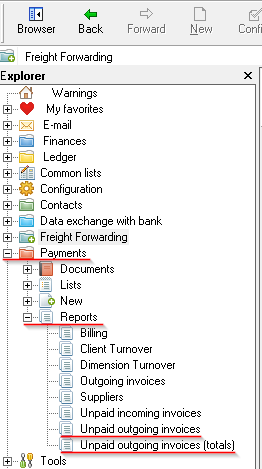](https://ozols.lv/doc/uploads/images/gallery/2022-09/image-1662644187444.png) 3\. With the help of Filter [](https://doc-ozols-lv.translate.goog/uploads/images/gallery/2022-05/image-1651585606852.png?_x_tr_sl=lv&_x_tr_tl=en&_x_tr_hl=en&_x_tr_pto=wapp), specify additional conditions for more accurate selection. [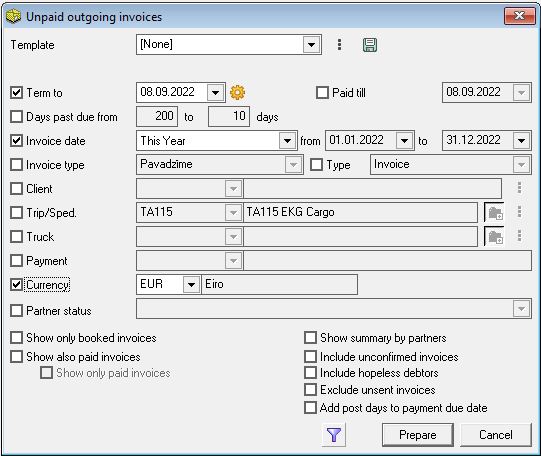](https://ozols.lv/doc/uploads/images/gallery/2022-09/image-1662644270016.png) ##### **See also** : [How to send payment reminders by e-mail?](https://ozols.lv/doc/books/ozols-tms-english/page/67-payment-reminders-by-e-mail) [List of debtors in your e-mail.](https://ozols.lv/doc/books/ozols-tms-english/page/e-mail-alerts) # Payment reminders by e-mail**To work with debtors** we recommend using the section created for this purpose. Press (F9) to open it. **Info [here](https://doc-ozols-lv.translate.goog/link/140?_x_tr_sl=lv&_x_tr_tl=en&_x_tr_hl=en&_x_tr_pto=wapp#bkmrk-page-title) .**
##### To quickly send a payment reminders to several partners at the same time: 1\. Filter unpaid invoices in section Unpaid outgoing invoices. Tutorial [here](https://ozols.lv/doc/books/ozols-tms-english/page/66-unpaid-outgoing-invoices) . 2\. Set the desired data **Filter** [](https://doc-ozols-lv.translate.goog/uploads/images/gallery/2022-05/image-1651585606852.png?_x_tr_sl=lv&_x_tr_tl=en&_x_tr_hl=en&_x_tr_pto=wapp) 3\. To mark several records, press **Multi select. [](https://doc-ozols-lv.translate.goog/uploads/images/gallery/2022-04/image-1649079539544.png?_x_tr_sl=lv&_x_tr_tl=en&_x_tr_hl=en&_x_tr_pto=wapp)** 4. While holding the **Ctrl key, mark** the necessary lines with the mouse 5\. Press **Functions** [](https://doc-ozols-lv.translate.goog/uploads/images/gallery/2022-05/image-1651737125163.png?_x_tr_sl=lv&_x_tr_tl=en&_x_tr_hl=en&_x_tr_pto=wapp) 6\. Choose: **Send a payment reminders via e-mail to selected Clients.** [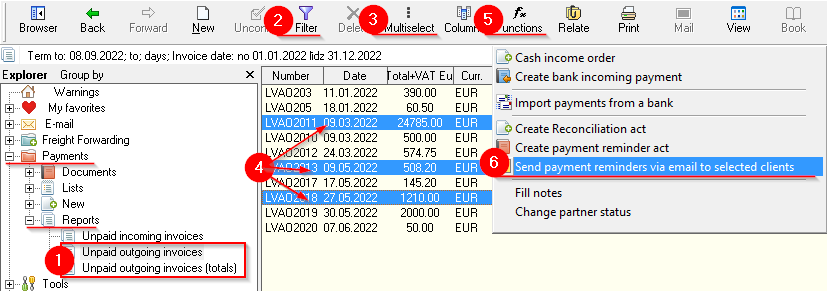](https://ozols.lv/doc/uploads/images/gallery/2022-09/image-1662715452866.png) # Work with debtors (F9)Pressing the function key F9 opens a window that opens a module with wide range of options for working with debtors.
1. List of debtors; 2. Summary of debt obligations; 3. Issued invoices; 4. Services provided; 5. Forming and sending payment reminders; 6. Sent payment reminders. [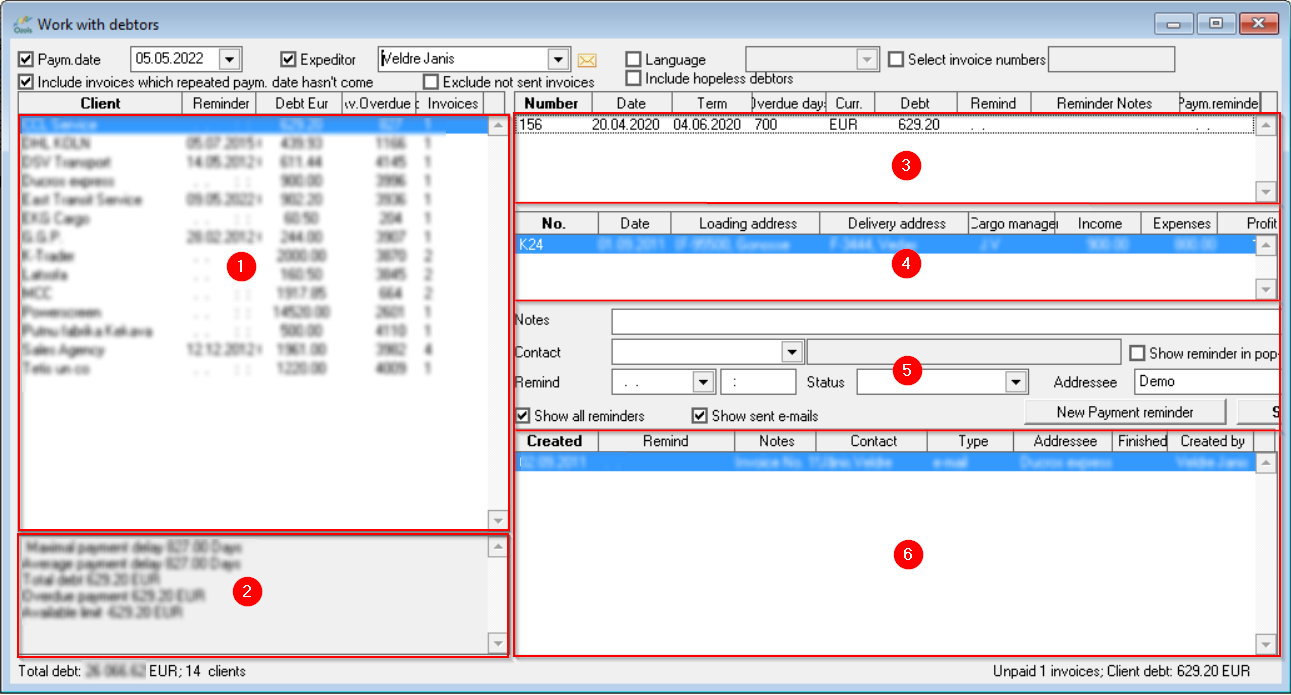](https://ozols.lv/doc/uploads/images/gallery/2022-09/image-1662716497410.png)If your company has a contract with a company that provides factoring services and you want to apply Factoring to the Partner:
##### 1. Create a bank account group called Factoring for your company 1. **OZOLS > Payments > Lists > Bank account groups** 2. Add... New Bank account group named **Factoring** **without ****specifying the account number!** [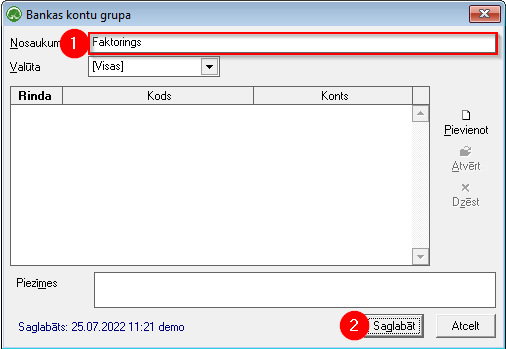](https://doc-ozols-lv.translate.goog/uploads/images/gallery/2022-07/image-1658826328840.png?_x_tr_sl=lv&_x_tr_tl=en&_x_tr_hl=en&_x_tr_pto=wapp) ##### 2. When an invoice is issued: 1. Open the outgoing invoice 2. Press the Seller button 3. Selects Bank account Group – Factoring and close the window 4. Press the search button 5. Select **New note**. (If the noteFactoring has already been created, select it.) 6. When creating a new one, name the note - Factoring 7. In the Description field, enter information about Factoring rules. 8. This field is filled automatically from the defined note (5) information and is included in the lower part of the invoice in red letters 9. The created invoice is sent to the Partner and Factoring service provider. [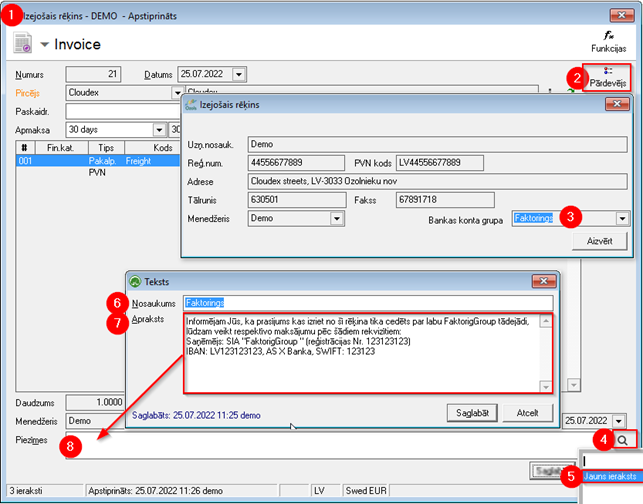](https://doc-ozols-lv.translate.goog/uploads/images/gallery/2022-07/image-1658826442289.png?_x_tr_sl=lv&_x_tr_tl=en&_x_tr_hl=en&_x_tr_pto=wapp)If the payment is unlinked with the intention of making corrections to the payment order, then the **payment must be re-added to the invoice** afterwards . You will find the [instructions here](https://ozols.lv/doc/link/231#bkmrk-4.-ien%C4%81ko%C5%A1o-bankas-m)
# Mutual Settlement Comparison Act The following steps must be taken to prepare the act of mutual settlement comparison: 1. OZOLS > Documents > Mutual settlement comparison act 2. A window opens New - Mutual settlement comparison act 3. Selects the required cooperation partner from the list 4. Document type - set **Invoices** 5. Press the button - **Fill content** 6. The act is ready for **printing** [](https://doc-ozols-lv.translate.goog/uploads/images/gallery/2020-11/ico-print.gif?_x_tr_sl=lv&_x_tr_tl=en&_x_tr_hl=en&_x_tr_pto=wapp) or sending by **e-mail** [](https://doc-ozols-lv.translate.goog/uploads/images/gallery/2022-03/image-1647260033166.png?_x_tr_sl=lv&_x_tr_tl=en&_x_tr_hl=en&_x_tr_pto=wapp) 7. Close the window by pressing ****Save**** [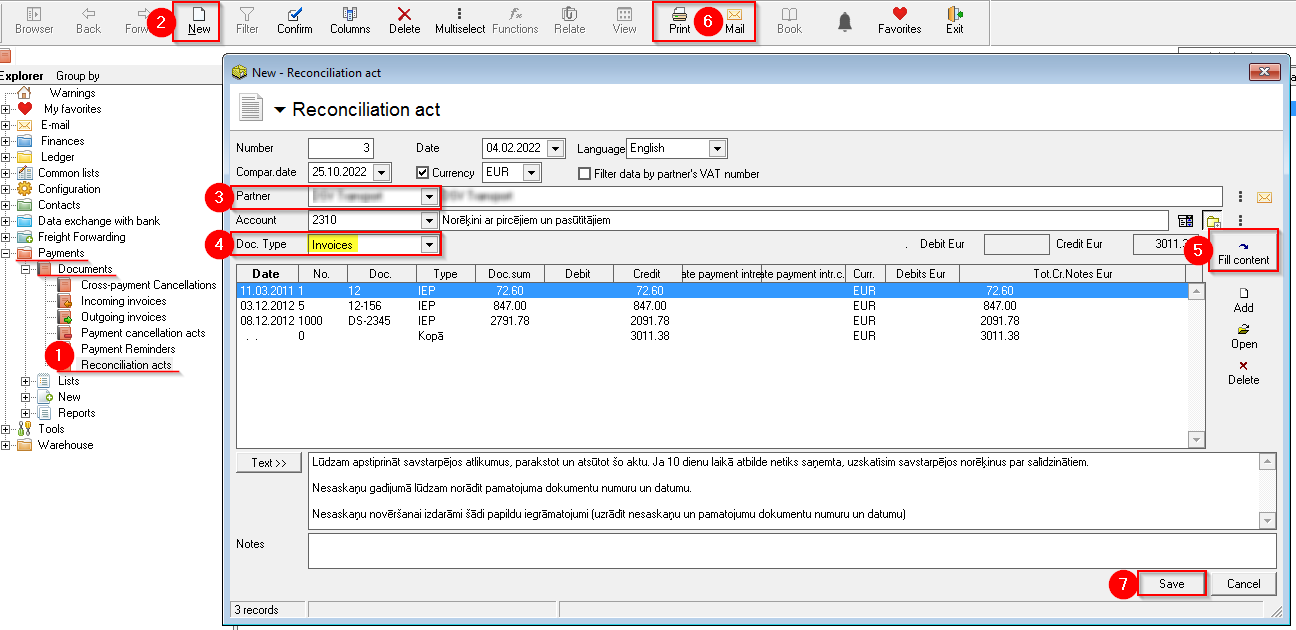](https://ozols.lv/doc/uploads/images/gallery/2022-10/image-1666686909099.png)Incoming invoices registered in Ozola are paid by creating payment orders. We recommend exporting these payment tasks to an internet bank for fast bill payment.
There are various options for preparing bank payments, so we recommend OZOLS users to use the one that is convenient for them
#### 1. Many Bank payment orders for many incoming invoicesThe selected documents MAY be of different types (invoices, waybills), of different dates and from different Partners!
1. **OZOLS > Payments > Documents > Incoming invoices** 2. The [ ](https://doc-ozols-lv.translate.goog/uploads/images/gallery/2022-07/image-1658324999001.png?_x_tr_sl=lv&_x_tr_tl=en&_x_tr_hl=en&_x_tr_pto=wapp)**necessary incoming invoices are selected** with the help of the **Filter**[](https://doc-ozols-lv.translate.goog/uploads/images/gallery/2022-07/image-1658324999001.png?_x_tr_sl=lv&_x_tr_tl=en&_x_tr_hl=en&_x_tr_pto=wapp) For example: Show only unpaid invoices. 3. Mark which invoices to pay - Select **Multi select [](https://ozols.lv/doc/uploads/images/gallery/2022-06/image-1654595946120.png)(Ctrl+Y)** and, similar to Excel, holding the **Ctrl** or **Shift** keys with the mouse highlight the desired invoices. 4. Press Functions  5. Select: **create bank payment orders for marked invoices** 6. Selects the bank payment **date** 7. **Specifie the bank account** from which payments will be made 8. Press **Continue !!!** Prepared bank payments are available: **OZOLS** **‣ Finances ‣ Documents ‣ Bank expenses** [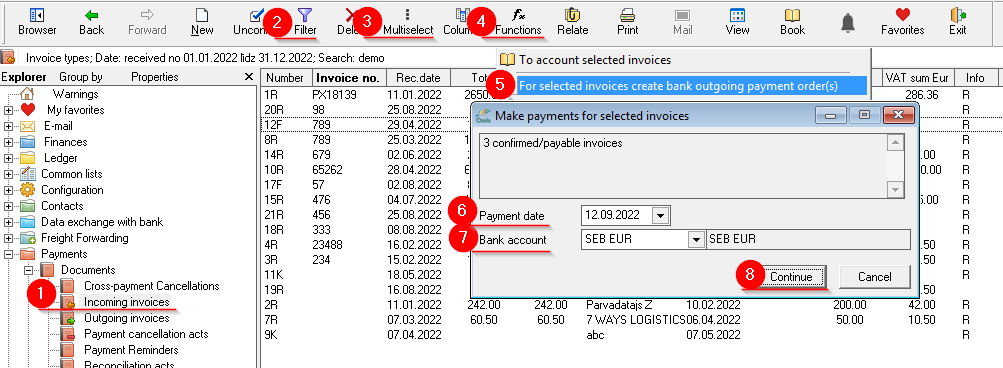](https://ozols.lv/doc/uploads/images/gallery/2022-09/image-1662981186969.png)When creating payment orders for multiple invoices, they will all be created with ONE preparation date and from the same company's bank account
We recommend exporting the prepared bank payment tasks to the bank using the [Data exchange with the bank functionality available in the system](https://doc-ozols-lv.translate.goog/books/ozols-desktop/page/bankas-maksajumu-uzdevumu-eksports?_x_tr_sl=lv&_x_tr_tl=en&_x_tr_hl=en&_x_tr_pto=wapp)
#### 2. Bank payment order for one incoming invoice Linking one incoming invoice with the outgoing payment order.If the Bank payment order has already been created in the Internet bank or another program, it is possible to enter it manually in OZOLS and thus register the payment of the incoming invoice.
1. **OZOLS > Payments> Documents > Incoming invoice** 2. **Press the Functions** button [](https://ozols.lv/doc/uploads/images/gallery/2022-05/image-1651737125163.png) 3. Select **Create bank outgoing payment order** 4. Enter the required **information from the bank payment order** and **save** [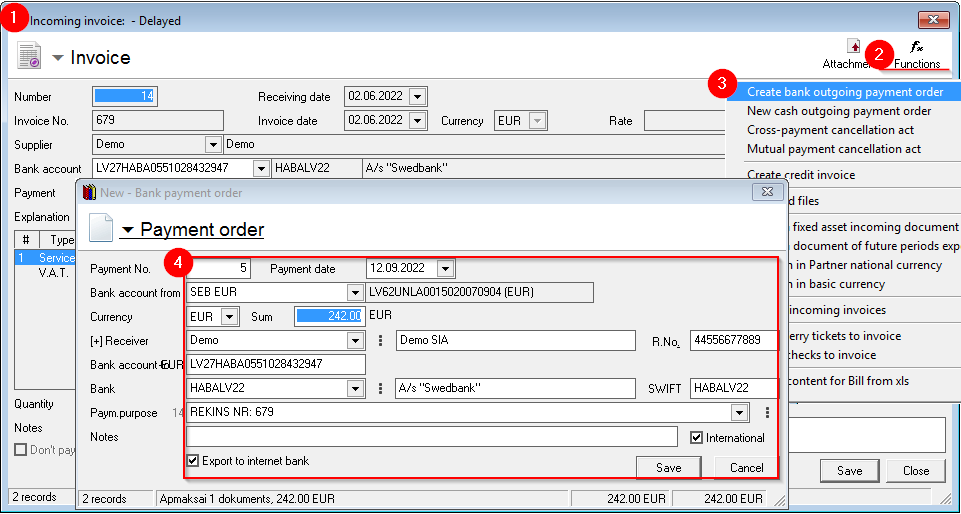](https://ozols.lv/doc/uploads/images/gallery/2022-09/image-1662981170825.png) #### 3. Deleting and correcting the bank payment orderIt is possible to correct or delete the payment order before it has been sent to the internet bank for payment. To do this, the payment order is first detached from the invoice:
1. **OZOLS > Finances > Documents > Bank expenses;** 2. Select the required payment order; 3. Press the **Relate** button . A window opens - **Settlement payment order**; 4. Select the invoice from which the payment order should be unrelated; 5. Press the Unlink button and save; [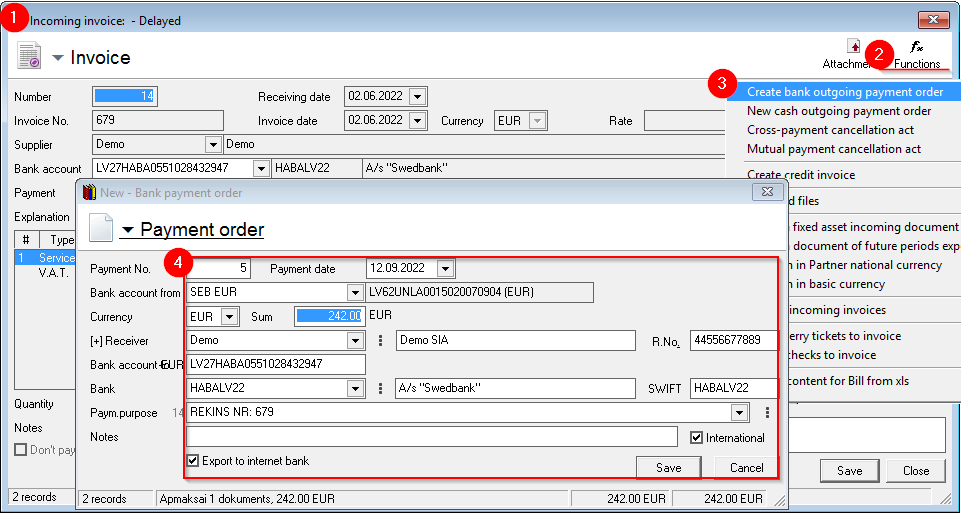](https://ozols.lv/doc/uploads/images/gallery/2022-09/image-1662983309984.png) 6. The confirmation of the desired payment order is removed; 7. Opens the payment order and make corrections or delete by pressing the Delete button [](https://ozols.lv/doc/uploads/images/gallery/2022-09/image-1662983740578.png) # Export of bank payment ordersIn the OZOLS system, it is possible to export the payment orders to the internet bank. You only need to import the file created by Ozols in your internet bank and confirm the payments.
In order to make such a connection, it is necessary to create **import** and **export** folders on the computer's hard drive. If you use several Internet banks, create own folder for each one, for example: C:\\bank\\swed\\export and C:\\bank\\swed\\import.
**OZOLS ‣ Data exchange with bank ‣ Lists ‣ Bank electronic payment system** 1\. Using the "New" button on the toolbar, you can add a new banking system. To modify an already created banking system, double click on it. [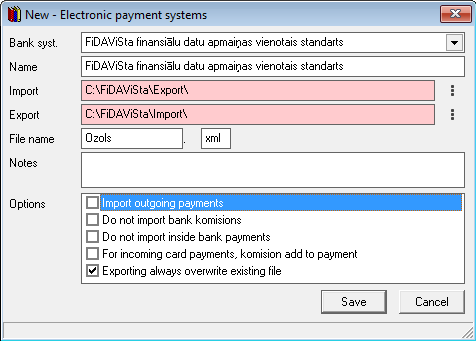](https://ozols.lv/doc/uploads/images/gallery/2022-09/image-1663577755778.png) 2\. In order to perform the necessary configuration for data exchange - you need to choose the appropriate system for your bank - for Latvian commercial banks it will be the standard of FiDAViSta.For Import and Export, you need to specify the path to previously created folders on the computer - for example C:\\banka\\Imports and C:\\banka\\Exports
If a corresponding folder is not created on the computer, OZOLS will show it by marking the field red, if the folder is found, the field will turn white.
3\. Since only a separate folder is created for each bank, it is also necessary to add another folder to each bank in the system. In addition to each bank, you can specify various options - whether outgoing payments will also be imported, or import bank commission payments, etc. #### Data exchange with the bank 1\. To export payment orders to the bank, the "Data exchange with the bank" tool is used, which is available: **OZOLS ‣ Data exchange with the bank ‣ Tools ‣ Bank payments import/export**To use data exchange with your bank, it is important to select which banking system you will be working with (in cases where more than one bank's electronic payment system is connected to OZOLS TMS.
If OZOLS TMS finds payment orders that have not yet been exported and are marked for export (checked in the bank payment order in Ozols under Finance), the tool will automatically check "Export payment orders". If the system finds a bank export file, "Import bank statements" will automatically be checked.
2\. In order to export the prepared bank payments from the OZOLS TMS, you need to mark the parameter: [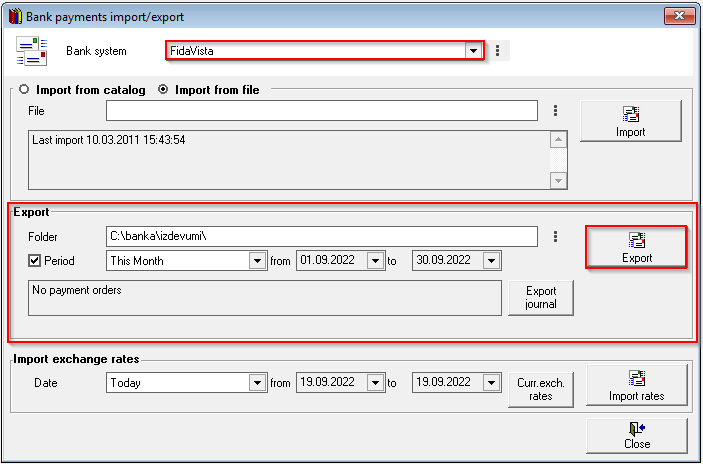](https://ozols.lv/doc/uploads/images/gallery/2022-09/image-1663579095233.png)**A ferry ticket is attached or detached from the Invoice by double-clicking on it.**
It is possible to attach several tickets to one invoice.
#### Read more: [Adding ferry tickets](https://ozols.lv/doc/books/ozols-tms-english/page/3-adding-a-ferry-ticket) # Mutual clearing actsThe Mutual clearing act settles the financial obligations between the outgoing and incoming invoices of the business partner
#### To create a new Mutual clearing acts: 1. **Ozols > Payments > Documents > Mutual clearing >** in the toolbar press ******New****** [](https://ozols.lv/doc/uploads/images/gallery/2022-10/image-1666084500678.png) 2. A new window opens **Mutual clearing** 3. In the header, indicate the date, document number, name (for example: according to the contract) and select the required cooperation partner from the list [.](https://doc-ozols-lv.translate.goog/books/ozols-instrukcijas/page/sadarbibas-partneri?_x_tr_sl=lv&_x_tr_tl=en&_x_tr_hl=en&_x_tr_pto=wapp) 4. Press the **Fill** button [](https://ozols.lv/doc/uploads/images/gallery/2022-10/image-1666160832574.png) 5. Choose **Incoming invoices** 5.1. **The Unpaid incoming invoices** window opens . By holding down the **ctrl** key, mark with mouse the necessary invoices and by pressing [ ](https://doc-ozols-lv.translate.goog/uploads/images/gallery/2020-11/ico-hand.gif?_x_tr_sl=lv&_x_tr_tl=en&_x_tr_hl=en&_x_tr_pto=wapp)or with a double click of the mouse, add the invoices to the act 6. **Press the Fill** button again [](https://ozols.lv/doc/uploads/images/gallery/2022-10/image-1666160832574.png) and select **Outgoing invoices** 6.1. **The Unpaid outgoing invoices** window opens . By holding down **the ctrl** key, mark with mouse the necessary invoices and by pressing [ ](https://doc-ozols-lv.translate.goog/uploads/images/gallery/2020-11/ico-hand.gif?_x_tr_sl=lv&_x_tr_tl=en&_x_tr_hl=en&_x_tr_pto=wapp)or with a double click of the mouse, add the invoices to the act 7. **Press the Equalize sums** button [](https://ozols.lv/doc/uploads/images/gallery/2022-10/image-1666161012847.png) !!! the amount of covered amount on both sides has to be the same! 8. Enter currency, consent term and notes if needed 9. The created act is confirmed by pressing the button on the toolbar [](https://ozols.lv/doc/uploads/images/gallery/2022-10/image-1666161395951.png) 10. **To print the document, press the Print** [](https://doc-ozols-lv.translate.goog/uploads/images/gallery/2020-11/ico-print.gif?_x_tr_sl=lv&_x_tr_tl=en&_x_tr_hl=en&_x_tr_pto=wapp) button on the toolbar to send to e-mail **Mail** [](https://doc-ozols-lv.translate.goog/uploads/images/gallery/2022-03/image-1647260033166.png?_x_tr_sl=lv&_x_tr_tl=en&_x_tr_hl=en&_x_tr_pto=wapp) 11. You need to press the button to save [](https://ozols.lv/doc/uploads/images/gallery/2022-10/image-1666161546834.png) [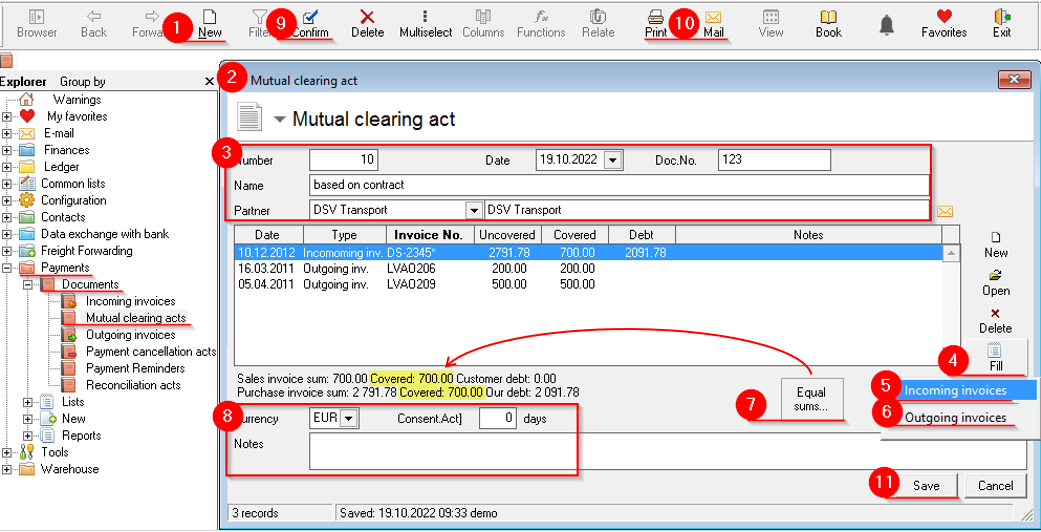](https://ozols.lv/doc/uploads/images/gallery/2022-10/image-1666167916229.png) ##### Sample of **Mutual clearing** **cancellation act** act: [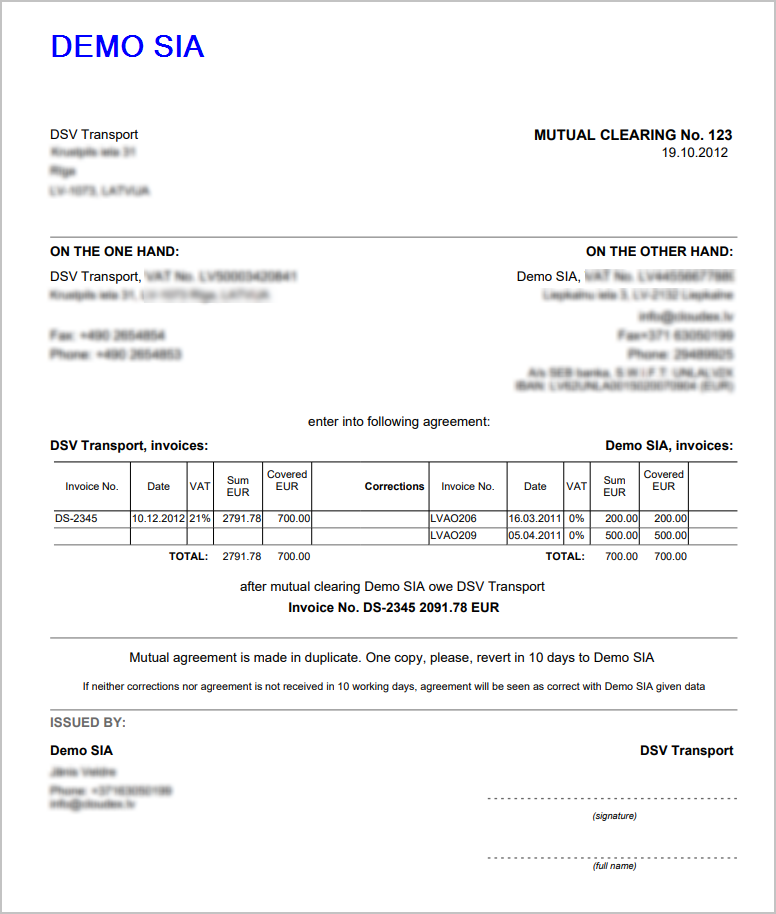](https://ozols.lv/doc/uploads/images/gallery/2022-10/image-1666168645471.png)When the Reconciliation act is approved, the documents attached to it are linked, thus the debt amounts of the documents are canceled and the documents are considered paid.
The Reconciliation act can be posted in the same way as other payment documents.
# Credit invoice for incoming invoice ##### Contents: 1. [Creating a credit invoice for an incoming invoice](#bkmrk-1.-kred%C4%ABtr%C4%93%C4%B7ina-izve) 2. [Deed of settlement of invoices for credit invoice of incoming invoice](#bkmrk-2.-nor%C4%93%C4%B7inu-dz%C4%93%C5%A1anas) 3. [Where does OZOLS store payment cancellation acts for credit invoices?](#bkmrk-3.-where-does-ozols-) #### 1. Creating a credit invoice for an incoming invoice 1. Open **Incoming Invoices** 2. Finds the invoice for which you need to register a credit note and open it 3. In the incoming invoice window, press **Functions** [](https://doc-ozols-lv.translate.goog/uploads/images/gallery/2022-05/image-1651737125163.png?_x_tr_sl=lv&_x_tr_tl=en&_x_tr_hl=en&_x_tr_pto=wapp) and 4. **Create a credit invoice** [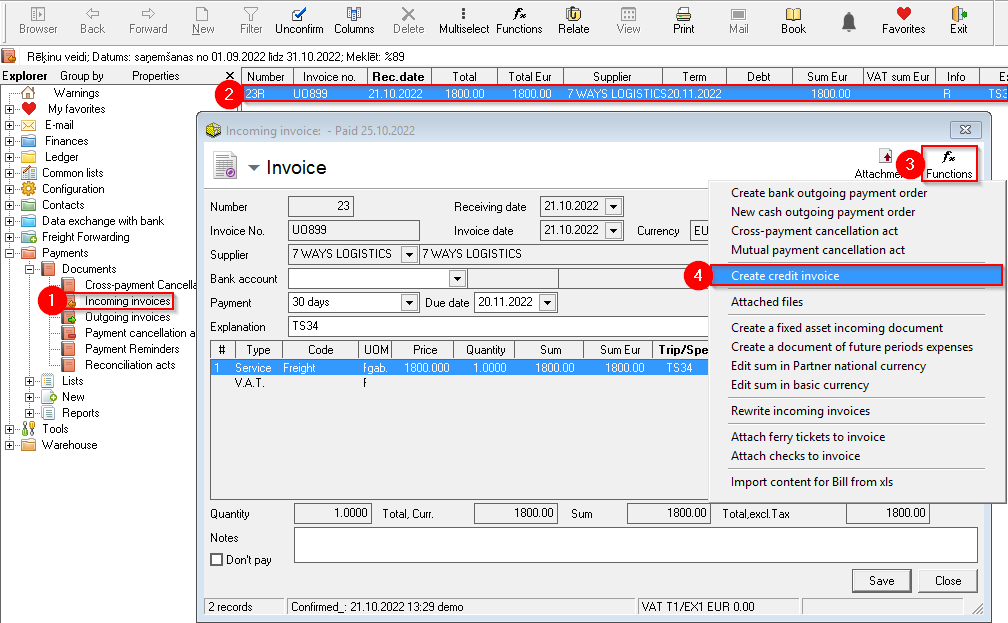](https://ozols.lv/doc/uploads/images/gallery/2022-10/image-1666773481932.png) 5. A new window will open - **Credit invoice.** You can enter the number of the credit invoice in this window 6. Keep your credit score [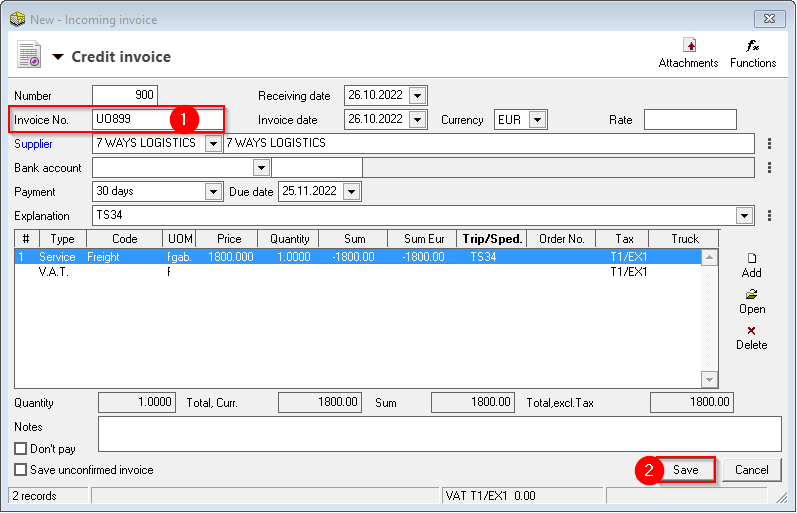](https://ozols.lv/doc/uploads/images/gallery/2022-10/image-1666774305196.png) ##### 2. Payment cancellation act for incoming invoice with credit invoice 1. The **Incoming invoices** list now shows both the **Incoming invoice and the credit invoice** (with a negative amount) 2. With **Multiselect** [](https://doc-ozols-lv.translate.goog/uploads/images/gallery/2022-06/image-1654595946120.png?_x_tr_sl=lv&_x_tr_tl=en&_x_tr_hl=en&_x_tr_pto=wapp) and holding the **Ctrl** key with the mouse, highlight both invoices 3. Functions [](https://doc-ozols-lv.translate.goog/uploads/images/gallery/2022-05/image-1651737125163.png?_x_tr_sl=lv&_x_tr_tl=en&_x_tr_hl=en&_x_tr_pto=wapp) 4. Selects **Create settlement cancellation act.** When the new act window opens, **Save it** 5. If necessary, invoices are confirmed by pressing [](https://doc-ozols-lv.translate.goog/uploads/images/gallery/2022-10/image-1666700519711.png?_x_tr_sl=lv&_x_tr_tl=en&_x_tr_hl=en&_x_tr_pto=wapp)[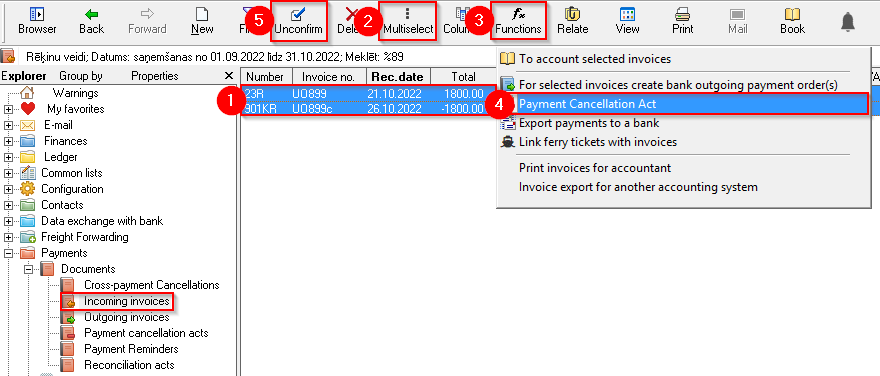](https://ozols.lv/doc/uploads/images/gallery/2022-10/image-1666774769371.png) ##### 3. Where does OZOLS store payment cancellation acts for credit invoices? [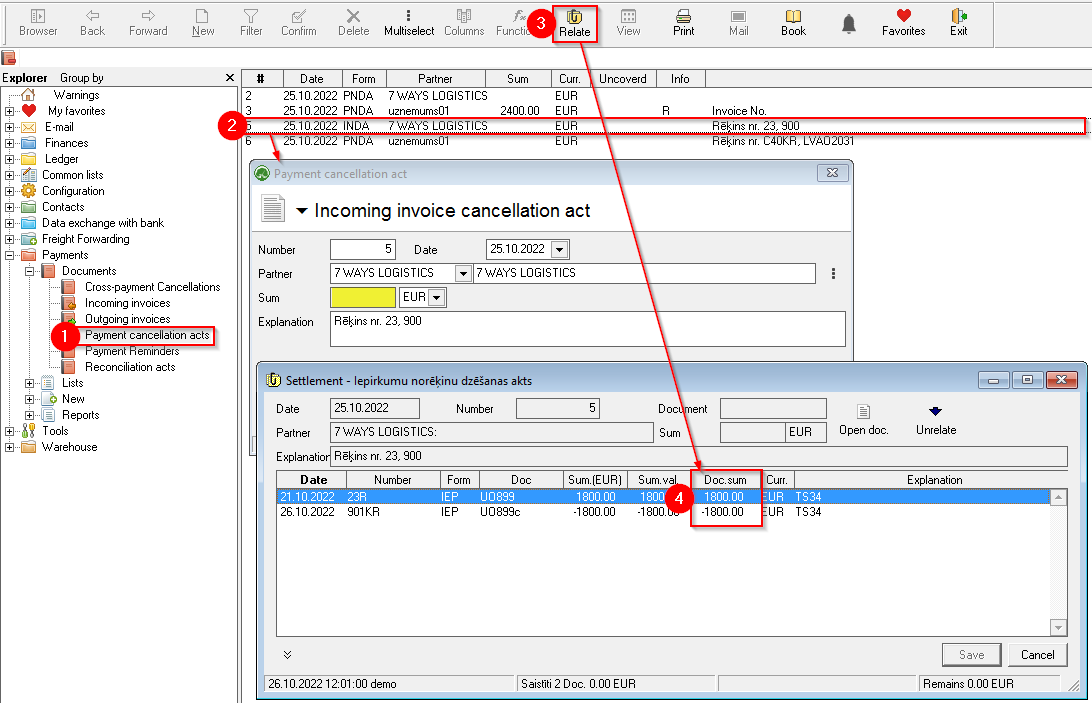](https://ozols.lv/doc/uploads/images/gallery/2022-10/image-1666777390392.png) # 8) Data exchange with other systems # Data exchange with other Accounting software Incoming and outgoing invoices and partner info lists can be exported to various accounting software.The best solution for our customers is **Ozols accounting software**, which is fully integrated with **OZOLS TMS.**
#### OZOLS TMS currently supports: **- Finvalda** **- Merit Aktiva** **- Optimum** **- Rekini.lv** **- Tildes Jumis** **- Zalktis**Export of documents to other accounting software can be programmed. Includes additional costs for programming.
# Export of outgoing invoicesTo perform the simultaneous export of several outgoing invoices from OZOLS for import into another accounting program, the following steps must be taken:
1. Open **Outgoing invoices** **OZOLS > Payments > Documents > Outgoing invoices** 2. Press **Multi select**[](https://doc-ozols-lv.translate.goog/uploads/images/gallery/2022-06/image-1654595946120.png?_x_tr_sl=lv&_x_tr_tl=en&_x_tr_hl=en&_x_tr_pto=wapp) 3. Holding the " **ctrl** " or " **shift** " key and with mouse select invoices to be exported. 4. Press the Functions button [](https://doc-ozols-lv.translate.goog/uploads/images/gallery/2022-05/image-1651737125163.png?_x_tr_sl=lv&_x_tr_tl=en&_x_tr_hl=en&_x_tr_pto=wapp) 5. Selects **Invoice export for another accounting system** 6. Choose the desired accounting program from the list. 7. Specify in which folder on the computer to save the data. We recommend creating a separate folder 8. Save. Then open your accounting program and import the data from folder [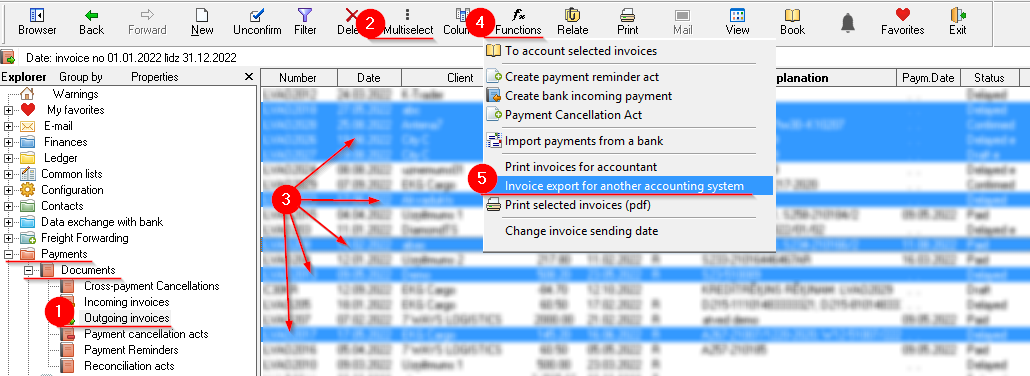](https://ozols.lv/doc/uploads/images/gallery/2022-09/image-1663574394354.png) [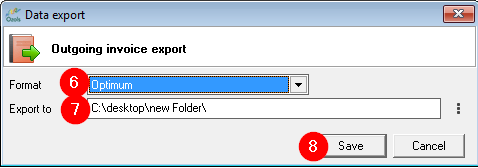](https://ozols.lv/doc/uploads/images/gallery/2022-09/image-1663575794928.png) # 9) Partner Relationship Management (CRM) # Who are partners?1. All companies involved in the business are called cooperation partners 2. Partners can be divided in groups that you define in advance or OZOLS TMS defines it automatically.
##### OZOLS TMS automatically divides into the following groups:| **Group** | **In which case OZOLS TMS marks the partner in the group** |
| Approoved | If the partner's VAT number can be found in the EU VAT register |
| Client | If the Customer's order is registered on the partner |
| Carrier | If a Trip/Spedition is registered to a partner |
| Sender | If a partner is selected as the sender in the Customer's order |
| Recipient | If a partner is selected as the recipient in the Customer's order |
Users can manually create and assign partners to other groups.
#### To see or change the group of Partner: 1. Open Partner card 2. Choose page- Other data 3. The check mark indicates to which group the partner is added [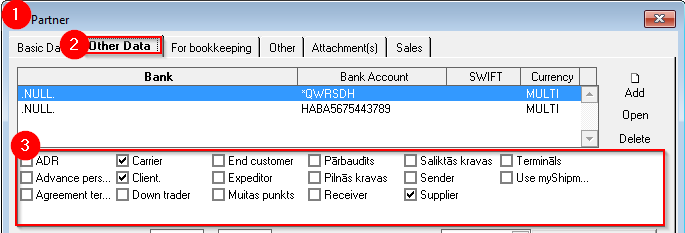](https://ozols.lv/doc/uploads/images/gallery/2022-08/image-1661758604252.png)Partners can be filtered by group in the reports and in the list of partners.
Some of the more frequently used **groups of partners** and contacts : Forwarding company, Final (direct) customer, Combined loads, Full loads, Send holiday greetings, Send information about promotions, etc.
# Partner cooperation summary (F3)**The partner cooperation summary is** opened by pressing the function key **F3**
##### This window displays the following information: A) Partner name B) Cooperation summary C) Shortcuts to OZOLS TMS sections with Partner Cooperation information [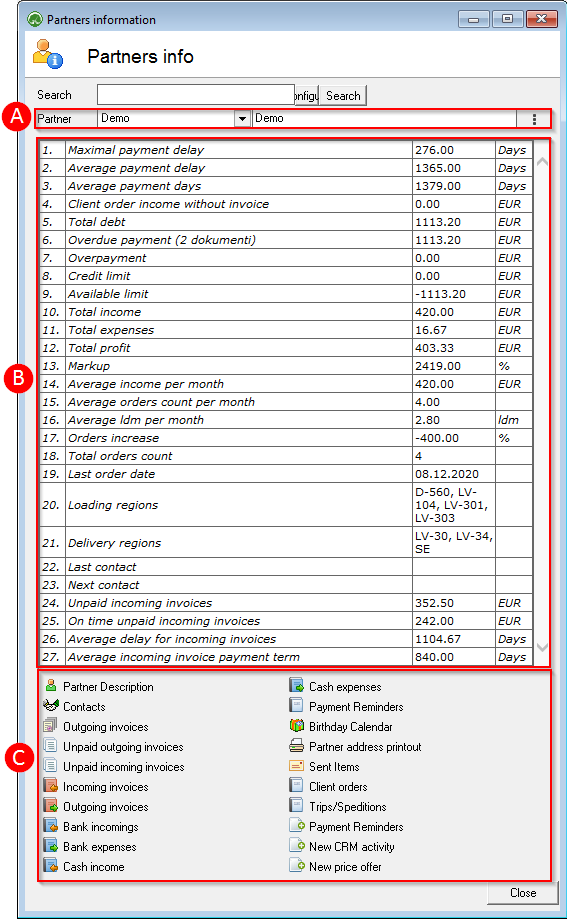](https://ozols.lv/doc/uploads/images/gallery/2022-08/image-1661764597488.png)When entering an address, we recommend that you search for it and check it on Google Maps. To do this, press the magnifying glass [](https://doc-ozols-lv.translate.goog/uploads/images/gallery/2022-06/image-1654508054375.png?_x_tr_sl=lv&_x_tr_tl=en&_x_tr_hl=en&_x_tr_pto=wapp)button before the street field in the Address form
#### 2. Other data and Billing configuration [](https://doc-ozols-lv.translate.goog/uploads/images/gallery/2022-07/image-1657196681037.png?_x_tr_sl=lv&_x_tr_tl=en&_x_tr_hl=en&_x_tr_pto=wapp) **Bank accounts: Bank accounts** added here, which can be selected when entering supplier invoices, then imported and paid via internet banking when paying **Partner groups:** Mark here the groups to which the partner belongs. If necessary, you can add Partner groups: CRM (Partners) > Lists > [Partner groups](https://ozols.lv/doc/books/ozols-tms-english/page/who-are-partners) **Carrier's price per 1km:** When entering the carrier's price per 1km, the program itself calculates the freight price if the kilometers traveled in the Voyage/Expedition are filled in **CMR insurance:** CMR insurance term can be set in 2 ways. 1) One CMR insurance end date is set for the carrier, if the carrier insures all its cars. 2) CMR insurance is entered for each machine separately, if the carrier does not insure all its machines with one insurance policy. **CMR insurance control:** performed before saving the voyage/expedition or in the report Freight > Reports > Expiration **Default Currency:** is the default payment currency for the customer's order **Total credit limit:** If the customer has specified a credit limit and it has been exceeded, the program can be configured so that before saving the Customer's order, the program warns that the credit limit has been exceeded or prohibits the entry of the Customer's order **Credit limit for overdue invoices:** If this limit is exceeded, Ozols will not allow accepting a new order from the customer **Fuel surcharge** **Cooperation agreement number:** If the field is filled, it will be displayed in the printout of the Customer's order **Prohibit acceptance of a customer's order if the payment is overdue by more than ... days:** This function does exactly what it says **Default company** - See [Working with multiple companies](https://doc-ozols-lv.translate.goog/books/ozols-desktop/page/darbs-ar-vairakiem-uznemumiem?_x_tr_sl=lv&_x_tr_tl=en&_x_tr_hl=en&_x_tr_pto=wapp) **Customer Payment Due Date:** is the default invoice payment due date for customers **Due date for incoming invoices:** This information helps you track the payment of incoming invoices **Cash discount for the customer** **Cash discount for incoming invoices** **Bank account group:** If your company has several bank accounts, here is an opportunity to specify which account to present to the client on the invoice. **Appearance of the order in the invoice:** In this section it is possible to configure the Order information included in the invoice **Appearance of the address in the invoice:** not to show or to show and if to show, then what to show **Appearance of cargo volume in the invoice:** not to show or to show and if to show, what to show ##### Features that can be turned on and off: - **Do not show date of delivery in the invoice** - **Do not show the sender and recipient on the invoice** - **Do not show base currency in currency invoices** - **Do not group Multibooking services in the invoice** - **Print orders in the invoice attachment** - **Print orders with a signature depending on configuration: 1. With scanned manager's signature and company stamp 2. A text "The invoice is prepared electronically and it is valid without a signature" 3. Order printed with space for a signature and stamp to put later manually.** - **Lock data entry** - **Print the order without a scanned signature** - **The customer issues the invoices himself (self-billing)** - **Add debt/overdraft to the current invoice** #### 3. Other conditions [](https://doc-ozols-lv.translate.goog/uploads/images/gallery/2022-07/image-1657279081478.png?_x_tr_sl=lv&_x_tr_tl=en&_x_tr_hl=en&_x_tr_pto=wapp) **Trailer types:** Freight forwarding can be added in the list: Freight transport > Lists > Vhiecle types **Document deadlines:** this list includes various carrier and driver deadlines, it is possible to add deadlines. You can add term types in the list: Freight > Lists > Term types **Examples of term types:** Driver's license, driver's code 95, driver's medical certificate, driver's professional doctor's certificate, driver's travel insurance, driver's Passport, or ID card **Shipping payment terms:** If the Partner is a Carrier on the basis of the contract, in this section it is possible to configure the terms of cooperation. #### 4. Attached files [](https://doc-ozols-lv.translate.goog/uploads/images/gallery/2022-07/image-1657280965189.png?_x_tr_sl=lv&_x_tr_tl=en&_x_tr_hl=en&_x_tr_pto=wapp)In the attached files section, you can add various files to the Partner card . For example, you can add ADR permit, CMR insurance policy, certificates, etc. files to the carrier
If, for example, you have added an ADR permit or CMR insurance to the carrier, then when preparing the Customer's order, you can easily add these documents and send them to the customer. #### 5. Sale [](https://doc-ozols-lv.translate.goog/uploads/images/gallery/2022-07/image-1657283984056.png?_x_tr_sl=lv&_x_tr_tl=en&_x_tr_hl=en&_x_tr_pto=wapp) In this section it is possible to: - Add main Manager for Client - Add two cargo managers - Specify cargo directions - Take notes related to the sale - Send an e-mail to the Partner - New Activity (CRM) - an easy-to-use customer relationship management system - New price offer - Plan the number of orders #### 6. How to find double partners? 1\. Group data by Name or VAT number. How to do it, see: [Data grouping](https://doc-ozols-lv.translate.goog/books/ozols-desktop/page/atskaites-datu-grupesana?_x_tr_sl=lv&_x_tr_tl=en&_x_tr_hl=en&_x_tr_pto=wapp) 2\. If the name of the company is entered twice, then the "Number" column will be greater than 1. Place the mouse cursor on the entry and in the list on the left you will see companies with the same names 3\. Sort the data in the list by left and check companies for similar names [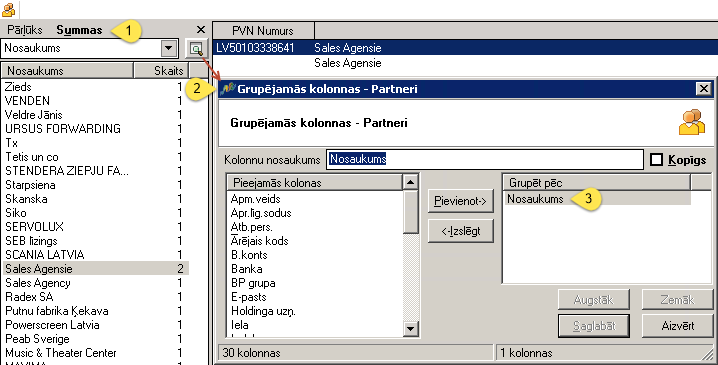](https://doc-ozols-lv.translate.goog/uploads/images/gallery/2022-07/image-1657285503673.png?_x_tr_sl=lv&_x_tr_tl=en&_x_tr_hl=en&_x_tr_pto=wapp) #### 7. Merger of double partnersIt is not uncommon for the same company to be entered multiple times. In such a case, the Merger of Partners must be performed.
**To combine the data of two companies into one:** 1\. Both companies must have the same VAT number. This condition is created for security reasons. 2\. In the list: CRM (Partners) > Lists > Partners, select Partners to be deleted and press the Del key or open the partner's card and press the command button "Merge partners with deletion" [](https://doc-ozols-lv.translate.goog/uploads/images/gallery/2022-07/image-1657284843784.png?_x_tr_sl=lv&_x_tr_tl=en&_x_tr_hl=en&_x_tr_pto=wapp) (it is the command button to the left of the Save command button) [](https://doc-ozols-lv.translate.goog/uploads/images/gallery/2022-07/image-1657285024180.png?_x_tr_sl=lv&_x_tr_tl=en&_x_tr_hl=en&_x_tr_pto=wapp) 3\. Mark the companies to be merged 4\. Press the command button "Replace and delete" [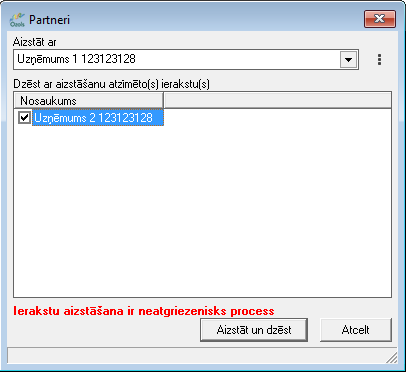](https://doc-ozols-lv.translate.goog/uploads/images/gallery/2022-07/image-1657285282896.png?_x_tr_sl=lv&_x_tr_tl=en&_x_tr_hl=en&_x_tr_pto=wapp) # 10) Tips and Tricks # Forwarders' work surface (F8)The Forwarder surface is created specifically at the request of our customers and combines functions that are directly related to the freight forwarder's work. It provides an opportunity to quickly select the necessary records with the help of filters, to plan and manage the Forwarder's work.
Forwarders work surface is **opened** by pressing **[Function key](https://doc-ozols-lv.translate.goog/link/119?_x_tr_sl=lv&_x_tr_tl=en&_x_tr_hl=en&_x_tr_pto=wapp#bkmrk-page-title) F8** , or **Main menu** > **Window** > **Forwarders desktop**
#### The forwarder desktop includes: 1. **Client orders** : All customer orders together; 2. **Services** : All services provided together; 3. **Trip/Spedition**: All Trip/Speditions and their cargo; 4. **Vehicles**: all information about your and contractors' machines; 5. ****Terminal** d**eliveries**** : Trip planning for terminal cargo; 6. **General planning**: Adding loads to flights; 7. **Delivery** : Current trips and it's cargo information; 8. **Client Analysis**: Work with clients - frequency, volumes, settlements, etc.; 9. ****Carrier a**nalysis**: Together, the directions of the carriers, profitability, etc. are visible; 10. **Comes in terminal** : Operations with incoming cargo (status, CMR labels, etc.); 11. **Takes away from the terminal** : Operations with outgoing cargo (status, CMR labels, etc.); A) **Filters** for record selection; B) Selected **Entries** . [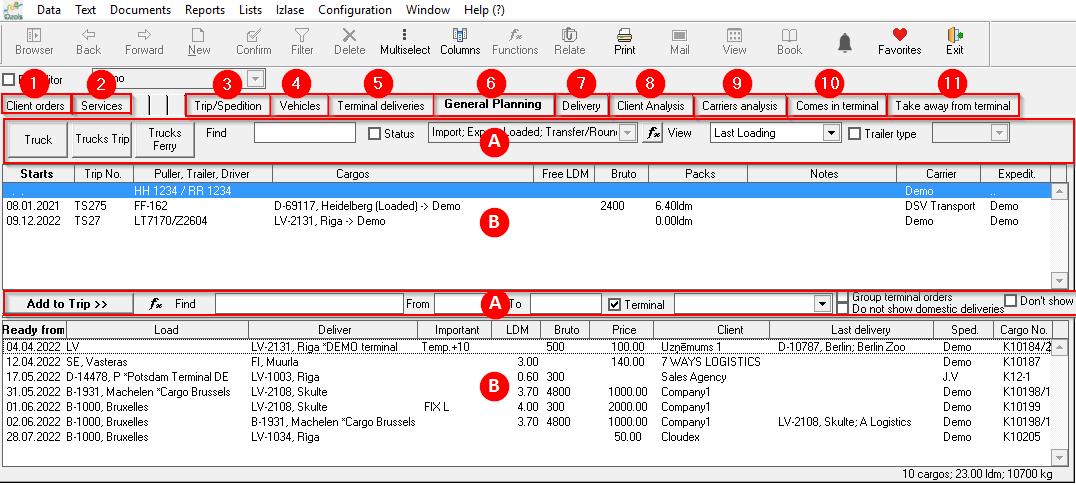](https://ozols.lv/doc/uploads/images/gallery/2022-09/image-1663581003155.png) # E-mail alertsOzols TMS already has standard automatic alerts set up by default, which are sent to the responsible persons by email. However, it is also possible to set them up individually for each user of OZOLS TMS.
##### Warnings are divided into: 1. User orders (created by user) 2. Orders available to the user (e.g. head of department) 3. Orders of all users (e.g. company manager) ##### Standard automatic warnings: 1. Prepaid invoices **are not paid until loading** 2. **The revenue** of the customer's order does not match the total amount of the issued invoices 3. Delivered cargo **has not** been **invoiced** 4. For customers whose **order** volume **decreases** or increases 5. **No prepaid** invoices issued 6. For open flights , the amount of cargo specified in the Customer's order **does not match** with what entered or left the warehouse 7. Cargo **is not added to the trip** 8. Cargo has been **added to the** trip 9. **Payment** for invoice **received** 10. Information **about debtors** ##### Additional warnings: 1. Orders for which POD ( **CMR** ) **is not sent** 2. Orders for which POD ( **CMR** ) **is not received** 3. Customers **credit limit is approaching or has already been exceeded** 4. No invoice **received** within 60 days 5. **No data entered** for own trips 6. Documents are missing **postings** 7. Unsent **invoices** 8. Cargo **is not included in the trip** 9. Permission expiry dates **for Cars/Trailers** 10. **Birthdays of** client contact persons # Order information in foreign language Because clients and suppliers are from different countries, documents often need to include information in a foreign language.Ozols TMS allows translation in client's language, for example content of invoice - **Type of service; VAT rate explanation; Payment term**
#### How to translate information into the client's language?1. Translation is possible for fields that have a symbol [](https://doc-ozols-lv.translate.goog/uploads/images/gallery/2022-04/image-1649835497887.png?_x_tr_sl=lv&_x_tr_tl=en&_x_tr_hl=en&_x_tr_pto=wapp) on the right side. It opens a window where you can enter the required translation.
#### Service type translation into a foreign language 1. **OZOLS > Payments > Lists > Service types** 2. Choose the service that needs translation 3. Press the translate button **[](https://ozols.lv/doc/uploads/images/gallery/2022-04/image-1649835497887.png)** 4. Fill in the translation in corresponding language [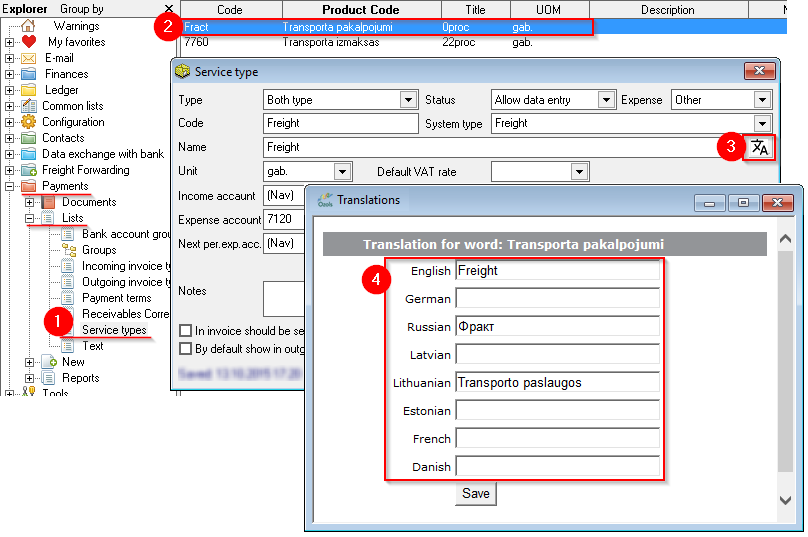](https://ozols.lv/doc/uploads/images/gallery/2022-10/image-1666616974911.png) # Client address in foreign languageOutgoing documents can include the Partner's contact details in a foreign language. To set this : 1) Indicate the preferred language of contact on the Client Card; 2) Translation of the contact details.
**Ozols > Contacts > Lists > All partners > \[Open Partner card\]** ##### Translation is available for the following fields of the Partner card: 1. Company Name 2. Contact person 3. Address [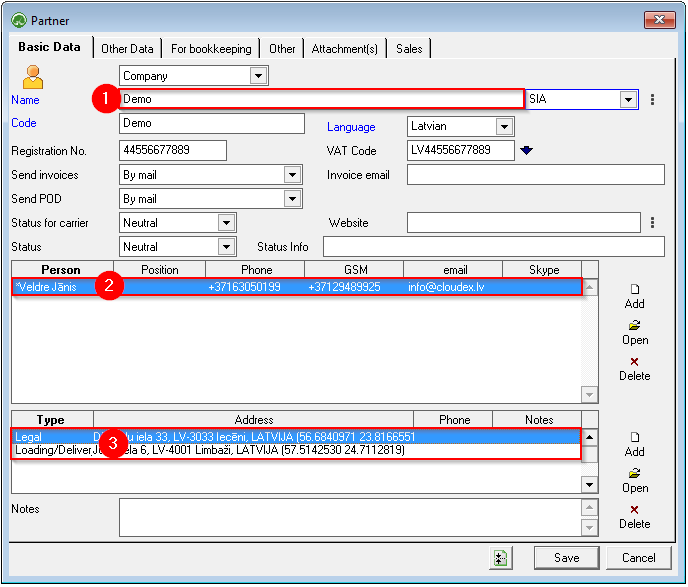](https://ozols.lv/doc/uploads/images/gallery/2022-10/image-1666604037076.png) ##### To enter a translation: 1. Select the desired field and press **the right mouse button** ; 2. A window opens in which you choose **translate** ; 3. **Make an entry** in the desired language and save. [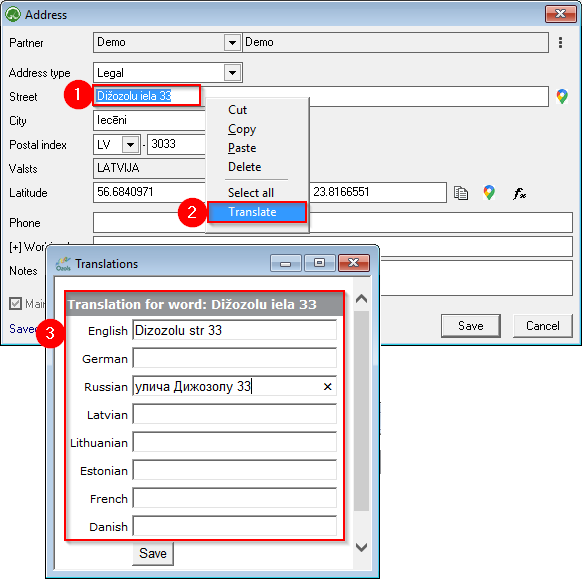](https://ozols.lv/doc/uploads/images/gallery/2022-10/image-1666604687973.png)In future outgoing documents, OZOLS TMS will insert contact information in the Partner's language.
#### See also: Information in the client's language - foreign language Contract terms in the customer's foreign language # How to change the Document's sequence numberFor documents that have automatic sequential numbering, it is possible to set the number of the next document.
1. **Open** the desired document (e.g. outgoing invoice) 2. In the **Number** window, press **the right mouse button [](https://doc-ozols-lv.translate.goog/uploads/images/gallery/2022-08/image-1660830329254.png?_x_tr_sl=lv&_x_tr_tl=en&_x_tr_hl=en&_x_tr_pto=wapp)** . A window opens - **Configure next document number** 3. In **the Continue numbering from** window, enter the desired number 4. **Save** changes [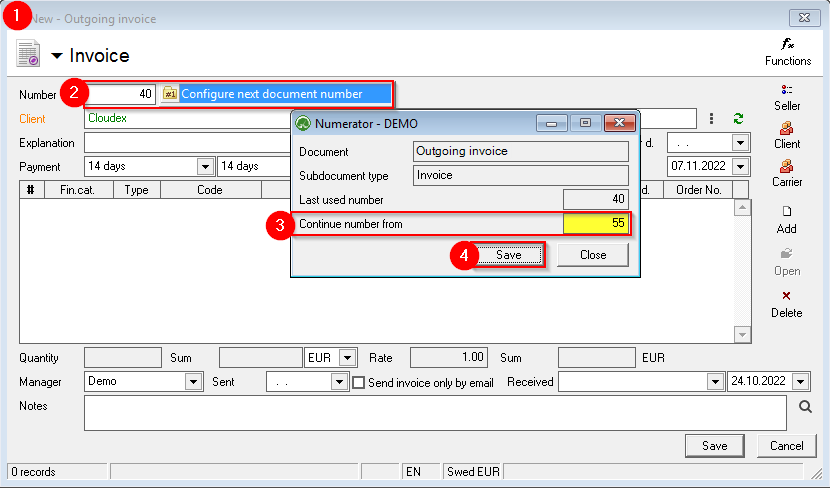](https://ozols.lv/doc/uploads/images/gallery/2022-10/image-1666606047239.png) # Work with several companiesHow to work if you have access to several company data bases?
1. [Switching between companies](#bkmrk-1.-p%C4%81rsl%C4%93g%C5%A1an%C4%81s-star) 2. [Choose the company in the New Customer's order](#bkmrk-2.-uz%C5%86%C4%93muma-izv%C4%93le-j) 3. [Set the default company for the cooperation Partner](#bkmrk-4.-defin%C4%93t-noklus%C4%93to) 4. [Access shortcut to database of the other company](#bkmrk-3.-k%C4%81-izveidotam-pas) 5. [How to change the company for a created order?](#bkmrk-5.-k%C4%81-izveidotam-pas) 6. [How to change company for incoming invoice?](#bkmrk-5.-k%C4%81-ien%C4%81ko%C5%A1ajam-r%C4%93) 7. Working with separate databases of several companies #### 1. Switching between companies 1. Help 2. Choose company 3. Select desired company 4. If you check [](https://ozols.lv/doc/uploads/images/gallery/2022-08/image-1660144023381.png) the Consolidation, the data of all companies will be displayed together. If not, they will be separated! 5. If you check [](https://ozols.lv/doc/uploads/images/gallery/2022-08/image-1660144023381.png) the option to choose the company will be given when opening OZOLS TMS [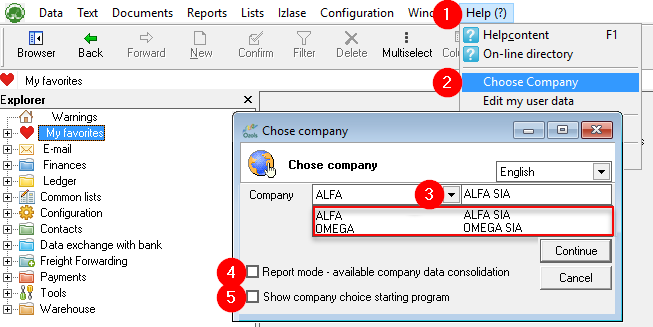](https://ozols.lv/doc/uploads/images/gallery/2022-09/image-1663836931651.png) #### 2. Choose the company in the New Customer's order [](https://ozols.lv/doc/uploads/images/gallery/2022-09/image-1663837231026.png) #### 3. Set the default company for the cooperation PartnerIt is possible for you to determine which of your companies to use by default in cooperation with the specific Partner.
1. Open **the Partner card**; 2. Open the **Other data** section; 3. Select **Default Company**.[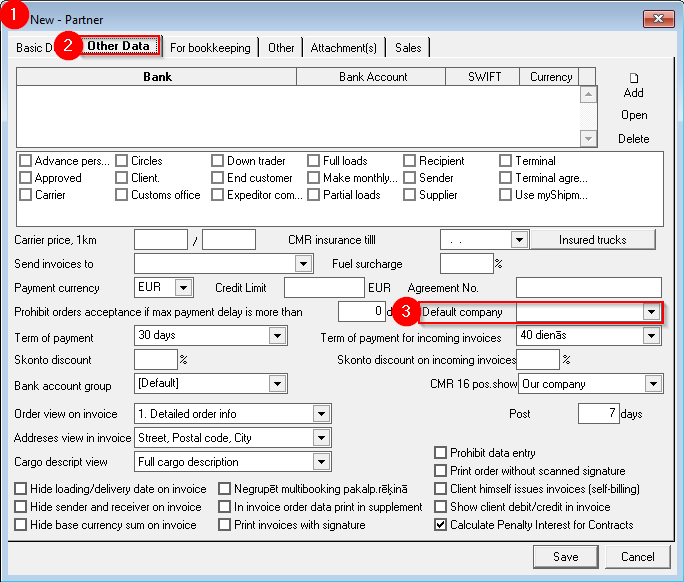](https://ozols.lv/doc/uploads/images/gallery/2022-09/image-1663838556445.png) #### 4. Access shortcut to database of the other company If you have two or more companies with separate OZOLS TMS access , it is possible to create a shortcut to each of these companies. Instructions can be found [here](https://doc-ozols-lv.translate.goog/books/ozols-desktop/page/piekluves-iscels-uz-otra-uznemuma-datu-bazi-ozols-tms?_x_tr_sl=lv&_x_tr_tl=en&_x_tr_hl=en&_x_tr_pto=wapp) . #### 5. How to change the company for a created order?If you have several companies available and you have entered the Customer's order and/or Trip/Expedition **to the wrong company**
1. Open **the Customer's order or Trip/Spedition** 2. Press **Shift +F4** 3. **Change** company 4. Click the **Edit button** 5. **!!!** Close **the Customer's order or Trip/Spedition by** pressing the **Cancel button !!! [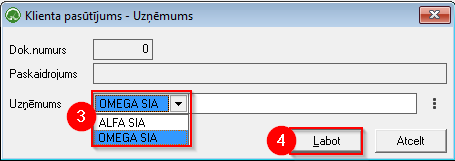](https://doc-ozols-lv.translate.goog/uploads/images/gallery/2022-08/image-1660547234177.png?_x_tr_sl=lv&_x_tr_tl=en&_x_tr_hl=en&_x_tr_pto=wapp) [](https://doc-ozols-lv.translate.goog/uploads/images/gallery/2022-08/image-1660546954868.png?_x_tr_sl=lv&_x_tr_tl=en&_x_tr_hl=en&_x_tr_pto=wapp)If the Invoice is also already issued from the wrong company, it must be deleted and a new Invoice created after correcting the company (shift+F4).
#### 6. How to change company for incoming invoice? 1. Open **the Customer's Incoming Invoice** 2. Press **Shift +F4** 3. **Change** company 4. Click the **Edit button** 5. **!!!** Close **the Incoming invoice by** pressing the **Close button!!!** [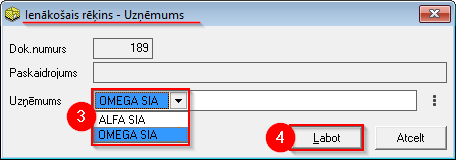](https://doc-ozols-lv.translate.goog/uploads/images/gallery/2022-08/image-1660547135664.png?_x_tr_sl=lv&_x_tr_tl=en&_x_tr_hl=en&_x_tr_pto=wapp) [](https://doc-ozols-lv.translate.goog/uploads/images/gallery/2022-08/image-1660546954868.png?_x_tr_sl=lv&_x_tr_tl=en&_x_tr_hl=en&_x_tr_pto=wapp) # Access shortcut to another company's database OZOLS TMSIf you have **two or more companies with separate access to OZOLS TMS** , it is possible to create a shortcut to each of these companies. **Benefits**: 1. You only need **to enter a password when** opening company database; 2. **Open and work with several companies at the same time.**
1\) press search on the Windows desktop [](https://doc-ozols-lv.translate.goog/uploads/images/gallery/2022-06/image-1654508054375.png?_x_tr_sl=lv&_x_tr_tl=en&_x_tr_hl=en&_x_tr_pto=wapp); **2) OZOLS** is written in the search field ; 3\) Select **Open file location** ; [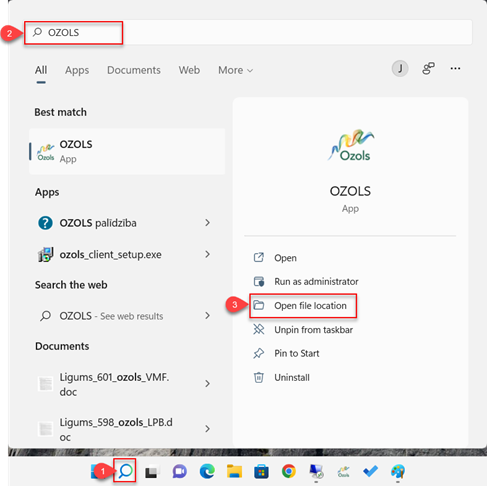](https://doc-ozols-lv.translate.goog/uploads/images/gallery/2022-06/image-1654508099489.png?_x_tr_sl=lv&_x_tr_tl=en&_x_tr_hl=en&_x_tr_pto=wapp) 4\) Select Open file location again until a folder opens where you can see a file called OZOLS.EXE [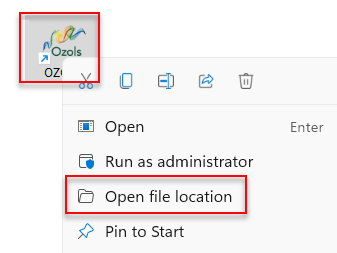](https://doc-ozols-lv.translate.goog/uploads/images/gallery/2022-06/image-1654508127686.png?_x_tr_sl=lv&_x_tr_tl=en&_x_tr_hl=en&_x_tr_pto=wapp) 5\) Create **a new Folder** with the name of the desired company. 6\) **Copy** the OZOLS.EXE file and place the copy in the **newly created folder** . **7) Create a shortcut** to the new OZOLS.EXE file on the desktop and **rename** it to fit the name of the desired company. 8\) Open Functions with the right mouse button and select **Properties.** [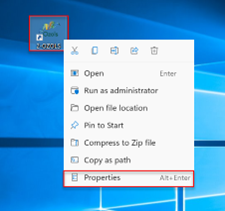](https://doc-ozols-lv.translate.goog/uploads/images/gallery/2022-06/image-1654678466131.png?_x_tr_sl=lv&_x_tr_tl=en&_x_tr_hl=en&_x_tr_pto=wapp) 9\) In the **Target** field , add the already existing record with server, company database and user information: 1. **Server** – Name of the server on which the company OZOLS TMS database is located; 2. **Database** – the username assigned to the company in the Ozols database; 3. **2** - the number two, which must be entered before the user's name; 4. **User** – the username assigned to your Ozols user account.**There must be a space** between these entries !
[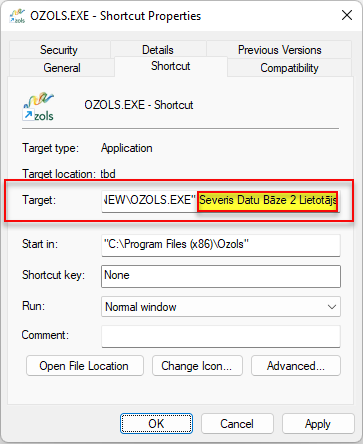](https://doc-ozols-lv.translate.goog/uploads/images/gallery/2022-06/image-1654693980944.png?_x_tr_sl=lv&_x_tr_tl=en&_x_tr_hl=en&_x_tr_pto=wapp)When the record has been updated, close the window by pressing **Apply** and **Ok** .
**Congratulations** ! You have created a separate access to the company account in OZOLS TMS! **Now you can simultaneously open all companies that are available to you in** OZOLS TMS on your computer.
# How to Delete ferry ticket To delete an incorrectly created ferry ticket: 1. Open the incorrect Ferry Ticket through Trip/Spedition [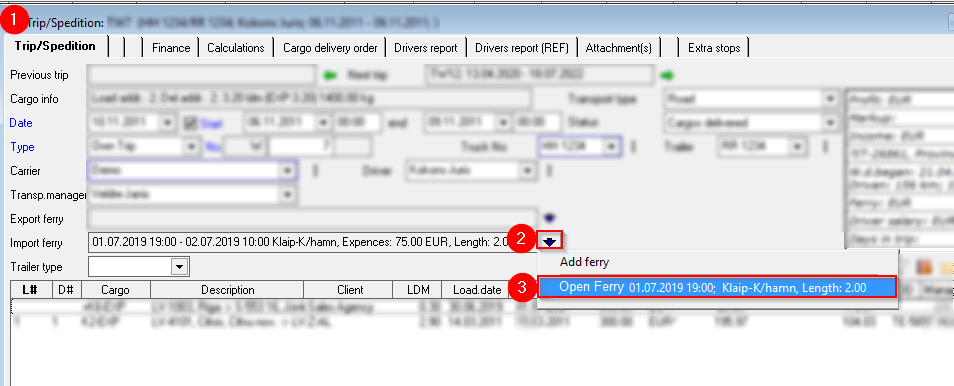](https://ozols.lv/doc/uploads/images/gallery/2022-09/image-1663588835313.png) 2. **Delete the Trip number from ticket** and **Save** changes. [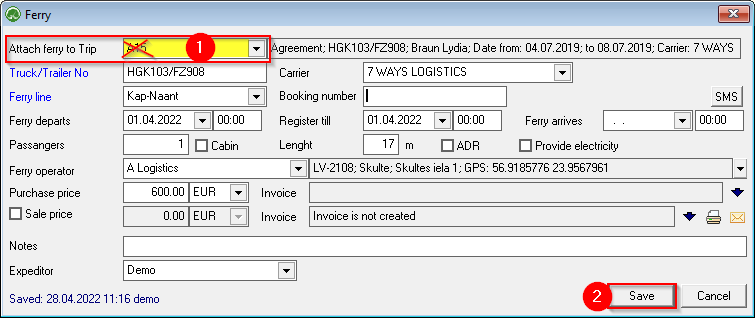](https://ozols.lv/doc/uploads/images/gallery/2022-10/image-1666619489813.png) 3. **OZOLS > cargo transportation > Reports > Ferry tickets** 4. **Find** the record you want, use the filter if necessary[](https://doc-ozols-lv.translate.goog/uploads/images/gallery/2022-05/image-1651585606852.png?_x_tr_sl=lv&_x_tr_tl=en&_x_tr_hl=en&_x_tr_pto=wapp) 5. Press **Delete** [](https://doc-ozols-lv.translate.goog/uploads/images/gallery/2022-08/image-1661511700515.png?_x_tr_sl=lv&_x_tr_tl=en&_x_tr_hl=en&_x_tr_pto=wapp) 6. **Confirm** the deletion of the record [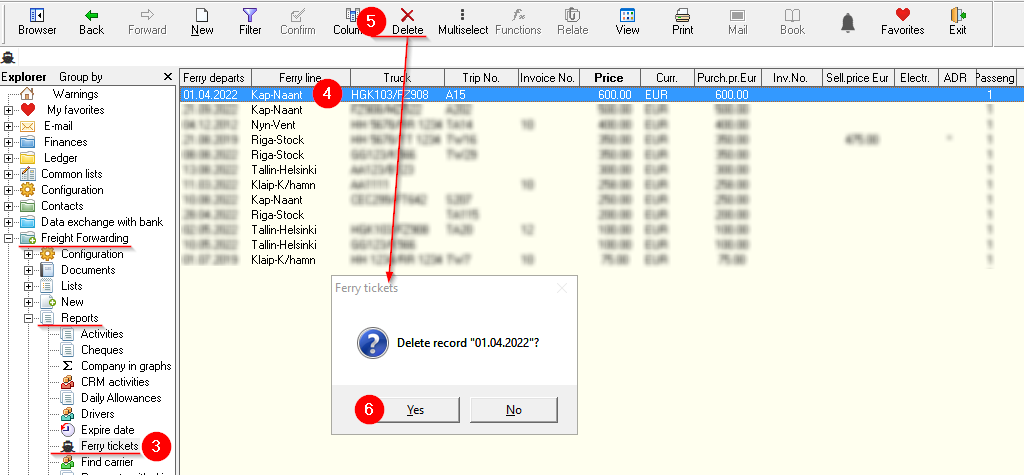](https://ozols.lv/doc/uploads/images/gallery/2022-10/image-1666620132769.png)