# CLOUDEX TMS - ENGLISH

# 1. Settings

# E-mail settings

**To send emails** from Cloudex TMS:  
1\) Click on the Your User Name icon   
2\) Select the "My Profile" menu

[![image-1742462603046.png](https://ozols.lv/doc/uploads/images/gallery/2025-03/scaled-1680-/image-1742462603046.png)](https://ozols.lv/doc/uploads/images/gallery/2025-03/image-1742462603046.png)

**In the "Email password" field:**  
1\) Enter your email password  
2\) Click the "Save" button<svg class="svg-icon" data-icon="link" role="presentation" viewbox="0 0 24 24" xmlns="http://www.w3.org/2000/svg"></svg>

[![image-1742462758441.png](https://ozols.lv/doc/uploads/images/gallery/2025-03/scaled-1680-/image-1742462758441.png)](https://ozols.lv/doc/uploads/images/gallery/2025-03/image-1742462758441.png)

# Create google email password

1\) Open google account and login:  
[https://myaccount.google.com/](https://myaccount.google.com/)

<div id="bkmrk-2%29-open-dro%C5%A1%C4%ABba%2Fsecu">2) Open **Drošība/Security**<svg class="svg-icon" data-icon="link" role="presentation" viewbox="0 0 24 24" xmlns="http://www.w3.org/2000/svg"></svg></div>[![image-1761208935394.png](https://ozols.lv/doc/uploads/images/gallery/2025-10/scaled-1680-/image-1761208935394.png)](https://ozols.lv/doc/uploads/images/gallery/2025-10/image-1761208935394.png)

<p class="callout warning">If 2-step verification is not available in the section, your company's email administrator must first enable it: [instrukction how to do it read here](https://ozols.lv/doc/link/382#bkmrk-uz%C5%86%C4%93mumiem-ir-j%C4%81b%C5%ABt-)</p>

**3) Ieslēgt "2-pakāpju verifikāciju / 2-Step verification"**

[![image-1742982231557.png](https://ozols.lv/doc/uploads/images/gallery/2025-03/scaled-1680-/image-1742982231557.png)](https://ozols.lv/doc/uploads/images/gallery/2025-03/image-1742982231557.png)
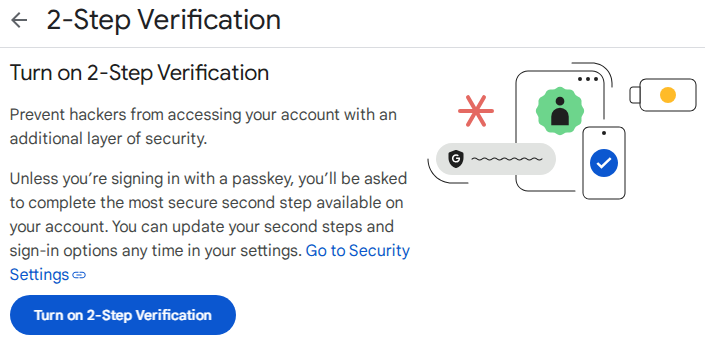
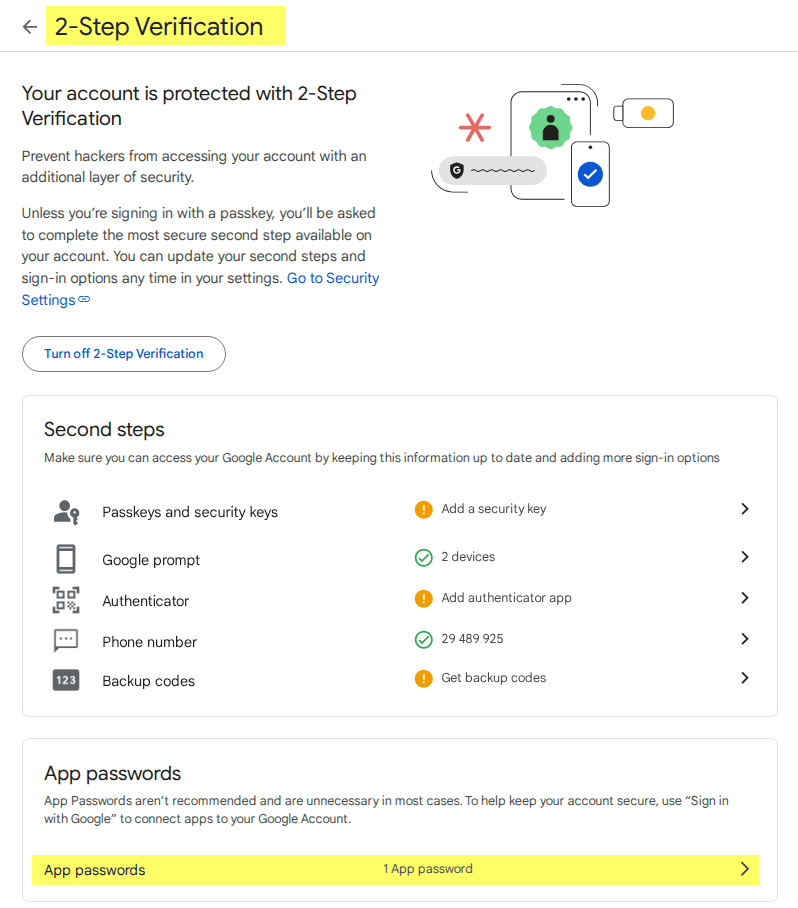
**4) Create a password/key for emails**

<p class="callout warning">If there is no "App passwords" section in the Two-step verification / 2-step verification section, you must exit the page and re-enter it. Or use the link **[https://myaccount.google.com/apppasswords](https://myaccount.google.com/apppasswords)**</p>

[![image-1761209173707.png](https://ozols.lv/doc/uploads/images/gallery/2025-10/scaled-1680-/image-1761209173707.png)](https://ozols.lv/doc/uploads/images/gallery/2025-10/image-1761209173707.png)

**5) Create password**

[![image-1761209442553.png](https://ozols.lv/doc/uploads/images/gallery/2025-10/scaled-1680-/image-1761209442553.png)](https://ozols.lv/doc/uploads/images/gallery/2025-10/image-1761209442553.png)
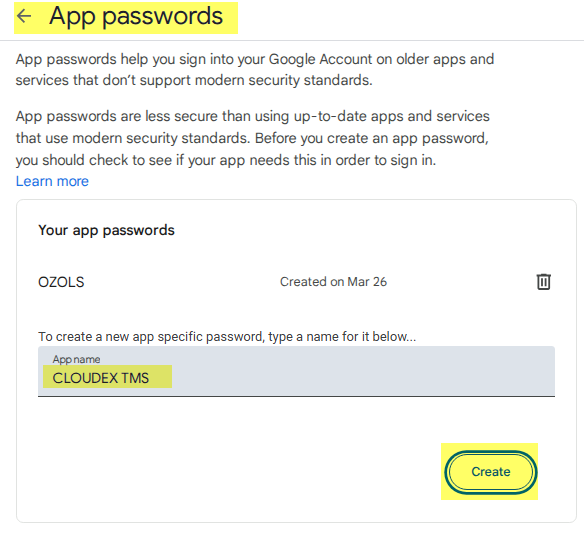
6\) Copy new password and enter it in OZOLS or CLOUDEX TMS

Instructions for entering your email password in Ozols: [https://ozols.lv/doc/books/ozols-tms-english/page/5-e-mail-settings](https://ozols.lv/doc/books/ozols-tms-english/page/5-e-mail-settings)

Instructions for entering your email password in CLOUDEX TMS: [https://ozols.lv/doc/books/cloudex-tms-english/page/e-mail-settings](https://ozols.lv/doc/books/cloudex-tms-english/page/e-mail-settings)

[![image-1761209548234.png](https://ozols.lv/doc/uploads/images/gallery/2025-10/scaled-1680-/image-1761209548234.png)](https://ozols.lv/doc/uploads/images/gallery/2025-10/image-1761209548234.png)
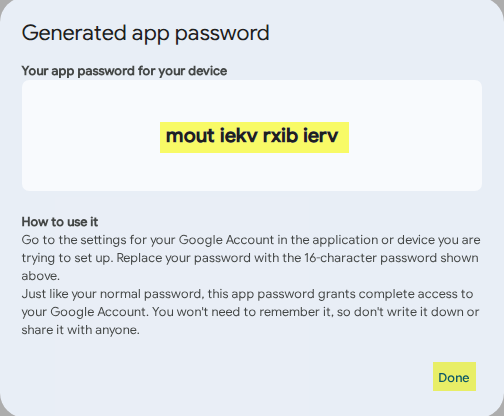
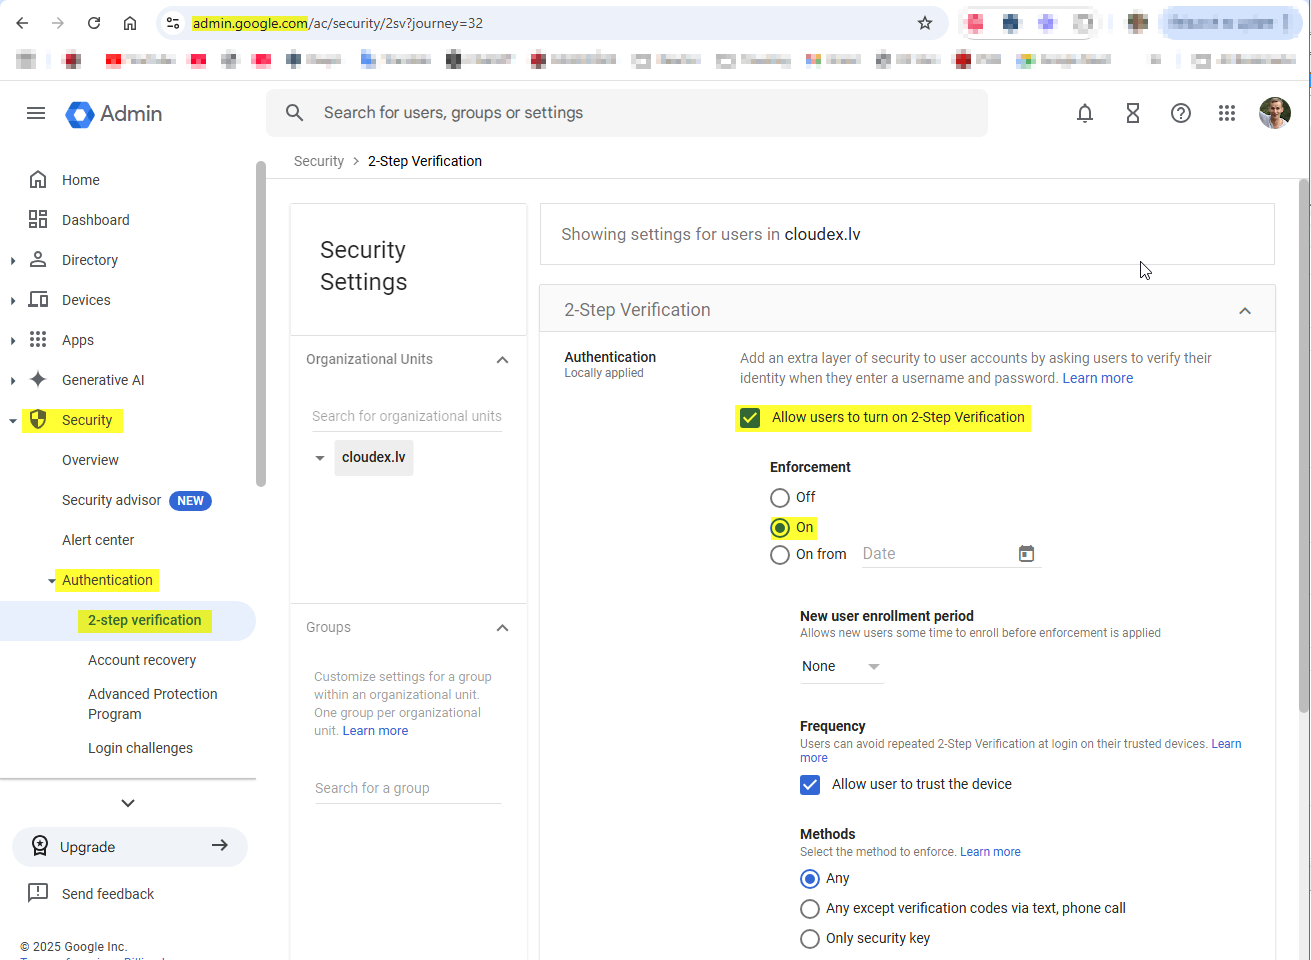
#### Companies must have the option enabled that is available

[Instrukction from google](https://support.google.com/a/answer/9176657?product_name=UnuFlow&visit_id=01742980293793-8471960249317013911&rd=1&src=supportwidget0)

[![image-1742980788837.png](https://ozols.lv/doc/uploads/images/gallery/2025-03/scaled-1680-/image-1742980788837.png)](https://ozols.lv/doc/uploads/images/gallery/2025-03/image-1742980788837.png)
# Office365: HOW TO GET TenantId, ClientId and ClientSecret

If you use Microsoft office 365 for email sending. Your company Microsoft admin need to get following settings from **Azure AD Application**

- **Directory (Tenant) ID**
- **Application (Client) ID**
- **Client Secret Value**

These three values are required for integrating CLOUDEX TMS with Microsoft Graph using OAuth2.

---

#### **1️⃣ Sign in to Azure Portal**

Open: [https://portal.azure.com<svg class="block h-[0.75em] w-[0.75em] stroke-current stroke-[0.75]" data-rtl-flip="" fill="currentColor" height="20" viewbox="0 0 20 20" width="20" xmlns="http://www.w3.org/2000/svg"></svg>](https://portal.azure.com)Sign in with a Microsoft 365 **Global Admin** or **Application Administrator** account.

---

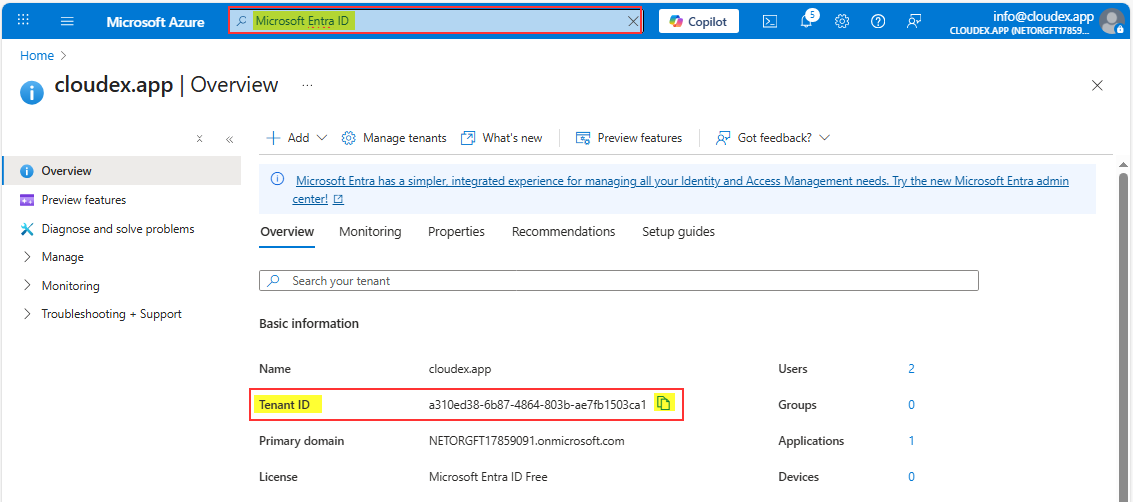
#### **2️⃣ Open “Microsoft Entra ID” (Azure AD)**

Left menu → **Microsoft Entra ID**  
(or search “Entra ID” in the top search bar)

[![image-1764595464188.png](https://ozols.lv/doc/uploads/images/gallery/2025-12/scaled-1680-/image-1764595464188.png)](https://ozols.lv/doc/uploads/images/gallery/2025-12/image-1764595464188.png)
<div id="bkmrk--2"><div></div></div>---

#### **3️⃣ Create a new App Registration**

1. Left menu: **App registrations**
2. Click **New registration**

[![image-1764595545977.png](https://ozols.lv/doc/uploads/images/gallery/2025-12/scaled-1680-/image-1764595545977.png)](https://ozols.lv/doc/uploads/images/gallery/2025-12/image-1764595545977.png)

[![image-1764595721522.png](https://ozols.lv/doc/uploads/images/gallery/2025-12/scaled-1680-/image-1764595721522.png)](https://ozols.lv/doc/uploads/images/gallery/2025-12/image-1764595721522.png)

<div id="bkmrk-url-type-must-be-%22we"><div>URL type must be "<span style="color: #ff0000;">Web" NOT "Single page application"</span></div><div><span style="color: #ff0000;">Looks like beter to register as Single tenant. If you register as multi tenant then can be so than you need to enter CLOUDEX <span data-olk-copy-source="MessageBody">MpnId 7086574</span> </span></div><div></div><div>**Fill the form:**</div></div><div id="bkmrk-field-value-name-clo"><div><table class="w-fit min-w-(--thread-content-width)" data-end="1440" data-start="1145"><thead data-end="1162" data-start="1145"><tr data-end="1162" data-start="1145"><th data-col-size="sm" data-end="1153" data-start="1145" style="width: 86.8594px;">Field</th><th data-col-size="md" data-end="1162" data-start="1153" style="width: 811.531px;">Value</th></tr></thead><tbody data-end="1440" data-start="1181"><tr data-end="1239" data-start="1181"><td data-col-size="sm" data-end="1192" data-start="1181" style="width: 86.8594px;">**Name**</td><td data-col-size="md" data-end="1239" data-start="1192" style="width: 811.531px;">CLOUDEX TMS Email Integration (or any name)</td></tr><tr data-end="1335" data-start="1240"><td data-col-size="sm" data-end="1270" data-start="1240" style="width: 86.8594px;">**Supported account types**</td><td data-col-size="md" data-end="1335" data-start="1270" style="width: 811.531px;">✔️ **Accounts in any organizational directory (multitenant)**</td></tr><tr data-end="1440" data-start="1336"><td data-col-size="sm" data-end="1355" data-start="1336" style="width: 86.8594px;">**Redirect URI**</td><td data-col-size="md" data-end="1440" data-start="1355" style="width: 811.531px;">Select **Web** → Enter your redirect:   
`https://my.cloudex.app/<strong>YourCompanyCode</strong>/Services/Office365Callback.aspx`

<span style="background-color: #ffff99;">1) Replace `<strong>YourCompanyCode</strong>` with your web app CompanyCode</span>

<span style="background-color: #ffff99;">2) Redirect URL is case-sensitive</span>``

</td></tr></tbody></table>

</div></div>Click **Register**.

---

#### **4️⃣ Get the Tenant ID and Client ID**

After creation, you will be redirected to the app’s **Overview** page.  
Here you will see:  
**✔ Directory (Tenant) ID**  
**✔ Application (Client) ID**

[![image-1764596895074.png](https://ozols.lv/doc/uploads/images/gallery/2025-12/scaled-1680-/image-1764596895074.png)](https://ozols.lv/doc/uploads/images/gallery/2025-12/image-1764596895074.png)

<div id="bkmrk-copy-them-and-save."><div>Copy them and save.</div></div>You already have **2/3 values**.

---

#### **5️⃣ Create Client Secret**

Side menu → **Certificates &amp; secrets**

1. Click **New client secret**
2. Enter a name: `CLOUDEX Secret`
3. Choose expiration:
    
    
    - 6 months (not recommended)
    - 12 months
    - **24 months** (recommended)
    - Or “Custom”
4. Click **Add**

[![image-1764596973920.png](https://ozols.lv/doc/uploads/images/gallery/2025-12/scaled-1680-/image-1764596973920.png)](https://ozols.lv/doc/uploads/images/gallery/2025-12/image-1764596973920.png)

[![image-1765269172104.png](https://ozols.lv/doc/uploads/images/gallery/2025-12/scaled-1680-/image-1765269172104.png)](https://ozols.lv/doc/uploads/images/gallery/2025-12/image-1765269172104.png)

<div id="bkmrk-important-%E2%9A%A0%EF%B8%8F"><div><span style="color: #222222; font-size: 1.666em; font-weight: 400;">IMPORTANT ⚠️</span></div></div>**Copy the Client Secret VALUE immediately.**  
You will never be able to see it again later.

Store it securely (Azure Key Vault, password manager, etc).

Now you have:

- **ClientId**
- **TenantId**
- **ClientSecret Value**

---

#### **6️⃣ Add Required API Permissions**

Side menu → **API permissions**

Click:

- **Add a permission**
- **Microsoft Graph**
- **Delegated permissions**

Search + select:

✔ `Mail.Send`  
✔ `Mail.ReadWrite<br data-end="2524" data-start="2521"></br>✔ User.Read`  
✔ `offline_access`

Then click **Add permissions**.

Then click **Grant admin consent**.

[![image-1779801024445.png](https://ozols.lv/doc/uploads/images/gallery/2026-05/scaled-1680-/image-1779801024445.png)](https://ozols.lv/doc/uploads/images/gallery/2026-05/image-1779801024445.png)

Can be in new interface need to choose Microsoft Graph API

[![image-1768998214141.png](https://ozols.lv/doc/uploads/images/gallery/2026-01/scaled-1680-/image-1768998214141.png)](https://ozols.lv/doc/uploads/images/gallery/2026-01/image-1768998214141.png)

---

#### **7️⃣ Final Check: Authentication Settings**

Side menu → **Authentication**

Ensure:

✔ Your redirect URI is correct  
✔ “Allow public client flows” is **OFF**  
✔ “Access tokens” and “ID tokens” are **ON**

[![image-1764598136406.png](https://ozols.lv/doc/uploads/images/gallery/2025-12/scaled-1680-/image-1764598136406.png)](https://ozols.lv/doc/uploads/images/gallery/2025-12/image-1764598136406.png)

<div id="bkmrk--16"><div></div></div>#### 🎉 DONE — Values ready to use

You now have everything:

<div id="bkmrk-parameter-where-to-f"><div><table class="w-fit min-w-(--thread-content-width)" data-end="3236" data-start="2994"><thead data-end="3026" data-start="2994"><tr data-end="3026" data-start="2994"><th data-col-size="sm" data-end="3006" data-start="2994">Parameter</th><th data-col-size="sm" data-end="3026" data-start="3006">Where to find it</th></tr></thead><tbody data-end="3236" data-start="3059"><tr data-end="3116" data-start="3059"><td data-col-size="sm" data-end="3074" data-start="3059">**TenantId**</td><td data-col-size="sm" data-end="3116" data-start="3074">App → Overview → Directory (tenant) ID</td></tr><tr data-end="3176" data-start="3117"><td data-col-size="sm" data-end="3132" data-start="3117">**ClientId**</td><td data-col-size="sm" data-end="3176" data-start="3132">App → Overview → Application (client) ID</td></tr><tr data-end="3236" data-start="3177"><td data-col-size="sm" data-end="3196" data-start="3177">**ClientSecret**</td><td data-col-size="sm" data-end="3236" data-start="3196">App → Certificates &amp; Secrets → **Value**</td></tr></tbody></table>

</div></div>#### Problem solution

In case you have any problems sending out emails from CLOUDEX TMS or Ozols you can run **"Diagnose and solve problems"** tool

[![image-1768999877635.png](https://ozols.lv/doc/uploads/images/gallery/2026-01/scaled-1680-/image-1768999877635.png)](https://ozols.lv/doc/uploads/images/gallery/2026-01/image-1768999877635.png)

# Microsoft email configuration

#### 1. Enable “Authenticated SMTP” for the mailbox

Open the Microsoft 365 Admin Center: [ https://admin.microsoft.com](https://admin.microsoft.com)

### Steps to enable Authenticated SMTP

[![image-1764062017876.png](https://ozols.lv/doc/uploads/images/gallery/2025-11/scaled-1680-/image-1764062017876.png)](https://ozols.lv/doc/uploads/images/gallery/2025-11/image-1764062017876.png)

1. In the left menu, click **Users → Active users**.
2. Click on the user/mailbox you will use for CLOUDEX TMS.
3. In the user details pane, go to the **Mail** tab.
4. Click **Manage email apps** (or *Email apps*).
5. In the list of email apps, find **Authenticated SMTP** and make sure the checkbox or toggle is **ON / enabled**.
6. Click **Save**.

<div id="bkmrk-%E2%9A%A0%EF%B8%8F"><div>⚠️</div></div>#### 2. Create an app password (if MFA is enabled)

If Multi-Factor Authentication (MFA) is enabled for the mailbox you use (recommended), SMTP cannot use your normal password. In that case you must create a special **app password** and use it in CLOUDEX TMS.

<div id="bkmrk-%F0%9F%94%90-if-mfa-is-not-enab"><div>🔐</div><div>If MFA is **not** enabled for this user, you can use the normal account password instead of an app password. However, using MFA + app password is more secure and recommended.</div></div>### Instruction to generate an app password

[https://ozols.lv/doc/books/ozols-tms-english/page/8-e-mail-server-configuration-for-work-with-ozols-tms](https://ozols.lv/doc/books/ozols-tms-english/page/8-e-mail-server-configuration-for-work-with-ozols-tms)

#### ❗ What to do if “Authenticated SMTP” switch does NOT appear

1. Turn off Checkbox "Turn off SMTP AUTH protocol for your organization""
2. Turn on use of old legacy TLS clients.
3. After enabling, wait **3–5 minutes**, then check the user mailbox again.

[![image-1764064038680.png](https://ozols.lv/doc/uploads/images/gallery/2025-11/scaled-1680-/image-1764064038680.png)](https://ozols.lv/doc/uploads/images/gallery/2025-11/image-1764064038680.png)

#### **Confirm the mailbox type (SMTP is NOT available for some accounts)**

The **Authenticated SMTP** switch is available ONLY for:

- User mailboxes with Exchange Online Plan 1 or 2
- Shared mailboxes
- Microsoft 365 E3/E5 Business Standard/Business Premium accounts

It will **NOT appear** for:

❌ Mailboxes with no Exchange license  
❌ Accounts converted to *Microsoft 365 Groups*  
❌ Mailboxes that were soft-deleted or recently restored  
❌ Resource mailboxes (Room / Equipment)

### How to check:

In Microsoft 365 Admin Center:

**Users → Active users → Select user → Licenses and Apps**

Make sure:  
✔ **Exchange Online** is enabled

If Exchange Online is missing → SMTP will NOT be available.

---

#### **Ensure modern authentication SMTP is not forced**

Microsoft sometimes blocks SMTP for users with strict conditional access.

### Check these items:

- Conditional Access policy requiring MFA for all protocols
- Legacy auth blocked at the tenant level
- Security defaults enabled (this disables SMTP)

### To check Security Defaults:

1. Go to Azure Portal  
    [https://portal.azure.com<svg class="block h-[0.75em] w-[0.75em] stroke-current stroke-[0.75]" data-rtl-flip="" fill="currentColor" height="20" viewbox="0 0 20 20" width="20" xmlns="http://www.w3.org/2000/svg"></svg>](https://portal.azure.com)
2. Search for **Azure Active Directory**
3. Open **Properties**
4. Click **Manage Security Defaults**
5. If **Security defaults = Enabled**, you must turn it **OFF** to allow SMTP.

> After disabling, wait up to 15 minutes, then check Manage Email Apps again.

---

#### **If none of the above works – your tenant may have SMTP permanently disabled**

Microsoft has been turning off SMTP AUTH for security reasons.  
Admins must manually re-enable it per mailbox.

### To force-enable for a specific mailbox (Admin only):

1. Go to:  
    [https://admin.exchange.microsoft.com<svg class="block h-[0.75em] w-[0.75em] stroke-current stroke-[0.75]" data-rtl-flip="" fill="currentColor" height="20" viewbox="0 0 20 20" width="20" xmlns="http://www.w3.org/2000/svg"></svg>](https://admin.exchange.microsoft.com)
2. Navigate to:  
    **Users → Active Users → select user → Mail → Email apps → Manage**
3. If still missing, enable via PowerShell:

<div id="bkmrk-set-casmailbox--iden"><div><div><div></div></div></div><div>`<span class="hljs-built_in">Set-CASMailbox</span> <span class="hljs-literal">-Identity</span> user@domain.com <span class="hljs-literal">-SmtpClientAuthenticationEnabled</span> <span class="hljs-variable">$true</span>`</div></div>*(Admins only — if customer cannot run PowerShell, you can give them this line to pass to their IT provider.)*

---

#### **Summary: Why SMTP may not appear**

<div id="bkmrk-reason-solution-tena"><div><table class="w-fit min-w-(--thread-content-width)" data-end="4368" data-start="3883"><thead data-end="3904" data-start="3883"><tr data-end="3904" data-start="3883"><th data-col-size="md" data-end="3892" data-start="3883">Reason</th><th data-col-size="md" data-end="3904" data-start="3892">Solution</th></tr></thead><tbody data-end="4368" data-start="3927"><tr data-end="4016" data-start="3927"><td data-col-size="md" data-end="3955" data-start="3927">Tenant-wide SMTP disabled</td><td data-col-size="md" data-end="4016" data-start="3955">Enable under Exchange Admin Center → Settings → Mail flow</td></tr><tr data-end="4086" data-start="4017"><td data-col-size="md" data-end="4043" data-start="4017">New UI hides the option</td><td data-col-size="md" data-end="4086" data-start="4043">Use Classic Exchange Admin Center (ECP)</td></tr><tr data-end="4133" data-start="4087"><td data-col-size="md" data-end="4116" data-start="4087">No Exchange Online license</td><td data-col-size="md" data-end="4133" data-start="4116">Add a license</td></tr><tr data-end="4191" data-start="4134"><td data-col-size="md" data-end="4162" data-start="4134">Security Defaults enabled</td><td data-col-size="md" data-end="4191" data-start="4162">Disable Security Defaults</td></tr><tr data-end="4255" data-start="4192"><td data-col-size="md" data-end="4236" data-start="4192">Legacy auth blocked by Conditional Access</td><td data-col-size="md" data-end="4255" data-start="4236">Update policies</td></tr><tr data-end="4324" data-start="4256"><td data-col-size="md" data-end="4283" data-start="4256">Mailbox type unsupported</td><td data-col-size="md" data-end="4324" data-start="4283">Use a licensed user or shared mailbox</td></tr><tr data-end="4368" data-start="4325"><td data-col-size="md" data-end="4344" data-start="4325">Needs PowerShell</td><td data-col-size="md" data-end="4368" data-start="4344">Run `Set-CASMailbox`</td></tr></tbody></table>

</div></div>

# Order conditions update

In order to edit Order for carrier rules or Order for Client rules Click on Your name &gt; Settings &gt; Classifications &gt; Agreement rules &gt; Edit

[![image-1765206565501.png](https://ozols.lv/doc/uploads/images/gallery/2025-12/scaled-1680-/image-1765206565501.png)](https://ozols.lv/doc/uploads/images/gallery/2025-12/image-1765206565501.png)

# Set up Office365 e-mail

If your email provider is Microsoft Office365 You need o set up email sending following this instruction

1\) Click on your name  
2\) Choose My user profile

[![image-1765283087826.png](https://ozols.lv/doc/uploads/images/gallery/2025-12/scaled-1680-/image-1765283087826.png)](https://ozols.lv/doc/uploads/images/gallery/2025-12/image-1765283087826.png)

Press comand button \[Office365 setup\]

[![image-1765283215435.png](https://ozols.lv/doc/uploads/images/gallery/2025-12/scaled-1680-/image-1765283215435.png)](https://ozols.lv/doc/uploads/images/gallery/2025-12/image-1765283215435.png)

Then press command button \[Connect to Microsoft\]

[![image-1765283367634.png](https://ozols.lv/doc/uploads/images/gallery/2025-12/scaled-1680-/image-1765283367634.png)](https://ozols.lv/doc/uploads/images/gallery/2025-12/image-1765283367634.png)

Login with your email and follow further instructions

# HOW TO CHANGE APPLICATION Callback URL in Azure Portal

#### **1️⃣ Open Azure Portal**

Go to: [https://portal.azure.co](https://portal.azure.com)m  
  
Sign in using a **Global Administrator** or **Application Administrator** account.

---

#### **2️⃣ Open *Microsoft Entra ID***

1\) In the left menu, click: **Microsoft Entra ID or Search for App registrations** 2) Open All Applications  
3\) Open CLOUDEX TMS application

[![image-1765285865602.png](https://ozols.lv/doc/uploads/images/gallery/2025-12/scaled-1680-/image-1765285865602.png)](https://ozols.lv/doc/uploads/images/gallery/2025-12/image-1765285865602.png)

Choose Redirect URLs

[![image-1765286018399.png](https://ozols.lv/doc/uploads/images/gallery/2025-12/scaled-1680-/image-1765286018399.png)](https://ozols.lv/doc/uploads/images/gallery/2025-12/image-1765286018399.png)

Press edit button and set correct URL

!!!! In <span style="color: #ff0000;">YourCompanyCode</span> you should place your company code https://my.cloudex.app/<span style="color: #ff0000;">YourCompanyCode</span>/Services/Office365Callback.aspx

[![image-1765286250615.png](https://ozols.lv/doc/uploads/images/gallery/2025-12/scaled-1680-/image-1765286250615.png)](https://ozols.lv/doc/uploads/images/gallery/2025-12/image-1765286250615.png)

<span style="color: #ff0000;">Redirect URL should be under Web NOT under SIngle-application</span>

# 2. Client orders

# Order registration

1. Registering a new customer order
2. New order window
3. Adding a new customer
4. Filling in a new customer card with VAT number

---

### 1. Registering a New Customer Order

1. Click **"New"** in the top navigation bar.
2. From the additional functions, select **"Customer Order"**.

Required sequence: **New → Customer Order**. A window will open where you need to enter the order information accordingly.

[![image-1719818133947.png](https://ozols.lv/doc/uploads/images/gallery/2024-07/scaled-1680-/image-1719818133947.png)](https://ozols.lv/doc/uploads/images/gallery/2024-07/image-1719818133947.png)

---

### 2. New Order Window

1. Customer order description
2. Customer order basic information
3. Revenue section
4. Services / Tasks
5. Save

[![pasūtijumu-jauns.png](https://ozols.lv/doc/uploads/images/gallery/2024-06/scaled-1680-/SFKpasutijumu-jauns.png)](https://ozols.lv/doc/uploads/images/gallery/2024-06/SFKpasutijumu-jauns.png)

---

### 3. Adding a New Customer

1. Click the three dots to open additional options.
2. Click **"New"** to open the **"New Customer"** card.

[![Jauna_klienta_pievienošana.png](https://ozols.lv/doc/uploads/images/gallery/2024-07/scaled-1680-/suTjauna-klienta-pievienosana.png)](https://ozols.lv/doc/uploads/images/gallery/2024-07/suTjauna-klienta-pievienosana.png)

---

### 4. Filling in a New Customer Card with VAT Number

1. Paste the VAT number.
2. Click the button [![image-1720764926448.png](https://ozols.lv/doc/uploads/images/gallery/2024-07/scaled-1680-/image-1720764926448.png)](https://ozols.lv/doc/uploads/images/gallery/2024-07/image-1720764926448.png) to automatically fill in the fields.

Reference link: [https://ozols.lv/doc/link/321#bkmrk--3<svg aria-hidden="true" class="block h-[0.75em] w-[0.75em] stroke-current stroke-[0.75]" data-rtl-flip="" height="20" width="20" xmlns="http://www.w3.org/2000/svg"></svg>](https://ozols.lv/doc/link/321#bkmrk--3)

[![image-1720735323955.png](https://ozols.lv/doc/uploads/images/gallery/2024-07/scaled-1680-/image-1720735323955.png)](https://ozols.lv/doc/uploads/images/gallery/2024-07/image-1720735323955.png)

# Delivery via Terminal

1. Delivery via Terminal
2. Delivery via Terminal Options
3. Services view after adding **"Delivery via Terminal"**

### 1. Delivery via Terminal

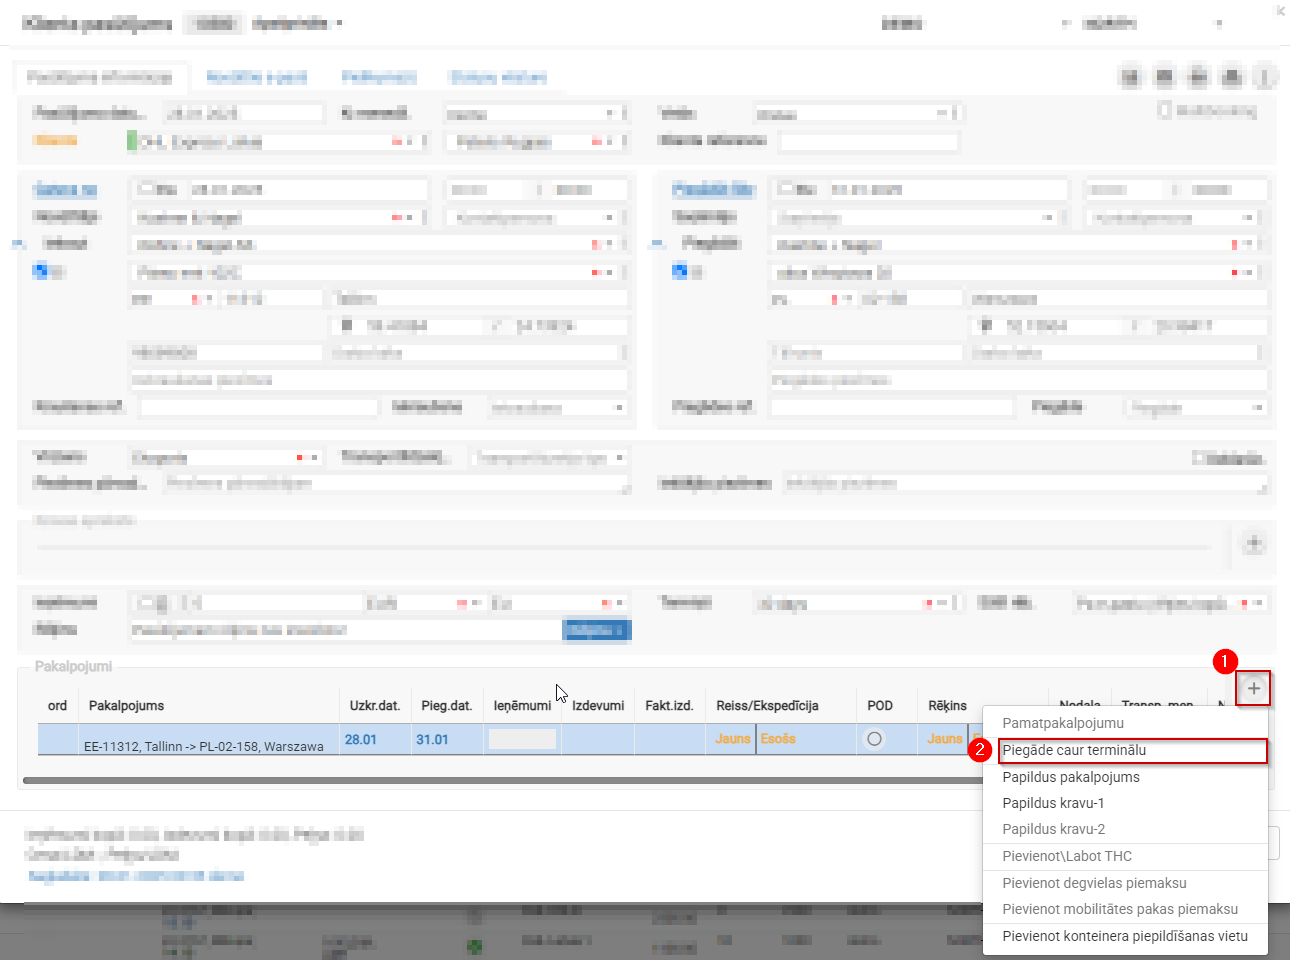
<p class="callout success">**Customer Order → Services → + →Delivery via Terminal**</p>

[![image-1738049875359.png](https://ozols.lv/doc/uploads/images/gallery/2025-01/scaled-1680-/image-1738049875359.png)](https://ozols.lv/doc/uploads/images/gallery/2025-01/image-1738049875359.png)

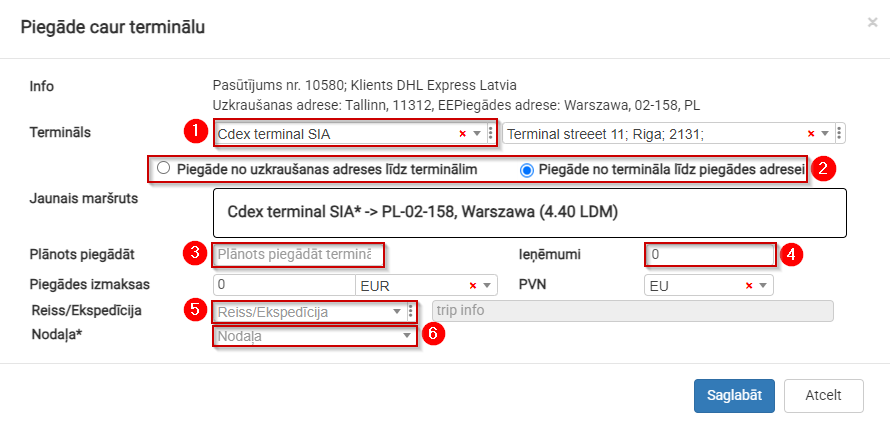
### 2. Delivery via Terminal Options

1. Select the required terminal; the address will be filled in automatically.
2. Split the route **EE11312 Tallinn → PL-02-158** into two parts.
3. Planned delivery deadline to the terminal.
4. Specify the amount allocated for the stage from the terminal to the delivery address.
5. If you know which truck will transport the cargo, you can create a new trip or add it to an existing trip.
6. Assign it to the department responsible for delivery from the terminal to the delivery address.

[![image-1738050405615.png](https://ozols.lv/doc/uploads/images/gallery/2025-01/scaled-1680-/image-1738050405615.png)](https://ozols.lv/doc/uploads/images/gallery/2025-01/image-1738050405615.png)
### <span role="text">3. Services View After Adding **"Delivery via Terminal"**</span>

<p class="callout success">The overall delivery process is divided into two stages, and each stage is assigned a specific amount:</p>

1. Total amount to be received from the customer.
2. Revenue distributed among departments.
3. Departments responsible for specific delivery stages.

[![image-1738052350049.png](https://ozols.lv/doc/uploads/images/gallery/2025-01/scaled-1680-/image-1738052350049.png)](https://ozols.lv/doc/uploads/images/gallery/2025-01/image-1738052350049.png)

# Multiple Pickup or Delivery Addresses – Multibooking

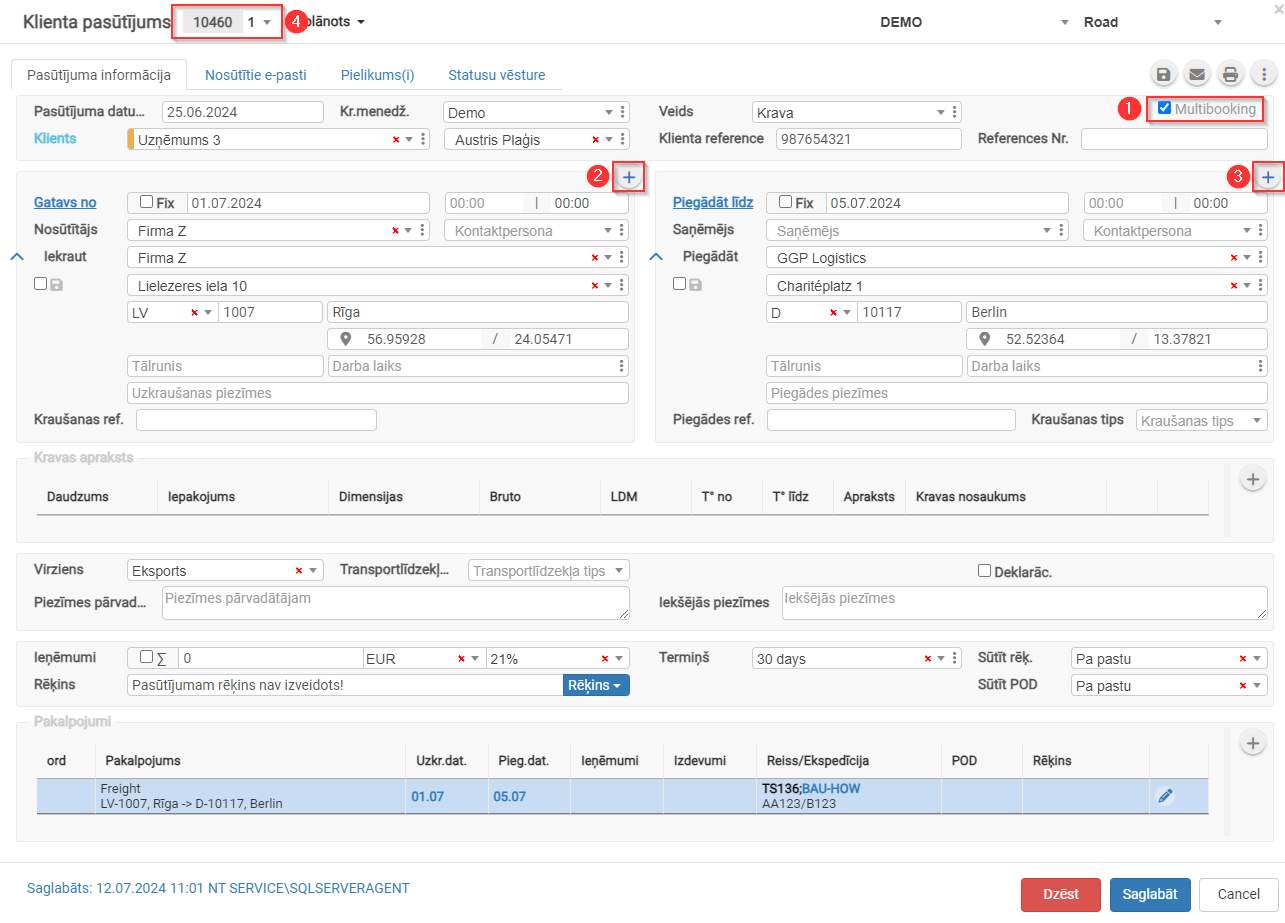
**Multibooking** is used when a single customer order includes multiple pickup or delivery addresses.

- Check the box [![image-1720785262062.png](https://ozols.lv/doc/uploads/images/gallery/2024-07/scaled-1680-/image-1720785262062.png)](https://ozols.lv/doc/uploads/images/gallery/2024-07/image-1720785262062.png) for **Multibooking**.
- Click *[![image-1720785164462.png](https://ozols.lv/doc/uploads/images/gallery/2024-07/scaled-1680-/image-1720785164462.png)](https://ozols.lv/doc/uploads/images/gallery/2024-07/image-1720785164462.png)* to add additional **pickup addresses**.
- Click *[![image-1720785164462.png](https://ozols.lv/doc/uploads/images/gallery/2024-07/scaled-1680-/image-1720785164462.png)](https://ozols.lv/doc/uploads/images/gallery/2024-07/image-1720785164462.png)* to add additional **delivery addresses**.
- The order number will be assigned a **sub-number**. Clicking [![image-1720785321487.png](https://ozols.lv/doc/uploads/images/gallery/2024-07/scaled-1680-/image-1720785321487.png)](https://ozols.lv/doc/uploads/images/gallery/2024-07/image-1720785321487.png)allows you to switch between multibooking orders.
- Reference link: [https://ozols.lv/doc/link/348#bkmrk-](https://ozols.lv/doc/link/348#bkmrk-)

[![image-1720785098716.png](https://ozols.lv/doc/uploads/images/gallery/2024-07/scaled-1680-/image-1720785098716.png)](https://ozols.lv/doc/uploads/images/gallery/2024-07/image-1720785098716.png)
# Active orders

1. Customer Order Classification
2. Active order statuses
3. Additional Options Without Opening the Order

---

## 1. Customer Order Classification

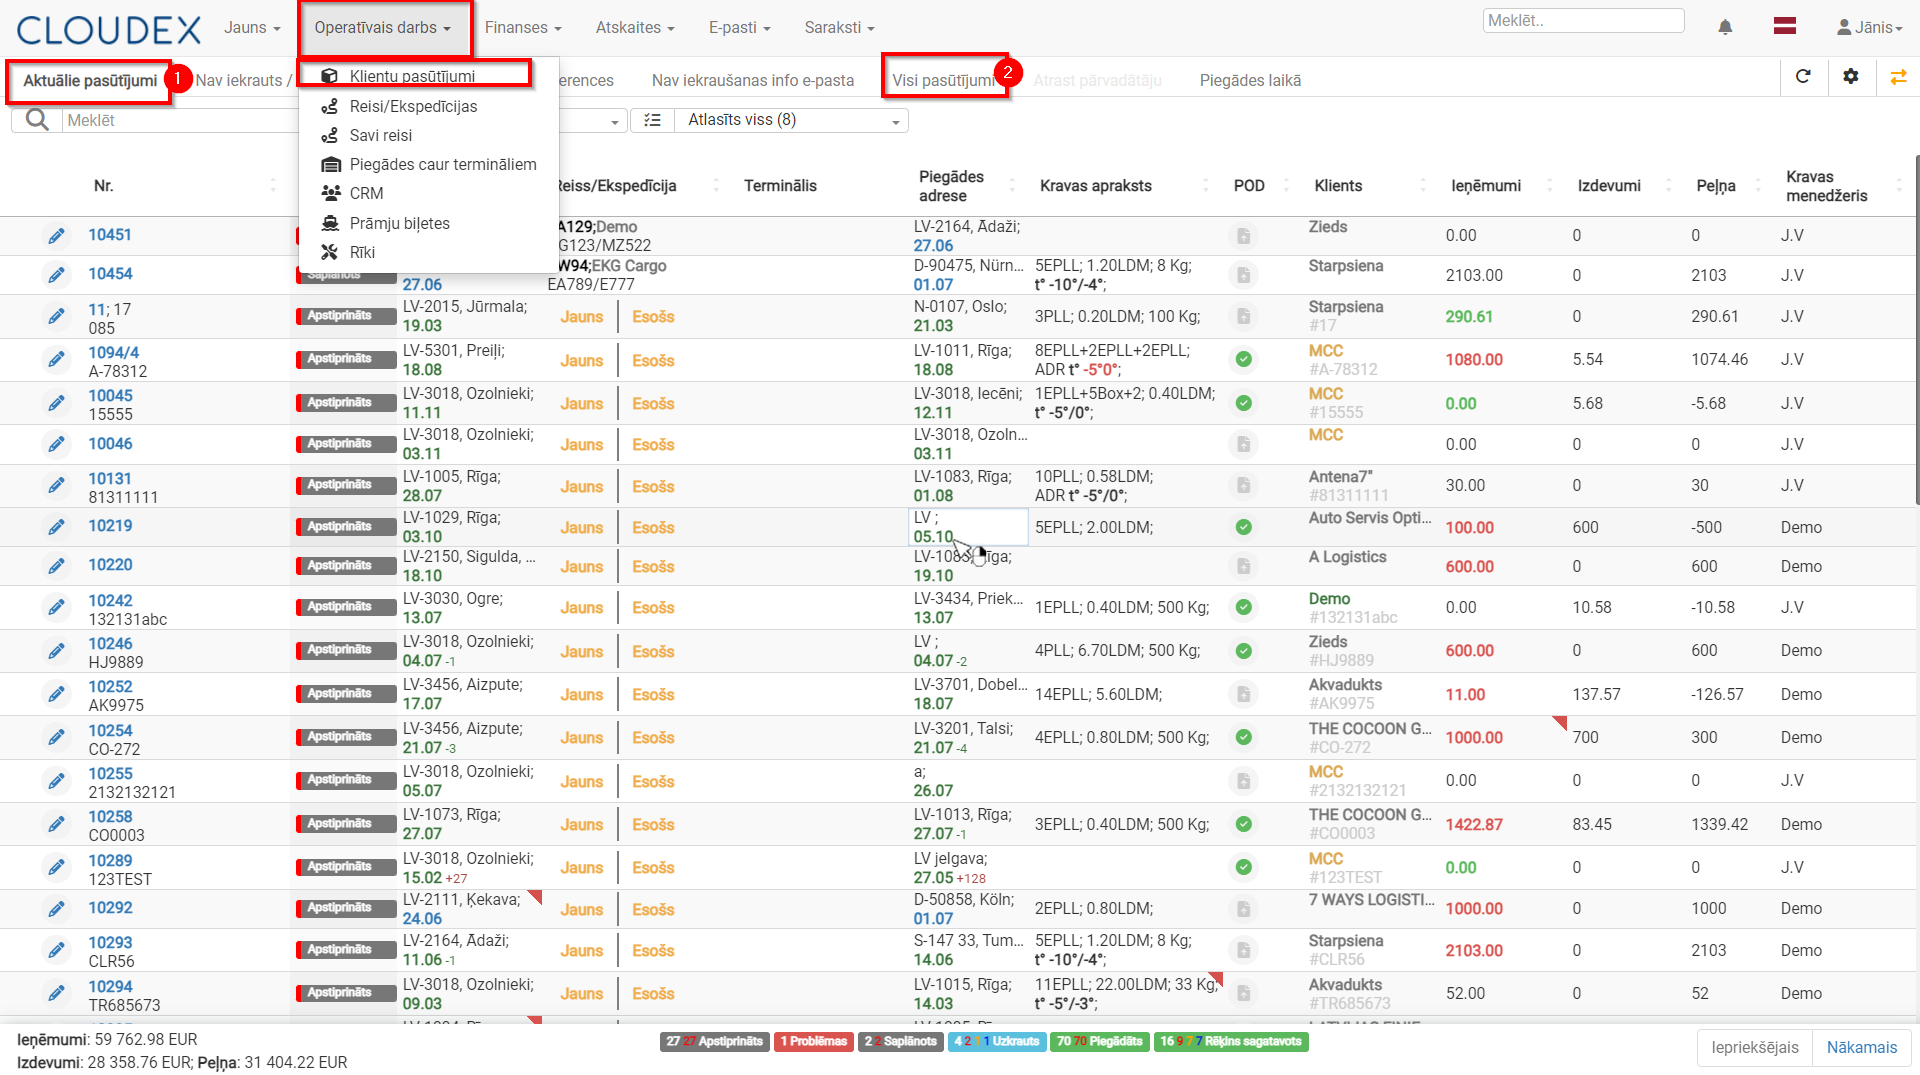
From the menu, open:  
**Operational Work &gt; Client orders**

Customer orders are divided into 2 groups:

1. **Active orders** – this list displays all orders that are in progress (with various statuses). Orders remain in this section until the invoice has been sent.
2. **All Orders** – this section also includes completed orders.

[![Pasūtījumi_iedalijums.png](https://ozols.lv/doc/uploads/images/gallery/2024-07/scaled-1680-/pasutijumi-iedalijums.png)](https://ozols.lv/doc/uploads/images/gallery/2024-07/pasutijumi-iedalijums.png)
---

## 2. Active order Statuses

- **New** – status assigned when the customer adds a new shipment through the customer portal.
- **Confirmed** – the manager confirms the shipment added by the customer, or the manager creates a new shipment manually.
- **Planned** – when the shipment is assigned to a trip/route.
- **Loaded** – when the shipment has been loaded.
- **Delivered** – when delivery of the shipment is confirmed.
- **Invoice Prepared** – after delivery, the invoice is prepared and issued.
- **Issues** – this status appears when something does not go as planned. It is highlighted in red to draw the manager’s attention.

### 2.1. Next Order Status

1. The “border” of the order status may be highlighted in blue, green, orange, or red, indicating the status of the next required action.
2. A shipment status summary is available below the table. Hovering the mouse cursor over the number of each color displays an explanation, for example: “Delayed shipment delivery”.

[![2024-07-18 17_39_33-legendas.png](https://ozols.lv/doc/uploads/images/gallery/2024-07/scaled-1680-/2024-07-18-17-39-33-legendas.png)](https://ozols.lv/doc/uploads/images/gallery/2024-07/2024-07-18-17-39-33-legendas.png)

<p class="callout success">Under the **“Status”** column, when hovering over the current shipment status with the mouse cursor, the system displays the next sequential action that needs to be performed.</p>

[![Statusu maina.gif](https://ozols.lv/doc/uploads/images/gallery/2024-07/Urqstatusu-maina.gif)](https://ozols.lv/doc/uploads/images/gallery/2024-07/Urqstatusu-maina.gif)

---

## 3. Additional Options Without Opening the Order

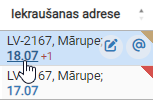
- If the loading date is displayed in blue, it means the shipment has not yet been loaded. Clicking the date opens a window where you can change the planned loading date.  
    [![image-1721306962849.png](https://ozols.lv/doc/uploads/images/gallery/2024-07/scaled-1680-/image-1721306962849.png)](https://ozols.lv/doc/uploads/images/gallery/2024-07/image-1721306962849.png)
- If, when hovering over information in a column, you see the icon, then right-clicking will display additional information. This option is available in several columns, such as:  
    [![image-1721306771051.png](https://ozols.lv/doc/uploads/images/gallery/2024-07/scaled-1680-/image-1721306771051.png)](https://ozols.lv/doc/uploads/images/gallery/2024-07/image-1721306771051.png)  
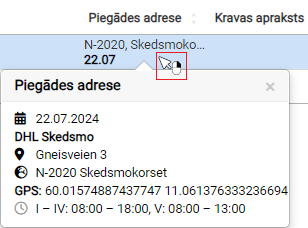
    
    - Loading Address
    - Delivery Address
    - Customer
    - Shipment Description
    - etc.
- In the **POD**\* column, it is possible to add delivery confirmation documents for the order.
- If a document icon with a red corner appears in the column, it means POD documents need to be added.

\* **POD – Proof Of Delivery** (CMR; B/L; AWB; SMGS)

The invoice issuing description is available here:  
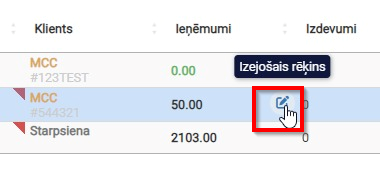
[OZOLS documentation<svg aria-hidden="true" class="block h-[0.75em] w-[0.75em] stroke-current stroke-[0.75]" data-rtl-flip="" height="20" width="20" xmlns="http://www.w3.org/2000/svg"></svg>](https://ozols.lv/doc/link/339?utm_source=chatgpt.com#bkmrk-r%C4%93%C4%B7inu-izrakst%C4%AB%C5%A1ana-)Outgoing invoices can also be opened through the current orders list, for example, to quickly enter the sending date.  
[![Datuma maina.png](https://ozols.lv/doc/uploads/images/gallery/2024-07/scaled-1680-/datuma-maina.png)](https://ozols.lv/doc/uploads/images/gallery/2024-07/datuma-maina.png)
# Save to the customer database

<div data-is-intersecting="true" data-turn-id-container="request-WEB:cd103514-8111-4b75-aae8-3bafb427d523-0" id="bkmrk-the-customer%27s-infor"><section class="text-token-text-primary w-full focus:outline-none [--shadow-height:45px] has-data-writing-block:pointer-events-none has-data-writing-block:-mt-(--shadow-height) has-data-writing-block:pt-(--shadow-height) [&:has([data-writing-block])>*]:pointer-events-auto R6Vx5W_threadScrollVars scroll-mb-[calc(var(--scroll-root-safe-area-inset-bottom,0px)+var(--thread-response-height))] scroll-mt-[calc(var(--header-height)+min(200px,max(70px,20svh)))]" data-scroll-anchor="false" data-testid="conversation-turn-2" data-turn="assistant" data-turn-id="request-WEB:cd103514-8111-4b75-aae8-3bafb427d523-0" data-turn-id-container="request-WEB:cd103514-8111-4b75-aae8-3bafb427d523-0" dir="auto"><p class="callout danger">The customer's information will be saved in the database.</p>

<div><div><div><div><div data-message-author-role="assistant" data-message-id="fac83e6d-94ab-4552-8bd6-edb3341f2b35" data-message-model-slug="gpt-5-5" data-turn-start-message="true"><div><div>1. To successfully save the customer's information in the database, you must check the box next to the diskette symbol.

</div></div></div></div></div></div></div>[![image-1720995333764.png](https://ozols.lv/doc/uploads/images/gallery/2024-07/scaled-1680-/image-1720995333764.png)](https://ozols.lv/doc/uploads/images/gallery/2024-07/image-1720995333764.png)

</section><div></div></div>

# Obtaining GPS data for a customer order

[![getgps_en_.png](https://ozols.lv/doc/uploads/images/gallery/2026-05/scaled-1680-/getgps-en.png)](https://ozols.lv/doc/uploads/images/gallery/2026-05/getgps-en.png)

1\. Benefits of Obtaining GPS Coordinates  
Filling in the GPS coordinates field in logistics and transport systems provides several advantages that improve operational efficiency, transparency, and accuracy. Here are the main benefits of completing the GPS coordinates field:

2\. Planning Accuracy  
Precise locations can be viewed on the map, making logistics planning and route optimization easier.

3\. Trip Route Tracking  
The route is visible on the map in real time, helping monitor transport flow and ensuring that the vehicle follows the planned route.

4\. Accurate Location Identification  
GPS coordinates allow precise identification of the location where the driver must arrive, reducing misunderstandings and increasing delivery accuracy.

5\. Automatic Time Recording  
The system automatically records the time when the vehicle arrives at and leaves the loading/delivery address, helping improve operational tracking and analysis.

6\. Cargo Status Tracking  
Time and location data are integrated into cargo statuses, providing a complete overview of cargo movement and delivery status.

7\. Automatic Status Changes  
The system automatically changes the trip status when the vehicle approaches the loading or delivery address, speeding up the process and reducing manual actions.

8\. Downtime Monitoring  
GPS data makes it possible to track how long the vehicle stays at the loading or delivery address, helping identify and reduce unproductive downtime.

9\. Driver Activity Monitoring  
The system can verify whether the driver marks the cargo as loaded or delivered at the specified address by comparing it with the driver’s actual location data.

10\. Route Comparison  
It is possible to compare the driver’s planned route with the actual route traveled, helping identify deviations and opportunities for route optimization.

11\. Customer Portal Functionality  
Customers can view the vehicle’s current location and route to the loading/delivery address in the portal, improving transparency and customer satisfaction.  
12\. These benefits help optimize logistics processes, improve delivery accuracy and efficiency, and provide greater transparency and customer satisfaction.

# Search / Filters and Their Use

### 1) Search

Using the search function, it is possible to find all records involving a specific company. By entering the company name into the search field, the system displays all orders in which this company is listed as the supplier, recipient, or in another role. The number 33 indicates that 33 records have been found.

[![Filter_eng.png](https://ozols.lv/doc/uploads/images/gallery/2026-05/scaled-1680-/filter-eng.png)](https://ozols.lv/doc/uploads/images/gallery/2026-05/filter-eng.png)

---

### 2) Increasing Visibility

By using the option to select how many rows are displayed per page, the visible amount of data can be increased. For example, if we select 300 rows, a larger volume of data will be visible on the screen at once, making it easier to analyze information without switching between pages.

[![Filter_row_eng.png](https://ozols.lv/doc/uploads/images/gallery/2026-05/scaled-1680-/filter-row-eng.png)](https://ozols.lv/doc/uploads/images/gallery/2026-05/filter-row-eng.png)

---

### 3) Narrowing the Customer List

To make the results more precise, we use the customer filter and select the exact name we are searching for. This narrows the list down only to records related to the specific customer, excluding all others.

[![Filter_smaler_eng.png](https://ozols.lv/doc/uploads/images/gallery/2026-05/scaled-1680-/filter-smaler-eng.png)](https://ozols.lv/doc/uploads/images/gallery/2026-05/filter-smaler-eng.png)

# Internal profit

**Adding “Internal Profit”**

1. Open the relevant order form and, in the **Services** section, add a new service.

[![profit.PNG](https://ozols.lv/doc/uploads/images/gallery/2025-01/scaled-1680-/profit.PNG)](https://ozols.lv/doc/uploads/images/gallery/2025-01/profit.PNG)

2. Select the type **“Internal Profit”**.
3. Enter the profit amount.

[![profit1.PNG](https://ozols.lv/doc/uploads/images/gallery/2025-01/scaled-1680-/profit1.PNG)](https://ozols.lv/doc/uploads/images/gallery/2025-01/profit1.PNG)

<p class="callout info">**Important!** After adding **“Internal Profit”**, everything should look as shown below:</p>

[![image-1737972755687.png](https://ozols.lv/doc/uploads/images/gallery/2025-01/scaled-1680-/image-1737972755687.png)](https://ozols.lv/doc/uploads/images/gallery/2025-01/image-1737972755687.png)

# Adding order to the trip

<div id="bkmrk-"><div data-test-render-count="2"><div><div><div></div></div></div></div></div><div id="bkmrk-open-the-client-orde"><div data-test-render-count="1"><div data-is-streaming="false">1. Open the client order
2. Scroll down to the "**Services**" section at the bottom of the screen.
3. In this table you'll see a service row with the route (e.g., *LV-3018, Ozolnieki → LV-1057, Riga*), loading and unloading dates, income, and costs.
4. In the "**Order for carrier**" column there are two buttons: 
    - "**New**"[![image-1782373852123.png](https://ozols.lv/doc/uploads/images/gallery/2026-06/scaled-1680-/image-1782373852123.png)](https://ozols.lv/doc/uploads/images/gallery/2026-06/image-1782373852123.png)— create a **new trip/order for the carrier** and assign this cargo to it.
    - "**Existing**"[![image-1782373869696.png](https://ozols.lv/doc/uploads/images/gallery/2026-06/scaled-1680-/image-1782373869696.png)](https://ozols.lv/doc/uploads/images/gallery/2026-06/image-1782373869696.png)— assign this cargo (order) **to an already existing trip.**
5. To add the order to an existing trip: 
    - Click the "**Existing**" button.
    - A window/list will open showing available trips (filterable by route, date, vehicle, etc.).
    - Select the matching trip from the list and confirm.
6. To create a **new trip** for this order: 
    - Click the "**New**" button.
    - The system will create a new carrier order/trip using this client order's data (route, cargo details, dates).
7. Click "**Save**" at the bottom of the screen to confirm the changes.

</div></div></div>[![image-1782369030685.png](https://ozols.lv/doc/uploads/images/gallery/2026-06/scaled-1680-/image-1782369030685.png)](https://ozols.lv/doc/uploads/images/gallery/2026-06/image-1782369030685.png)

# 3. Order Confirmation for the Customer

# Information for the customer about accepting the order

To send an order acceptance confirmation, open the specific customer order.  
  
1 .In the toolbar, click the button [![image-1724937762525.png](https://ozols.lv/doc/uploads/images/gallery/2024-08/scaled-1680-/image-1724937762525.png)](https://ozols.lv/doc/uploads/images/gallery/2024-08/image-1724937762525.png) and select the appropriate option.

[![image-1780992395893.png](https://ozols.lv/doc/uploads/images/gallery/2026-06/scaled-1680-/image-1780992395893.png)](https://ozols.lv/doc/uploads/images/gallery/2026-06/image-1780992395893.png)

2\. By selecting **Information to Customer About Order Acceptance**, you can send an automatically generated order acceptance confirmation email.

[![image-1780995258569.png](https://ozols.lv/doc/uploads/images/gallery/2026-06/scaled-1680-/image-1780995258569.png)](https://ozols.lv/doc/uploads/images/gallery/2026-06/image-1780995258569.png)

3\. By selecting **Order to Customer**, an email containing the order agreement will be generated automatically.

[![image-1780995368027.png](https://ozols.lv/doc/uploads/images/gallery/2026-06/scaled-1680-/image-1780995368027.png)](https://ozols.lv/doc/uploads/images/gallery/2026-06/image-1780995368027.png)

# 4. Trip planning

# Planning desk

Opening the Planning View  
Current Trips View  
Trip Tracking View  
Current Unplanned Loads / Map View

---

## Planning View

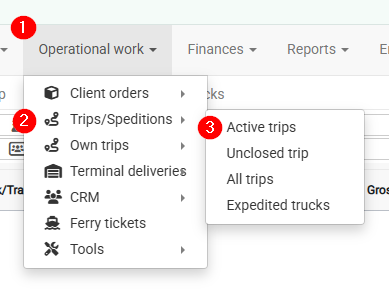
1. In the top navigation bar, click **“Operational Work”**
2. From the pop-up menu, select **“Trips/Expeditions”**

[![image-1779267721847.png](https://ozols.lv/doc/uploads/images/gallery/2026-05/scaled-1680-/image-1779267721847.png)](https://ozols.lv/doc/uploads/images/gallery/2026-05/image-1779267721847.png)

---

## Current Trips View

1. Tabs for:

- Current Trips
- Open Trips
- Trip Archive
- Vehicle Statuses
- Dispatched Vehicles
- Filters

2. List of current trips

[![image-1779267861707.png](https://ozols.lv/doc/uploads/images/gallery/2026-05/scaled-1680-/image-1779267861707.png)](https://ozols.lv/doc/uploads/images/gallery/2026-05/image-1779267861707.png)

---

## Trip Tracking / Map View

1. Tracking of Trip No. #
2. Trip Tracking
3. Map
4. Chat

[![image-1779267953918.png](https://ozols.lv/doc/uploads/images/gallery/2026-05/scaled-1680-/image-1779267953918.png)](https://ozols.lv/doc/uploads/images/gallery/2026-05/image-1779267953918.png)

---

## Current Unplanned Loads List

1. Filters for unplanned loads
2. List of unplanned loads

[![image-1779268001930.png](https://ozols.lv/doc/uploads/images/gallery/2026-05/scaled-1680-/image-1779268001930.png)](https://ozols.lv/doc/uploads/images/gallery/2026-05/image-1779268001930.png)

# Active trips

**Current trips view**

### 1. Opening the current trips view

1. Operational work
2. Trips / Speditions

<p class="callout info">Required navigation sequence: **Operational work → Trips / Dispatches**. This opens the planning view.</p>

[![image-1781000359766.png](https://ozols.lv/doc/uploads/images/gallery/2026-06/scaled-1680-/image-1781000359766.png)](https://ozols.lv/doc/uploads/images/gallery/2026-06/image-1781000359766.png)

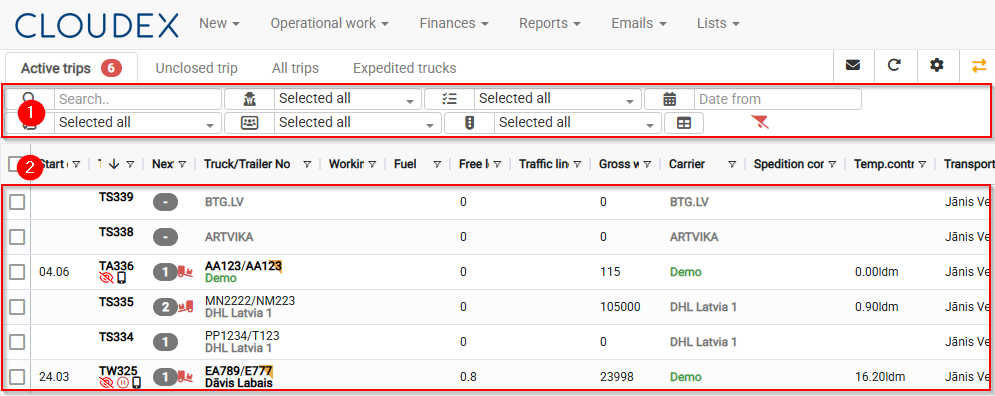
### 2. Current trips view

1. Information about current / open / trip archive / vehicle statuses / dispatched vehicles
2. List of currently available trips

[![image-1781000582715.png](https://ozols.lv/doc/uploads/images/gallery/2026-06/scaled-1680-/image-1781000582715.png)](https://ozols.lv/doc/uploads/images/gallery/2026-06/image-1781000582715.png)
# New Unplanned Cargo Map Window Page

**Opening the Unplanned Cargo Map/Window**

1. Click **“New”** in the top navigation bar
2. From the pop-up menu, select **“Trips/Expeditions”**

<p class="callout info">Required workflow: **Operational work → Trips/Expeditions**.  
You will open the **Trips/Expeditions** window.</p>

---

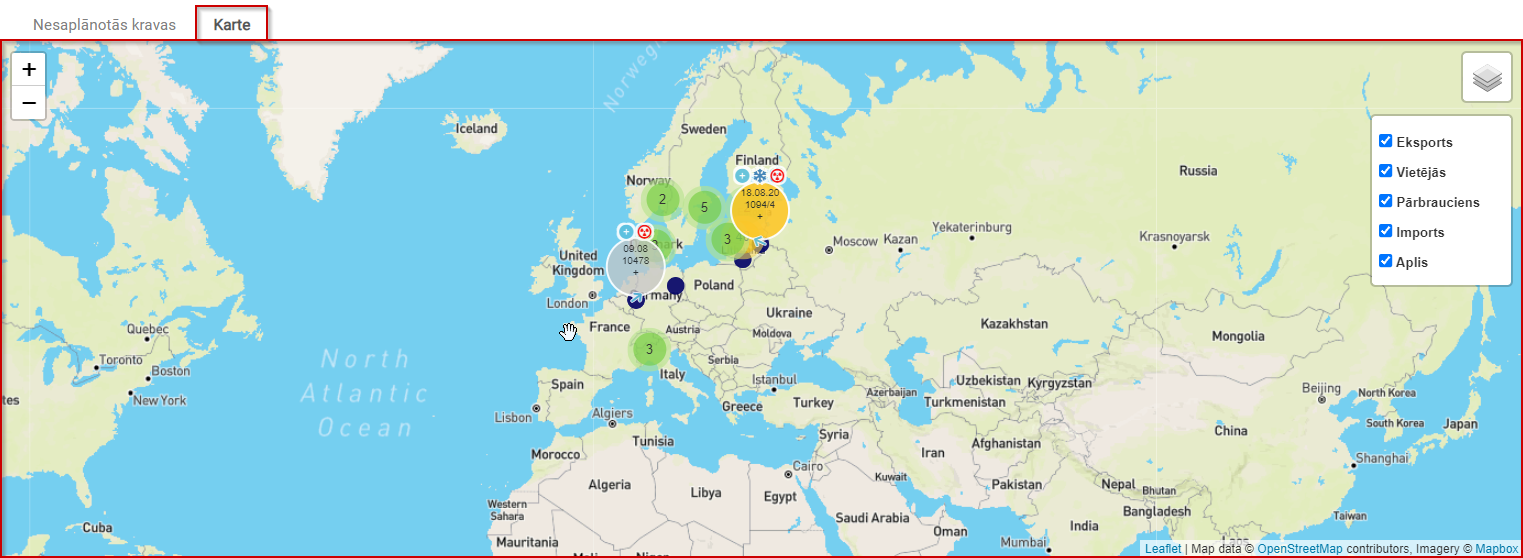
<p class="callout info">**Current Unplanned Cargo Map**  
The current unplanned cargo map displays cargo in a visually clear way, making it easier to search for shipments.</p>

<p class="callout danger">For cargo to be properly displayed on the map, loading and unloading coordinates are important. See the image below.</p>

[![image-1722322393255.png](https://ozols.lv/doc/uploads/images/gallery/2024-07/scaled-1680-/image-1722322393255.png)](https://ozols.lv/doc/uploads/images/gallery/2024-07/image-1722322393255.png)

Cargo can be filtered by the following attributes: **Export, Local, Transit, Import, Round trip**.

[![image-1722321986405.png](https://ozols.lv/doc/uploads/images/gallery/2024-07/scaled-1680-/image-1722321986405.png)](https://ozols.lv/doc/uploads/images/gallery/2024-07/image-1722321986405.png)
# Trip Tracking – Map – Chat

#### Opening Trip Tracking / Map / Chat

1. Open **Trip Tracking / Map / Chat**.


[![image-1781073918549.png](https://ozols.lv/doc/uploads/images/gallery/2026-06/scaled-1680-/image-1781073918549.png)](https://ozols.lv/doc/uploads/images/gallery/2026-06/image-1781073918549.png)
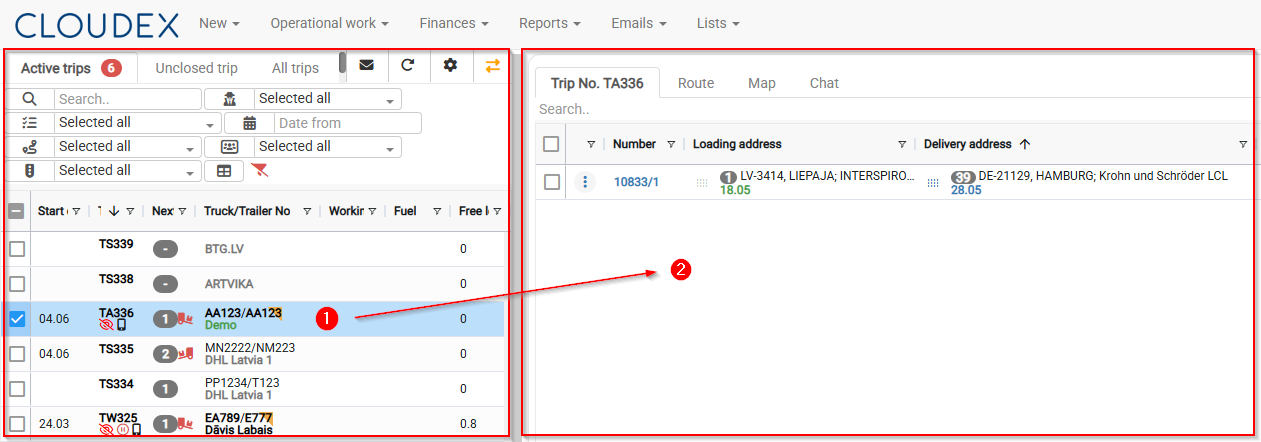
2. **Trip Tracking / Map / Chat**

[![image-1720769819679.png](https://ozols.lv/doc/uploads/images/gallery/2024-07/scaled-1680-/image-1720769819679.png)](https://ozols.lv/doc/uploads/images/gallery/2024-07/image-1720769819679.png)

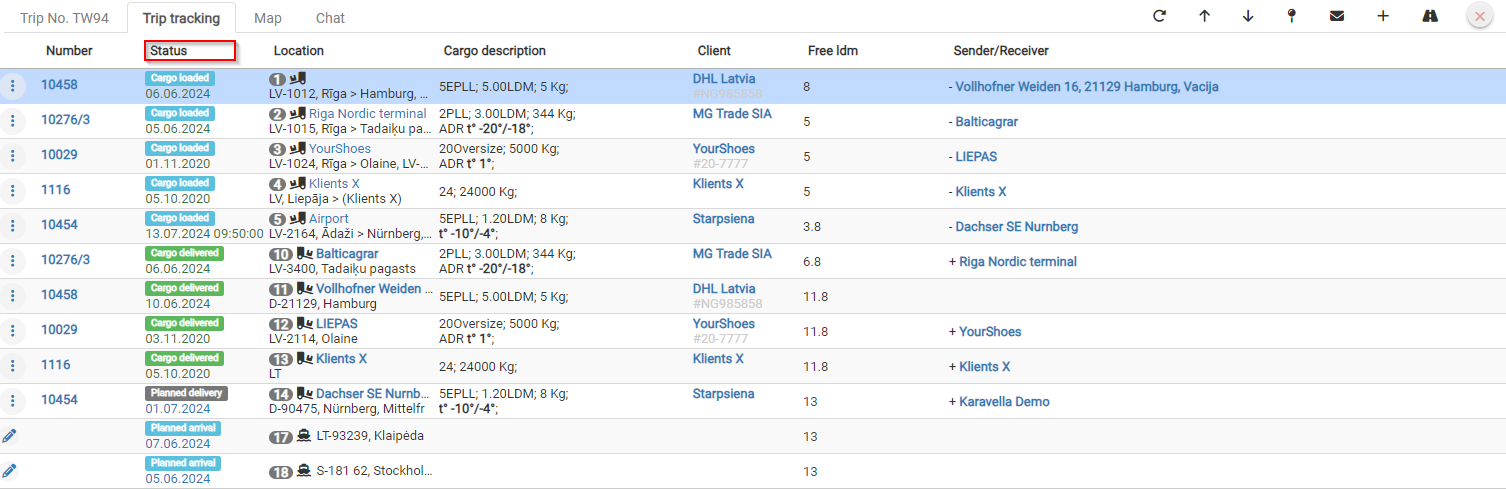
3. **Trip Tracking**

[![image-1720769979107.png](https://ozols.lv/doc/uploads/images/gallery/2024-07/scaled-1680-/image-1720769979107.png)](https://ozols.lv/doc/uploads/images/gallery/2024-07/image-1720769979107.png)
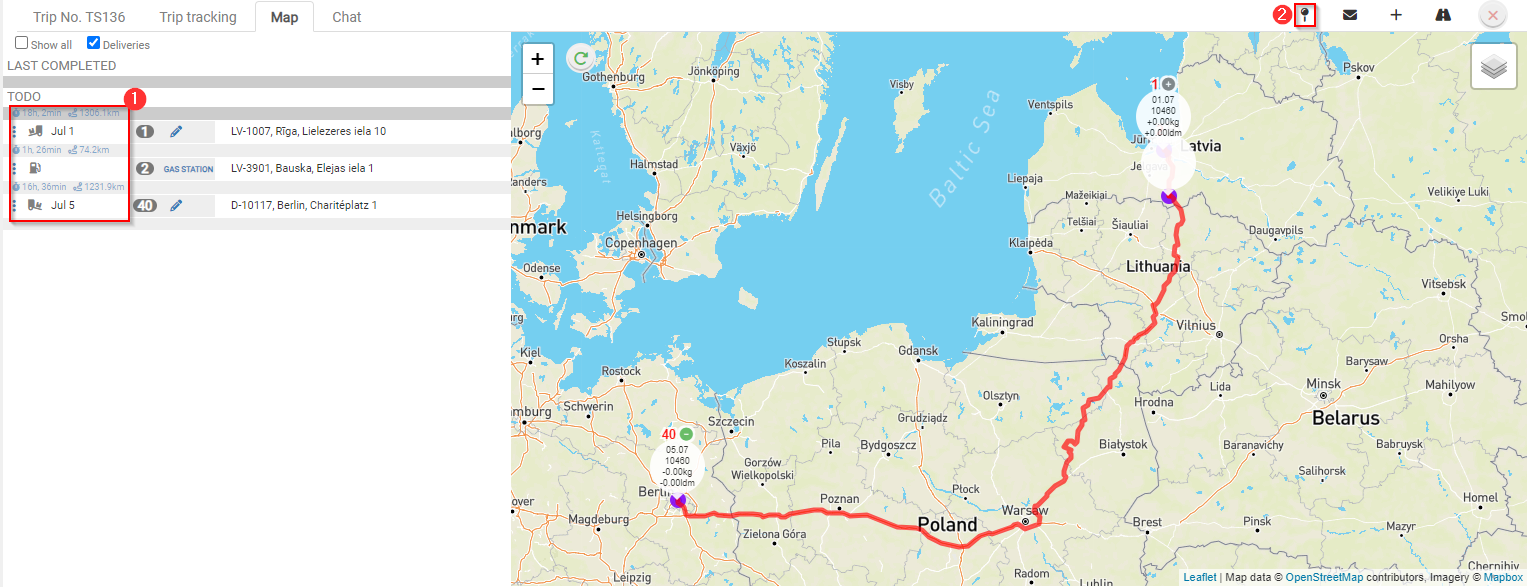
4. **Map**
5. **Distance in kilometers between stops.**
6. **Add additional stops** by clicking the **+** symbol. [![image-1720770781392.png](https://ozols.lv/doc/uploads/images/gallery/2024-07/scaled-1680-/image-1720770781392.png)](https://ozols.lv/doc/uploads/images/gallery/2024-07/image-1720770781392.png)

[![image-1720770594751.png](https://ozols.lv/doc/uploads/images/gallery/2024-07/scaled-1680-/image-1720770594751.png)](https://ozols.lv/doc/uploads/images/gallery/2024-07/image-1720770594751.png)
# Creating a New Trip

#### Trip/Expedition Types

##### 1. Adding a New Trip

1. Click the **“New”** button in the toolbar.
2. From the menu that opens, select **“Trip/Expedition”**.

[![image-1781074232876.png](https://ozols.lv/doc/uploads/images/gallery/2026-06/scaled-1680-/image-1781074232876.png)](https://ozols.lv/doc/uploads/images/gallery/2026-06/image-1781074232876.png)
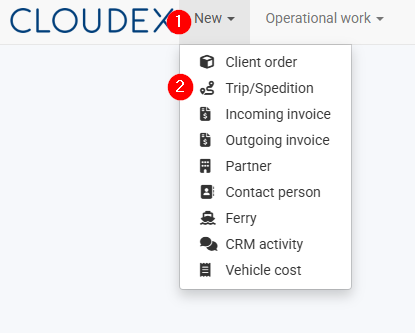
##### 2. Trip/Expedition Types

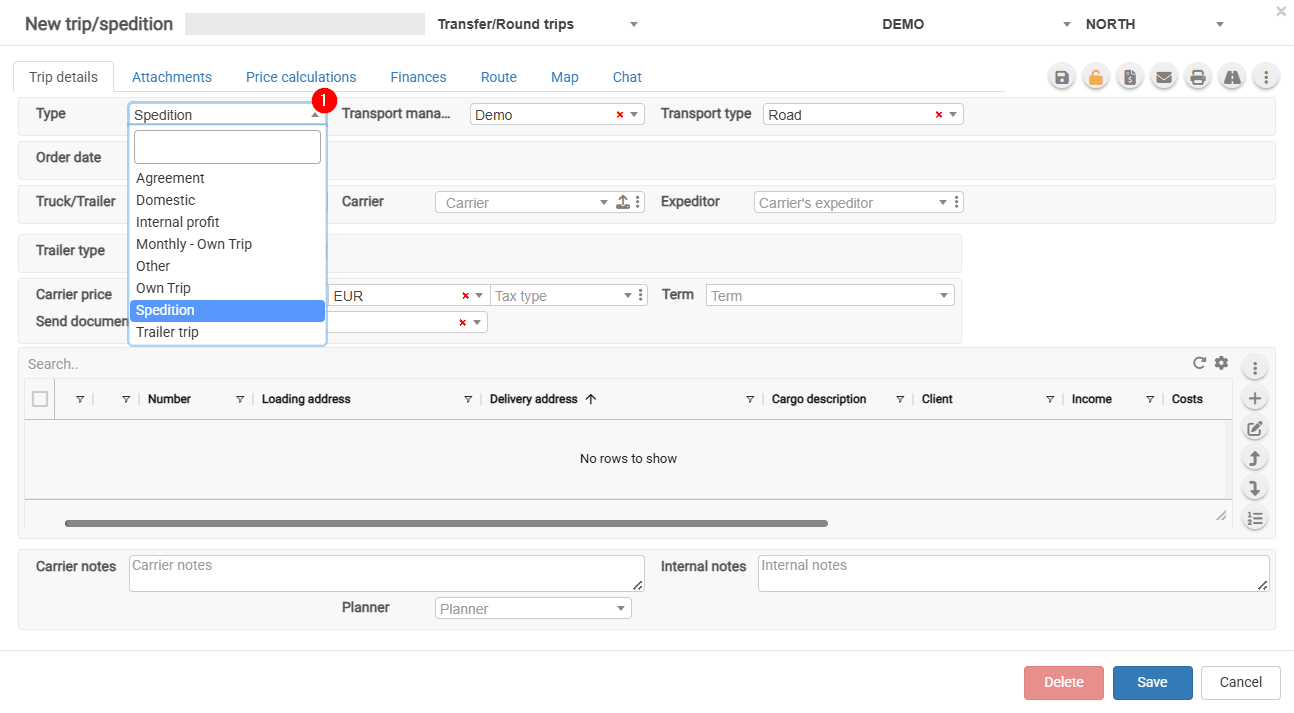
- **Agreement** – Select this option when a subcontractor operates under your management and you are forwarding the vehicle for a full or partial route. Payment is usually calculated based on the kilometers driven.
- **Domestic** – Local transportation.
- **Monthly** – Monthly trip.
- **Other** – Other types of trips.
- **Own Trip** – Select this option when the trip is performed with your own vehicle. This enables the completion of the driver's report.
- **Spedition** – Freight forwarding and cargo transportation.

<p class="callout warning">To ensure accurate trip reporting, it is important to select the correct trip type.</p>

[![image-1781074911904.png](https://ozols.lv/doc/uploads/images/gallery/2026-06/scaled-1680-/image-1781074911904.png)](https://ozols.lv/doc/uploads/images/gallery/2026-06/image-1781074911904.png)

# 5. Sending a Trip/Expedition

# Sending a Trip to the Driver

1\. Sending a Trip to the Driver via a Link  
2\. Displaying a Trip in the "Cloudex Drive" (Driver) App  
3\. Creating a "Cloudex Drive" Password

## 1. Sending a Trip to the Driver via a Link

1\) Select the Required Trip

- Open the trip list menu.
- Select the desired trip from the list of available trips.

##### 2) Open the Trip Window

- Click the **road icon** located in the toolbar.
- After clicking the road icon, the corresponding trip window will automatically open on a new page.

[![image-1781785863202.png](https://ozols.lv/doc/uploads/images/gallery/2026-06/scaled-1680-/image-1781785863202.png)](https://ozols.lv/doc/uploads/images/gallery/2026-06/image-1781785863202.png)

**A window with the driver's web application for the trip will open.**

- Copy the link from the browser's address bar and send it to the driver via **WhatsApp** so that the driver can complete the required information.

[![image-1781785518367.png](https://ozols.lv/doc/uploads/images/gallery/2026-06/scaled-1680-/image-1781785518367.png)](https://ozols.lv/doc/uploads/images/gallery/2026-06/image-1781785518367.png)

## 2. Displaying a Trip in the "Cloudex Drive" (Driver) App

### 1) Select the Required Trip

- Click on the trip number to open the trip.

[![image-1781785748585.png](https://ozols.lv/doc/uploads/images/gallery/2026-06/scaled-1680-/image-1781785748585.png)](https://ozols.lv/doc/uploads/images/gallery/2026-06/image-1781785748585.png)
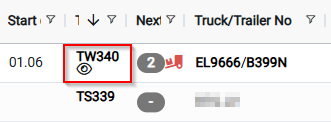
### Important:

For the driver to be able to see the trip information:

1. Activate the **eye icon** located next to the driver's name and surname. 
    - Once activated, the trip information will be sent to and become available in the **Cloudex Drive** mobile application.

[![image-1781786034097.png](https://ozols.lv/doc/uploads/images/gallery/2026-06/scaled-1680-/image-1781786034097.png)](https://ozols.lv/doc/uploads/images/gallery/2026-06/image-1781786034097.png)

1. The trip will remain visible in the list of active trips until its status is changed to **Delivered**.

<div id="bkmrk-3.-creating-a-%22cloud"><div data-is-intersecting="true" data-turn-id-container="request-WEB:ef2d947a-9f65-4b30-851b-929914274781-0"><section class="text-token-text-primary w-full focus:outline-none has-data-writing-block:pointer-events-none [&:has([data-writing-block])>*]:pointer-events-auto R6Vx5W_threadScrollVars scroll-mb-[calc(var(--scroll-root-safe-area-inset-bottom,0px)+var(--thread-response-height))] scroll-mt-[calc(var(--header-height)+min(200px,max(70px,20svh)))]" data-testid="conversation-turn-2" data-turn="assistant" data-turn-id="request-WEB:ef2d947a-9f65-4b30-851b-929914274781-0" data-turn-id-container="request-WEB:ef2d947a-9f65-4b30-851b-929914274781-0" dir="auto">## 3. Creating a "Cloudex Drive" Password

### 1) Open the Vehicle Window

<div><div><div data-conversation-screenshot-content=""><div><div data-message-author-role="assistant" data-message-id="7d40b24f-f93e-48f7-b6ed-9f9cb0e03ddf" data-message-model-slug="gpt-5-5" data-turn-start-message="true"><div><div>- Click on the vehicle registration number specified in the trip.
- The **Vehicle** window will open.  
    [![image-1781786149969.png](https://ozols.lv/doc/uploads/images/gallery/2026-06/scaled-1680-/image-1781786149969.png)](https://ozols.lv/doc/uploads/images/gallery/2026-06/image-1781786149969.png)

</div></div></div></div></div></div></div>### 2) Create a Password

<div><div><div><div data-conversation-screenshot-content=""><div><div data-message-author-role="assistant" data-message-id="7d40b24f-f93e-48f7-b6ed-9f9cb0e03ddf" data-message-model-slug="gpt-5-5" data-turn-start-message="true"><div><div>- Create a password of your choice.
- The driver will use this password to log in to the **Cloudex Drive** application.

</div></div></div></div></div></div></div></div>[![image-1781787131276.png](https://ozols.lv/doc/uploads/images/gallery/2026-06/scaled-1680-/image-1781787131276.png)](https://ozols.lv/doc/uploads/images/gallery/2026-06/image-1781787131276.png)

</section></div></div>

# 7. Outgoing invoices (debtors)

# Outgoing invoice payments

1\. [Payment of Outgoing invoices - automated data Import from the Bank](https://ozols.lv/doc/link/335#bkmrk-1.-payment-of-outgoi-0)  
2\. [Linking Incoming Bank payments with Outgoing invoices](https://ozols.lv/doc/link/335#bkmrk-2.-linking-incoming-)  
3\. [Outgoing invoice payment - manual data entry](https://ozols.lv/doc/link/335#bkmrk-3.-outgoing-invoice-)

<p class="callout danger">Important! CLOUDEX TMS provides two options - <span style="font-family: -apple-system, BlinkMacSystemFont, 'Segoe UI', Oxygen, Ubuntu, Roboto, Cantarell, 'Fira Sans', 'Droid Sans', 'Helvetica Neue', sans-serif; font-size: 14px; font-style: normal; font-variant-ligatures: normal; font-variant-caps: normal; font-weight: 400;">automated</span><span style="font-family: -apple-system, BlinkMacSystemFont, 'Segoe UI', Oxygen, Ubuntu, Roboto, Cantarell, 'Fira Sans', 'Droid Sans', 'Helvetica Neue', sans-serif; font-size: 14px; font-style: normal; font-variant-ligatures: normal; font-variant-caps: normal; font-weight: 400;"> and </span>manual outgoing invoice.</p>

<p class="callout danger">Only one of options can be used for the accounting period!</p>

#### 1. Payment of Outgoing invoices - automated data Import from the Bank

1.1. **Export Account report from your Bank**  
Open your company's **Internet Bank** &gt; prepare **the Bank Account report** for the desired period &gt; **Export it in ISO format.** &gt; **Save this document to your computer.**

1.2. Open **CLOUDEX TMS**

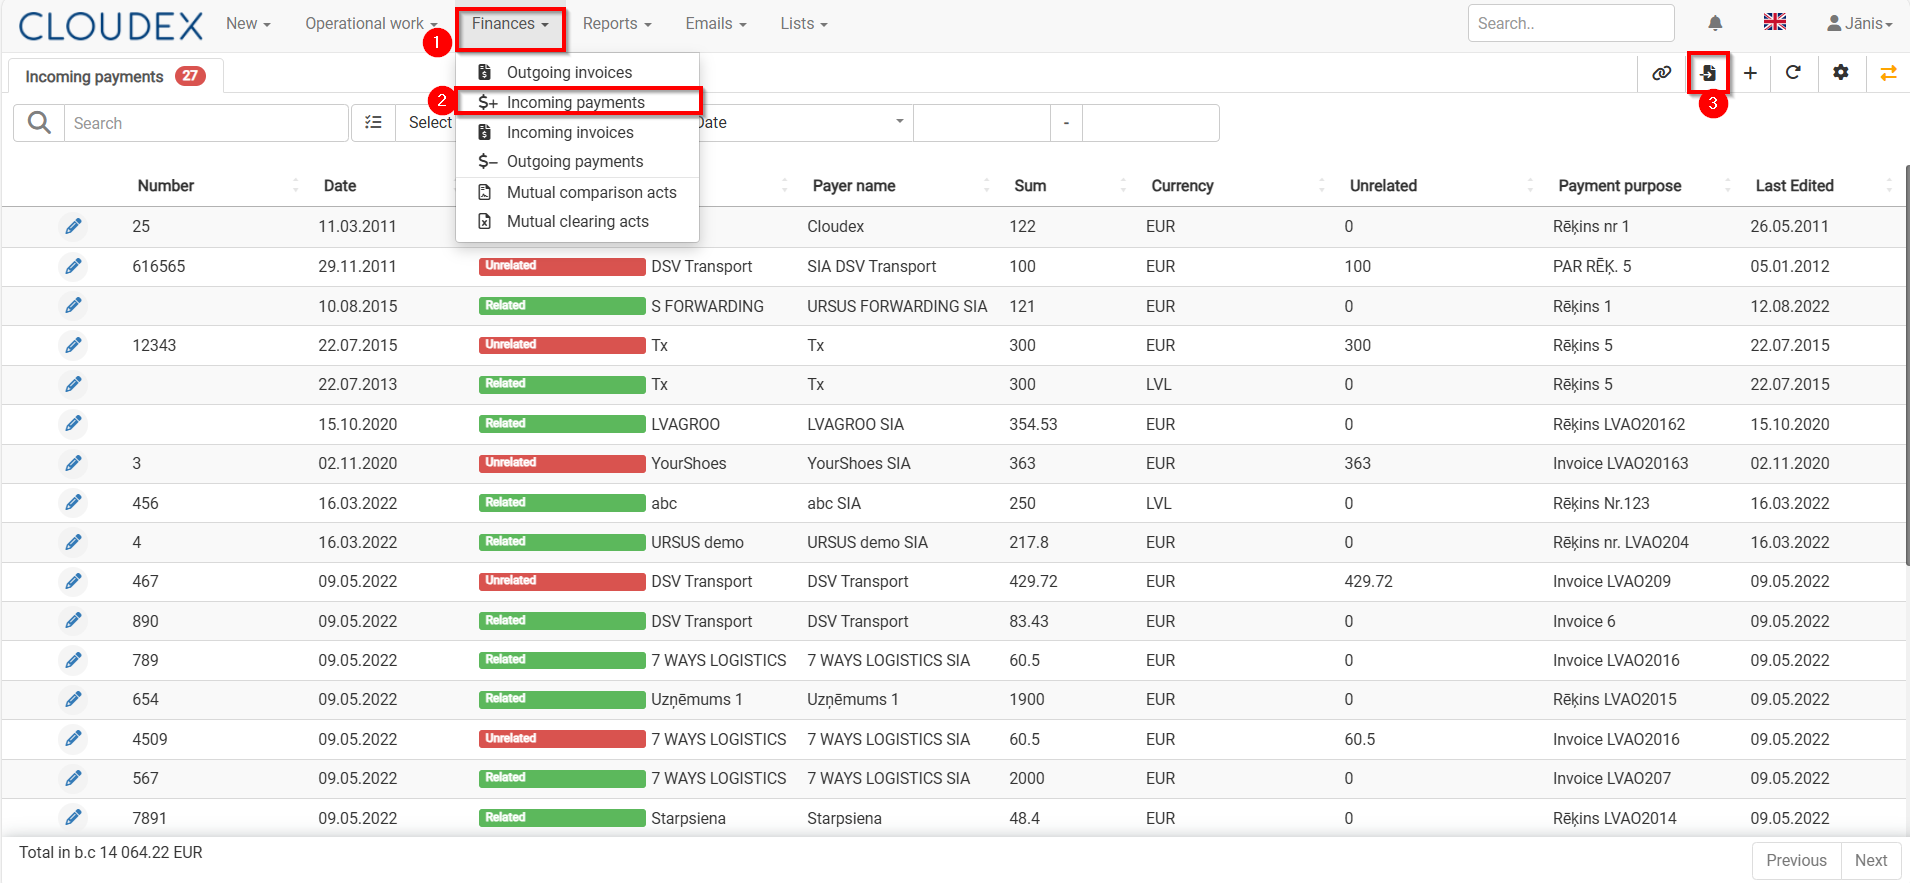
1. **Finance &gt; Incoming payments**
2. <span style="color: #000000;">**Import payments from the Bank** (using symbol ["![image-1719928964263.png](https://ozols.lv/doc/uploads/images/gallery/2024-07/scaled-1680-/image-1719928964263.png)](https://ozols.lv/doc/uploads/images/gallery/2024-07/image-1719928964263.png)")</span><span style="color: #000000;">  
      
    [![Import from Bank.png](https://ozols.lv/doc/uploads/images/gallery/2024-07/scaled-1680-/import-from-bank.png)](https://ozols.lv/doc/uploads/images/gallery/2024-07/import-from-bank.png)</span><span style="color: #000000;">1.3. **Import** Bank payments  
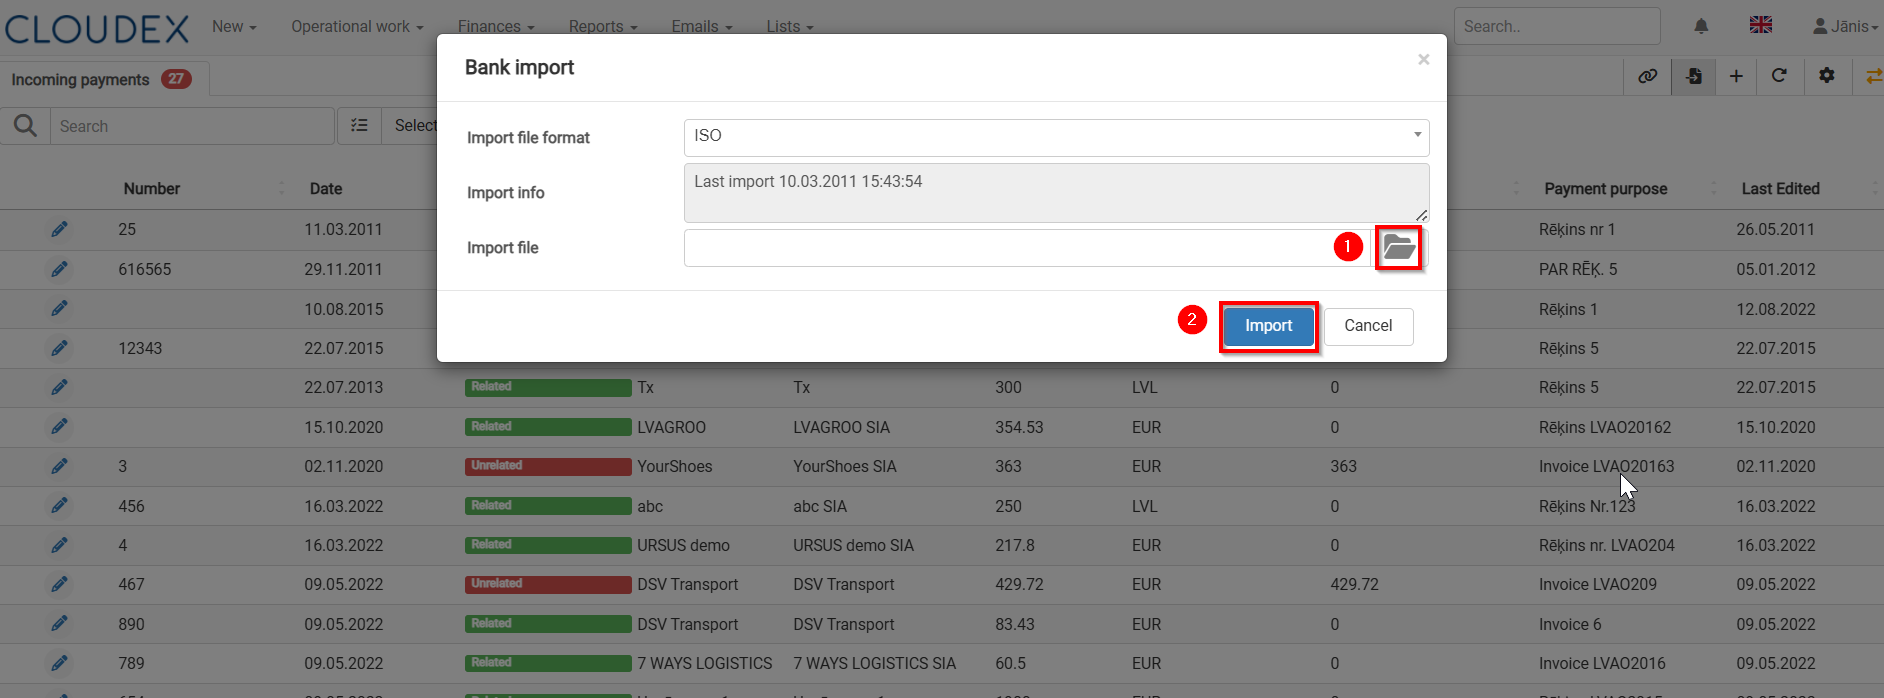
    </span><span style="color: #000000;">1) </span>Choose **the file** which you imported from **Internet Bank** 2) Press **Import  
      
    [![Import the fail.png](https://ozols.lv/doc/uploads/images/gallery/2024-07/scaled-1680-/import-the-fail.png)](https://ozols.lv/doc/uploads/images/gallery/2024-07/import-the-fail.png)**
#### 2. Linking "Incoming Bank payments" with "Outgoing invoices"

<p class="callout info"><span class="HwtZe" lang="en"><span class="jCAhz JxVs2d ChMk0b"><span class="ryNqvb">When importing payments from the Internet bank, CLOUDEX TMS creates attachment of invoices, but if the invoices are not attached to the payment amount, then do the attachment according to the instructions bellow.</span></span></span></p>

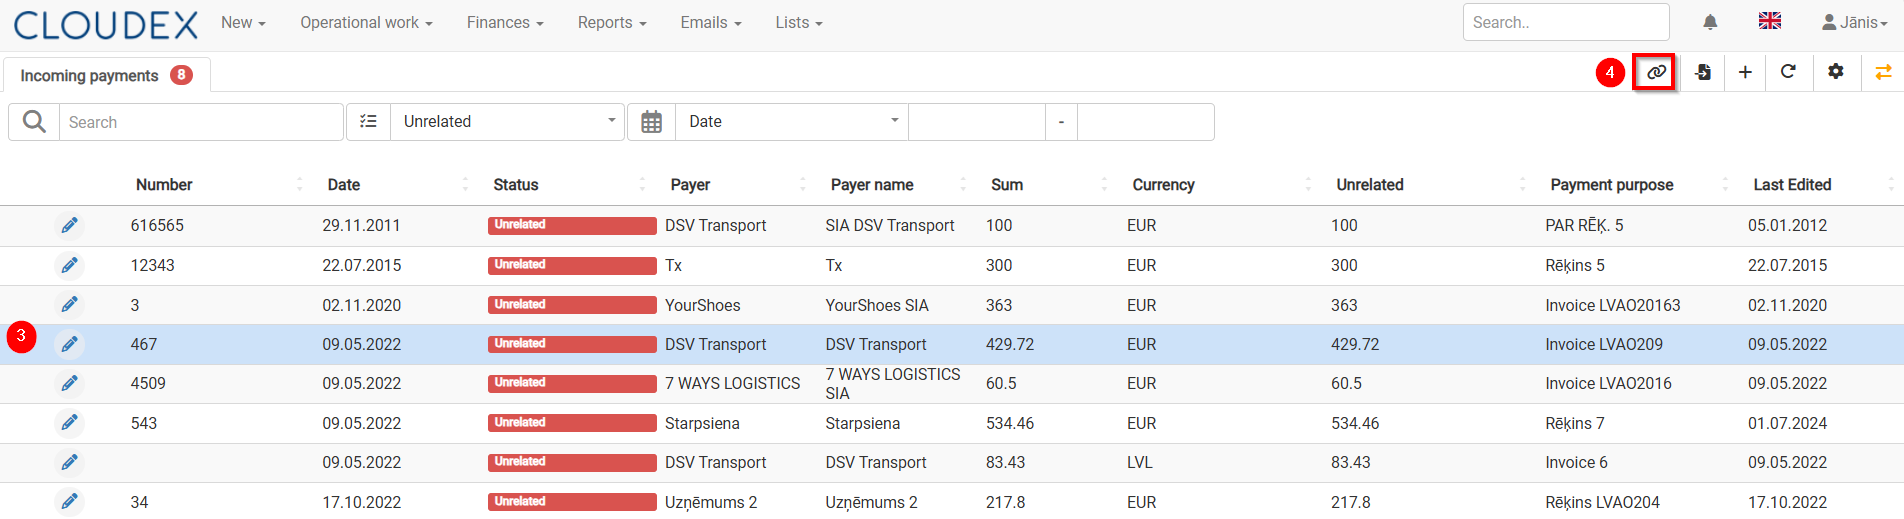
1\) **CLOUDEX TMS &gt; Finaces &gt;Incoming payments** 2) **Filter &gt;**show only **Unrelated payments "Unrelated" (payments which are not related to invoices)**

**[![Unrelated payments.png](https://ozols.lv/doc/uploads/images/gallery/2024-07/scaled-1680-/puBunrelated-payments.png)](https://ozols.lv/doc/uploads/images/gallery/2024-07/puBunrelated-payments.png)**
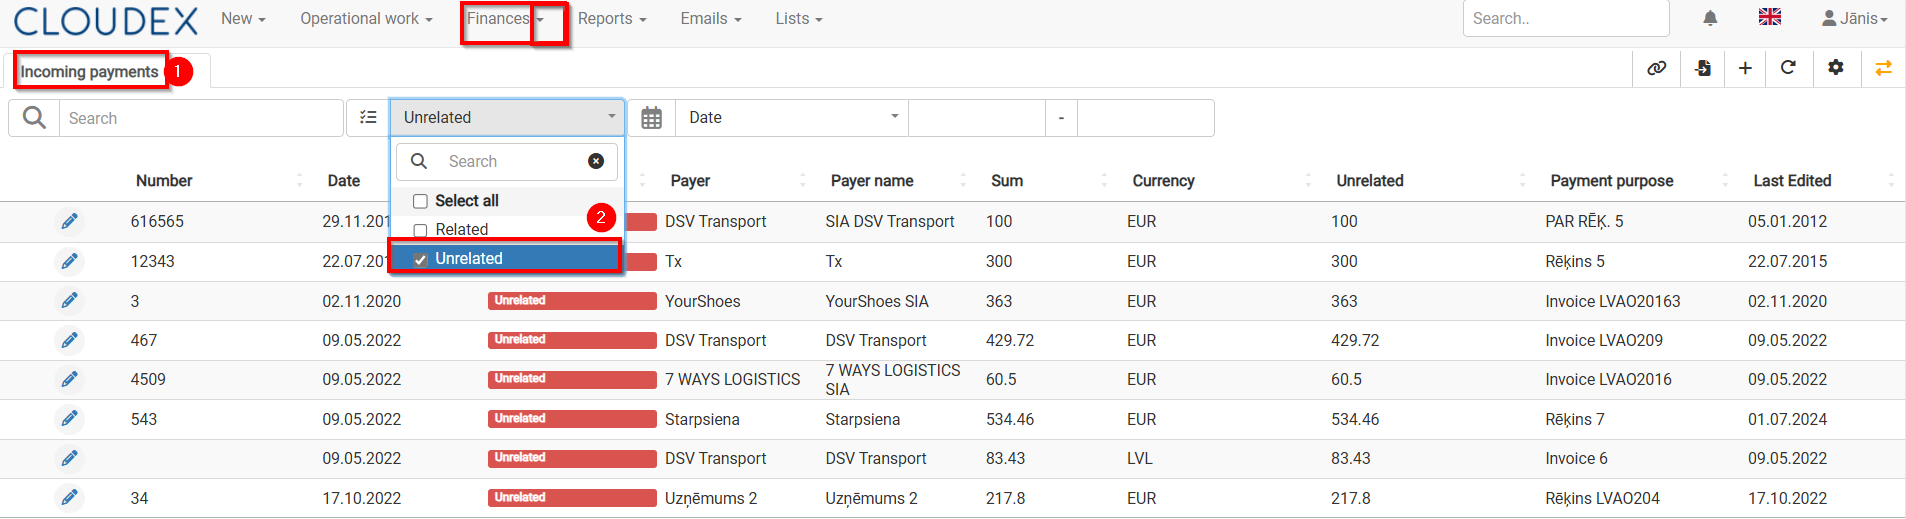
3\)  **Select** **Incoming Payment** which to "Relate" with Invoice  
4\) Press the button "Relate invoices" [![image-1719838166417.png](https://ozols.lv/doc/uploads/images/gallery/2024-07/scaled-1680-/image-1719838166417.png)](https://ozols.lv/doc/uploads/images/gallery/2024-07/image-1719838166417.png)

[![Relate.png](https://ozols.lv/doc/uploads/images/gallery/2024-07/scaled-1680-/relate.png)](https://ozols.lv/doc/uploads/images/gallery/2024-07/relate.png)
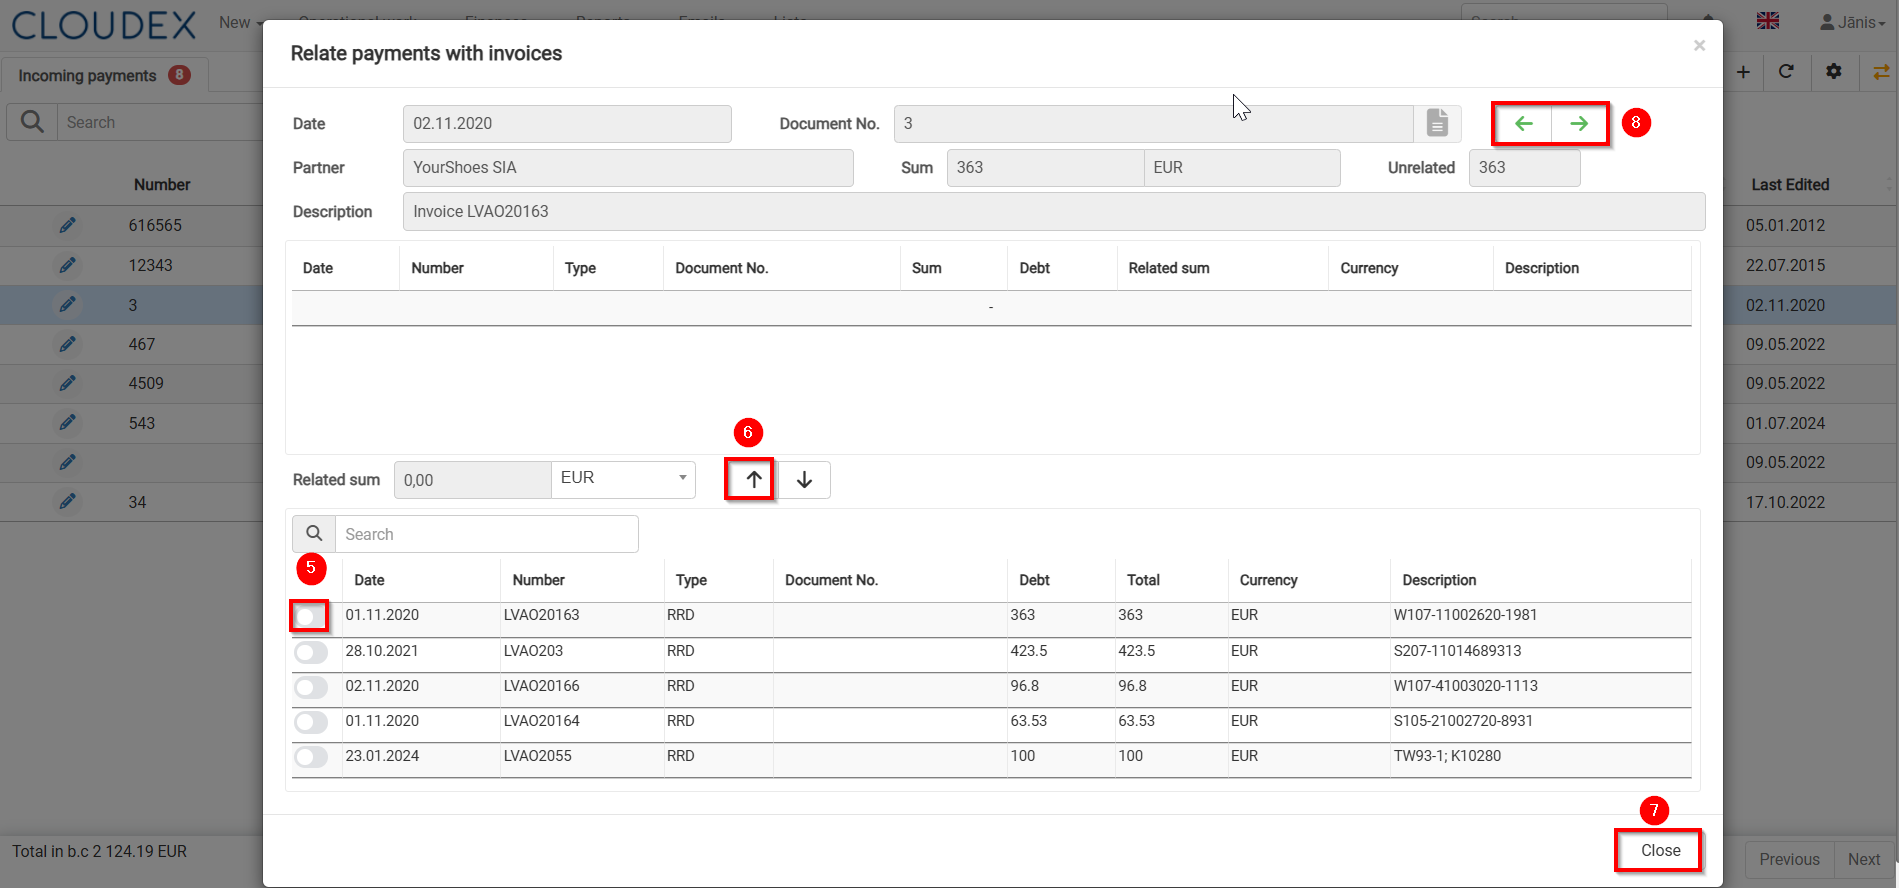
<span class="jCAhz JxVs2d ChMk0b"><span class="ryNqvb">5) In the list of Invoices, select the appropriate invoice/invoices for which payment has been made, mark them.  
</span></span><span class="jCAhz JxVs2d ChMk0b"><span class="ryNqvb">6) Selecting "the up arrow" you will be able to relate the invoice to payment.  
</span></span><span class="jCAhz JxVs2d ChMk0b"><span class="ryNqvb">7) Confirm with the button "Close".  
</span></span><span class="jCAhz JxVs2d ChMk0b"><span class="ryNqvb">8) With "the green arrows" it is possible to switch to another "Unlinked" payment.  
[![Relate Invoice with payment.png](https://ozols.lv/doc/uploads/images/gallery/2024-07/scaled-1680-/relate-invoice-with-payment.png)](https://ozols.lv/doc/uploads/images/gallery/2024-07/relate-invoice-with-payment.png)  
</span></span>

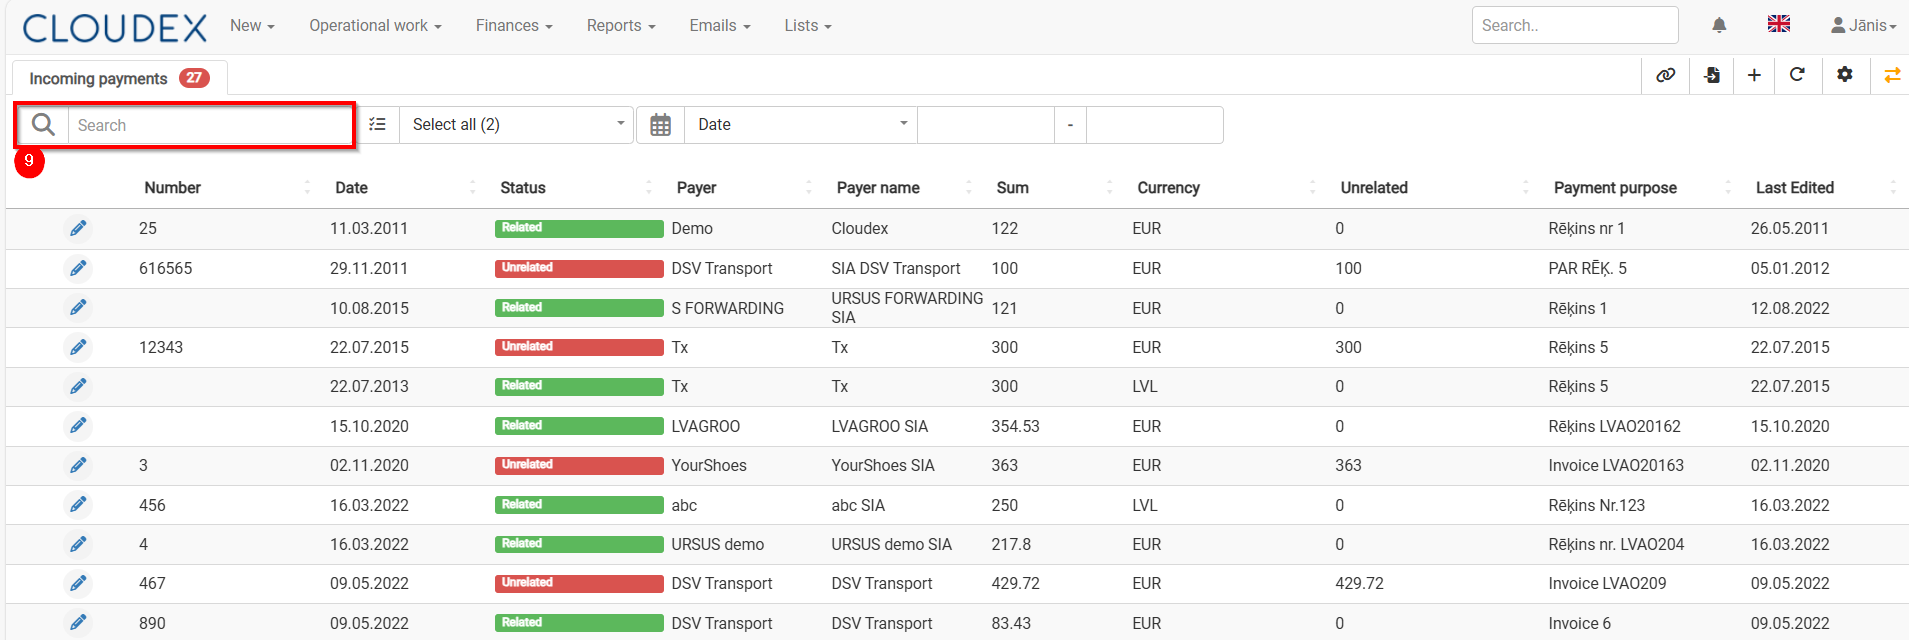
<span class="jCAhz JxVs2d ChMk0b"><span class="ryNqvb">9) With the filter, you can quickly find the required invoice by number, amount, etc.  
[![Filter.png](https://ozols.lv/doc/uploads/images/gallery/2024-07/scaled-1680-/filter.png)](https://ozols.lv/doc/uploads/images/gallery/2024-07/filter.png)  
</span></span>

<p class="callout success"><span class="jCAhz JxVs2d ChMk0b"><span class="ryNqvb">When the Incoming Payment is linked to the corresponding invoice, the amount in the "Unrelated" column in the Bank incomings list will be zero.</span></span></p>

#### 3. Outgoing invoice payment - manual data entry

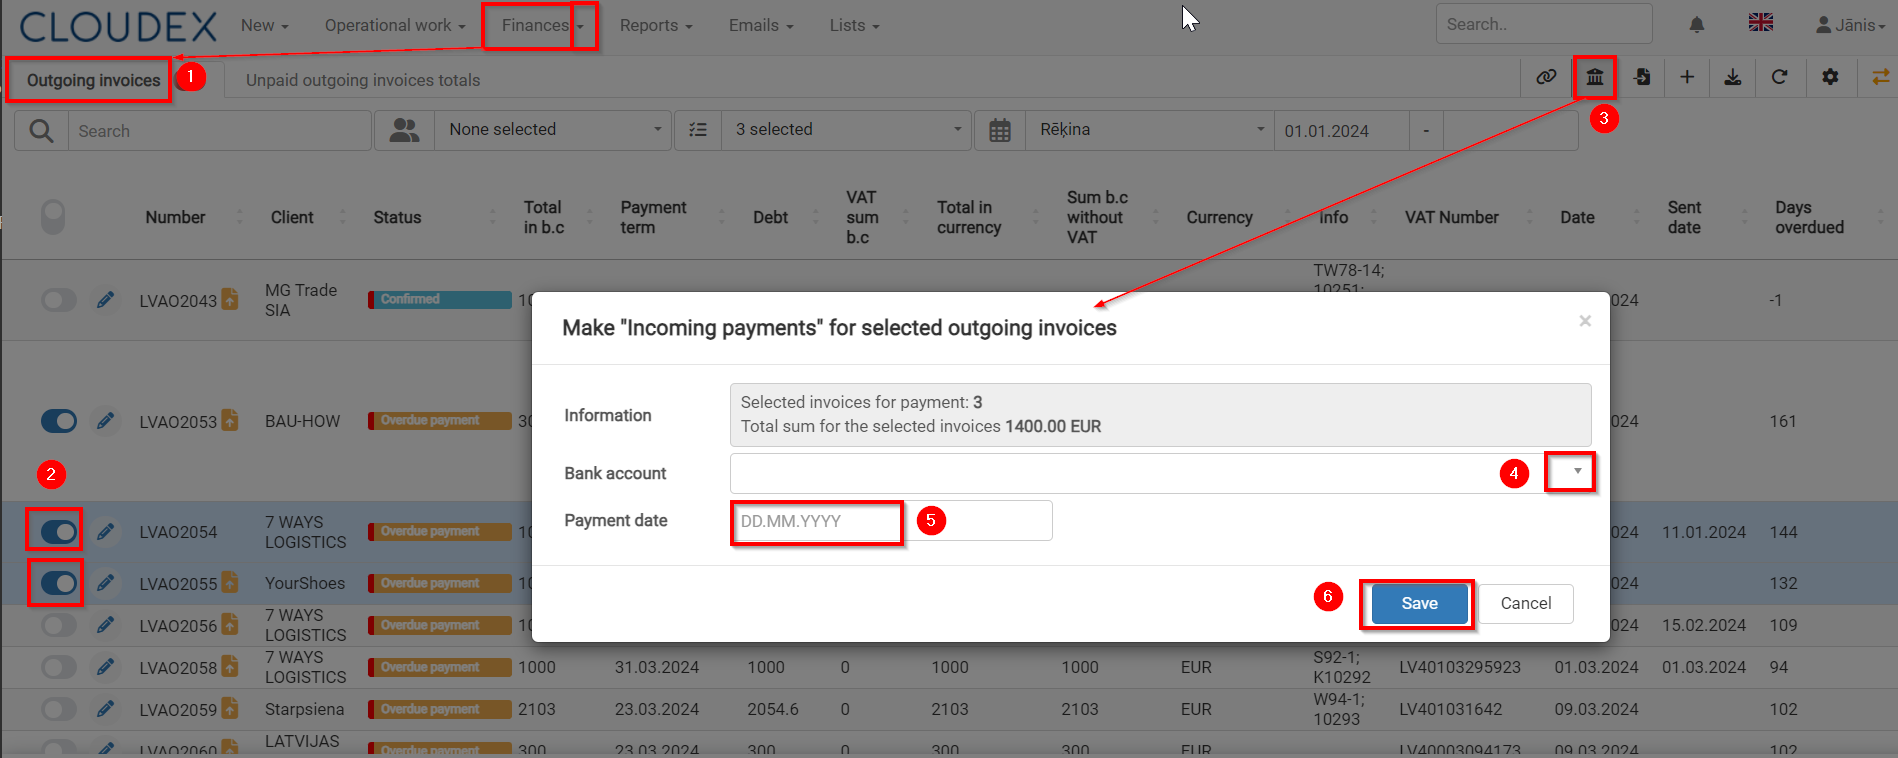
1. Go to **Finances &gt;Outgoing Invoices**
2. Mark **Outgoing Invoices** which are **paid**
3. Choose function "Make Incoming payments for selected outgoing invoice"
4. Choose appropriate Bank account, if you have more than one account
5. Enter the Payment date.
6. Save

[![Manual payment.png](https://ozols.lv/doc/uploads/images/gallery/2024-07/scaled-1680-/manual-payment.png)](https://ozols.lv/doc/uploads/images/gallery/2024-07/manual-payment.png)
# Invoice "Date sent"

This will answer the question of when the Invoice **“Date sent”** is set automatically and when the user needs to enter it manually.

The status **“Invoice sent”** changes automatically when a value is set in the Invoice field **“Date sent.”**  
The **“Date sent”** field is set automatically when the **“Send by email only”** checkbox is selected and the invoice is sent by email.

[![image-1769073685737.png](https://ozols.lv/doc/uploads/images/gallery/2026-01/scaled-1680-/image-1769073685737.png)](https://ozols.lv/doc/uploads/images/gallery/2026-01/image-1769073685737.png)
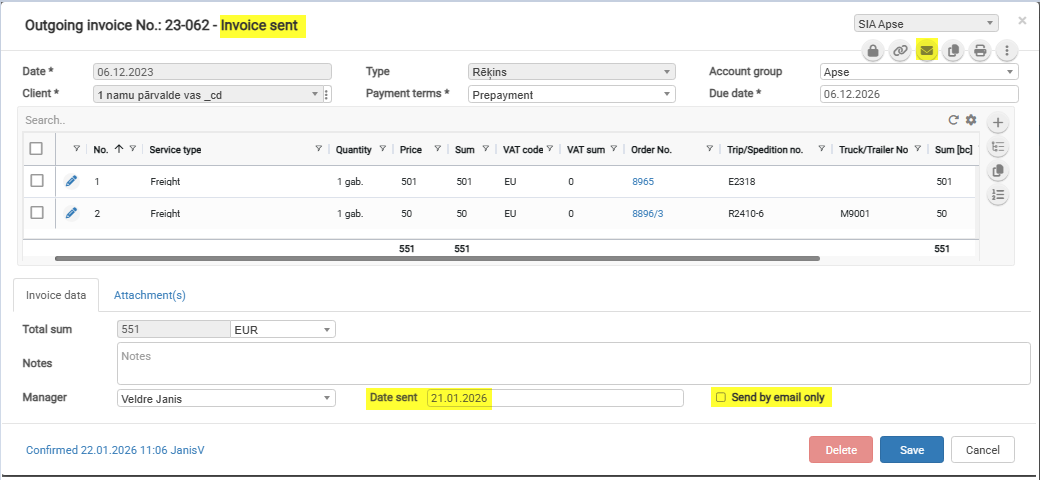
The **“Send by email only”** checkbox value is set automatically when generating an invoice from an order.  
The checkbox value depends on the **“Send invoices”** field value.

[![image-1769069369331.png](https://ozols.lv/doc/uploads/images/gallery/2026-01/scaled-1680-/image-1769069369331.png)](https://ozols.lv/doc/uploads/images/gallery/2026-01/image-1769069369331.png)
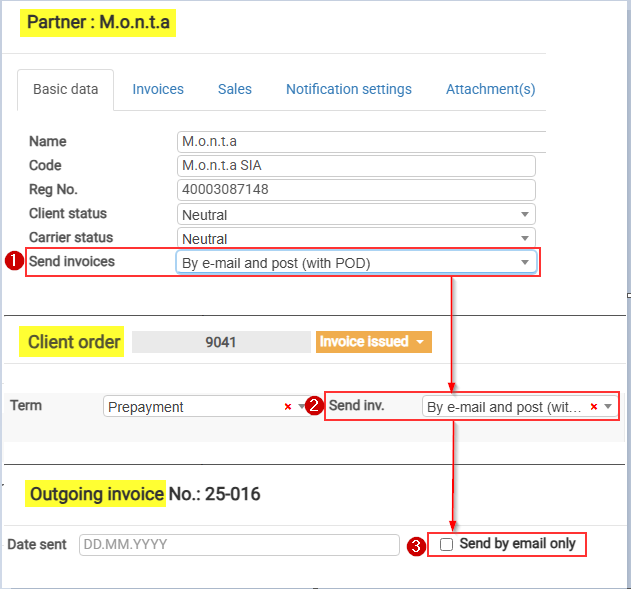
**Send invoices** values marked with “\*” set the **“Send by email only”** checkbox value automatically:

- **By e-mail (with POD)** \*
- By post (with POD)
- By e-mail and post (with POD)
- **Don’t send (Self-billing)** \*
- **Download in client portal** \*
- By e-mail (invoice upon delivery, second time with POD)
- **By e-mail (without POD)** \*
- Upload to the customer portal together with POD

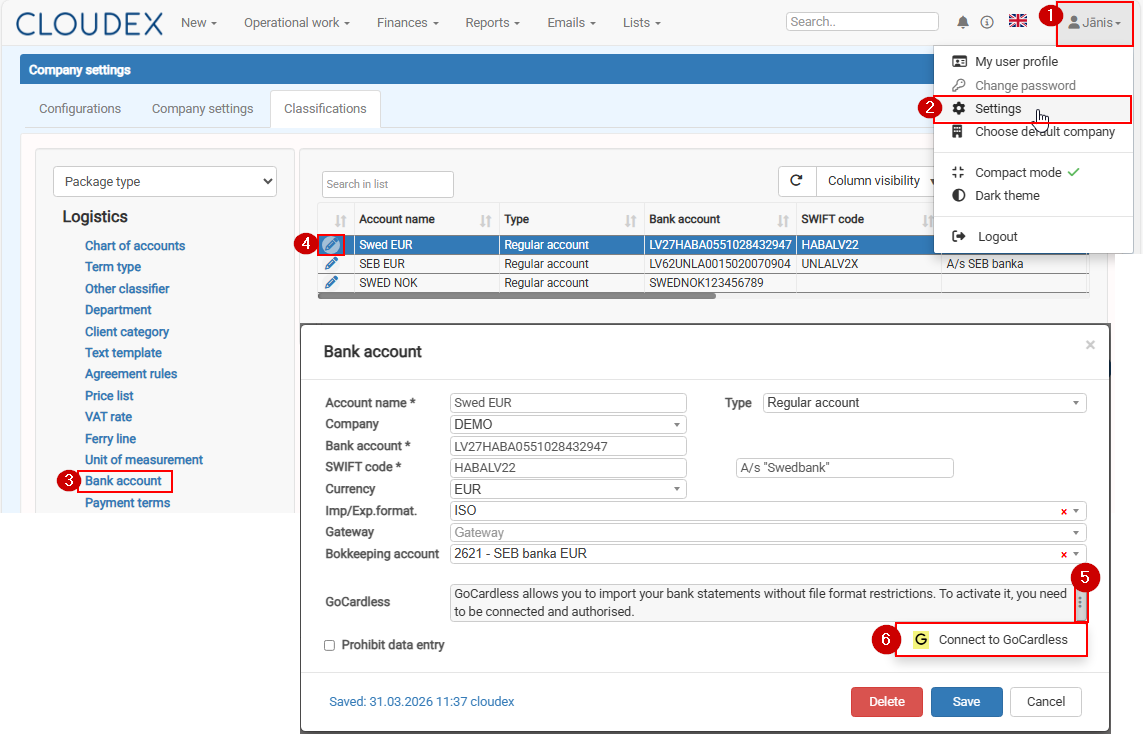
# How to connect your bank account with GoCardless

To enable automatic bank statement downloads (up to 3 times per day), you need to connect your bank account with GoCardless.

Please follow the steps below:

[![image-1774946604962.png](https://ozols.lv/doc/uploads/images/gallery/2026-03/scaled-1680-/image-1774946604962.png)](https://ozols.lv/doc/uploads/images/gallery/2026-03/image-1774946604962.png)
# 8. Incoming Invoices (Creditors)

# Registering an Incoming Invoice

If you need to register a single invoice for multiple trips at once, you can do so in one of the following ways:

1\) Register an invoice from the Trip form.  
2\) Register an invoice from the Open Trips window.

##### 1. Registering an Invoice from the Trip Form

1. Open the trip.
2. Click the **"Register Invoice"** button.

[![image-1780561081176.png](https://ozols.lv/doc/uploads/images/gallery/2026-06/scaled-1680-/image-1780561081176.png)](https://ozols.lv/doc/uploads/images/gallery/2026-06/image-1780561081176.png)
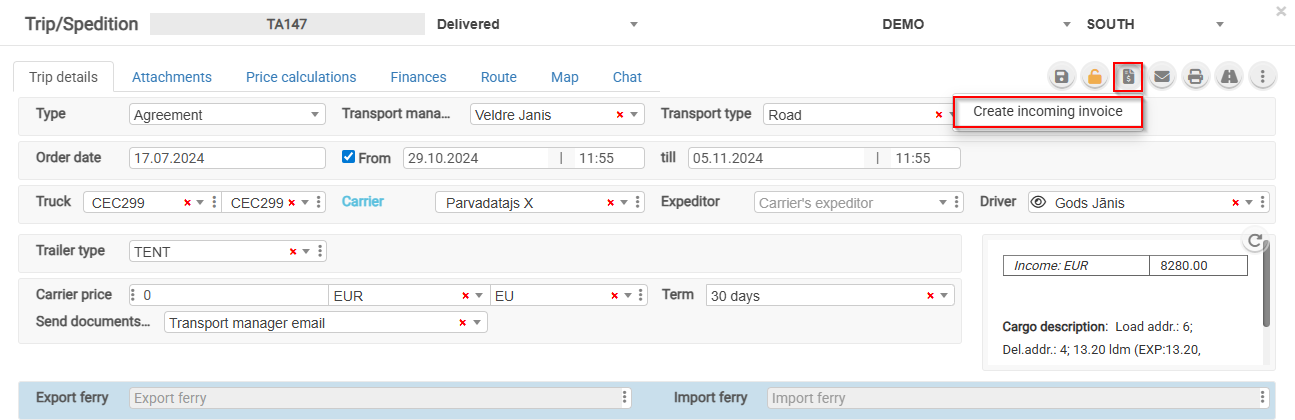
<p class="callout info">For an unconfirmed invoice, it is possible to add other customer orders.</p>

##### 2. Registering an Invoice from the Open Trips Window

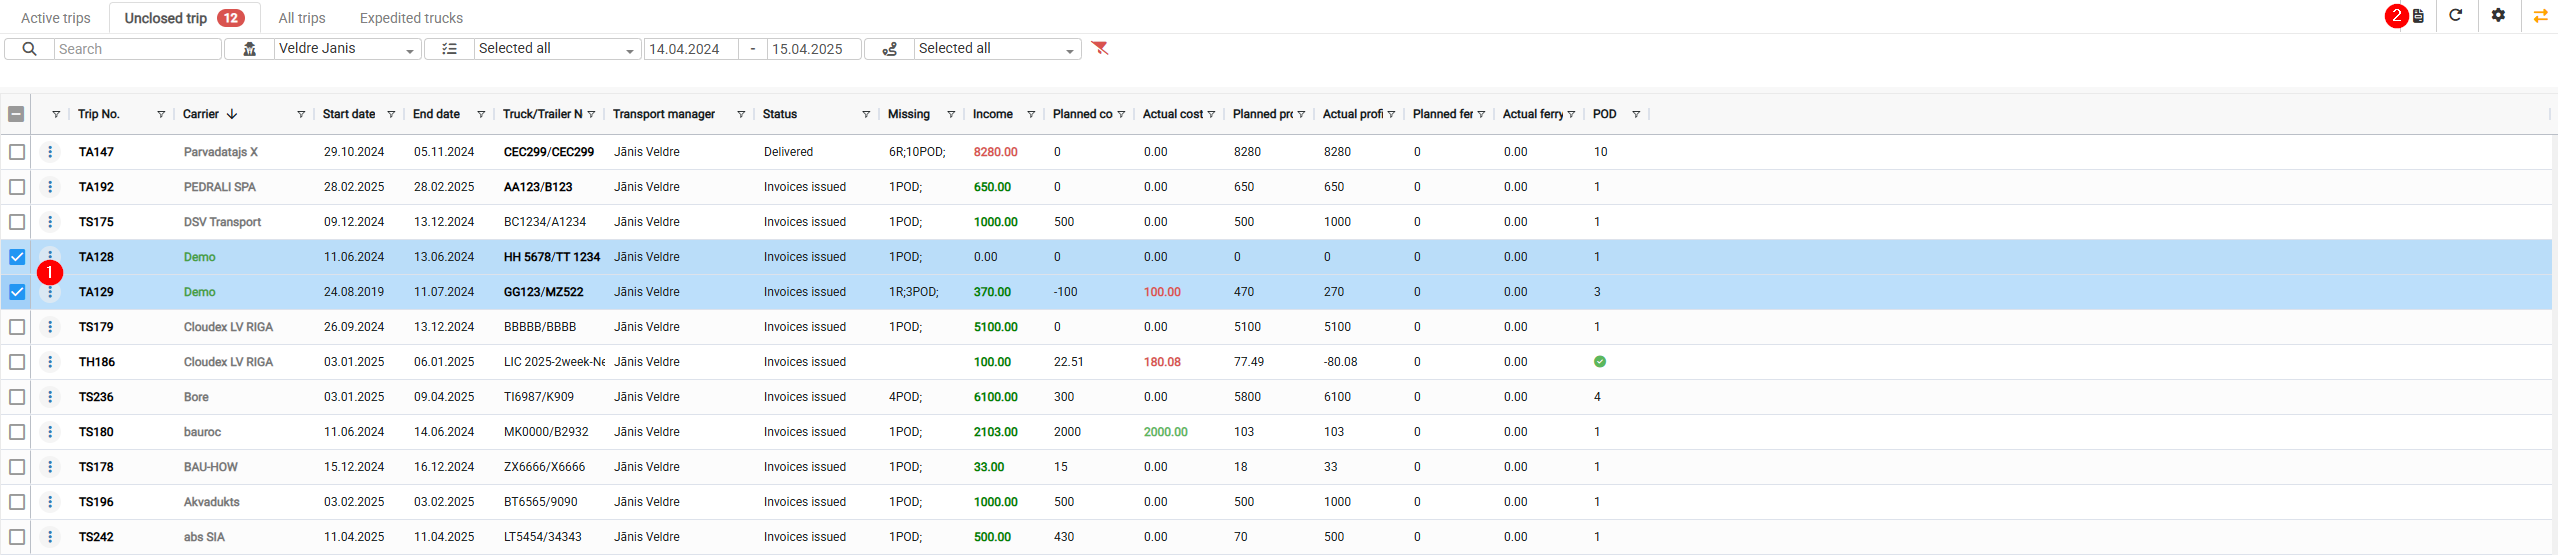
<p class="callout info">Navigate to the **Open Trips** tab. Select the trips for which incoming invoices have been received and click the **"Register Incoming Invoice"** button.</p>

1. Select the trips for which you want to register an incoming invoice.
2. Click the invoice registration icon.[![image-1780561317768.png](https://ozols.lv/doc/uploads/images/gallery/2026-06/scaled-1680-/image-1780561317768.png)](https://ozols.lv/doc/uploads/images/gallery/2026-06/image-1780561317768.png)
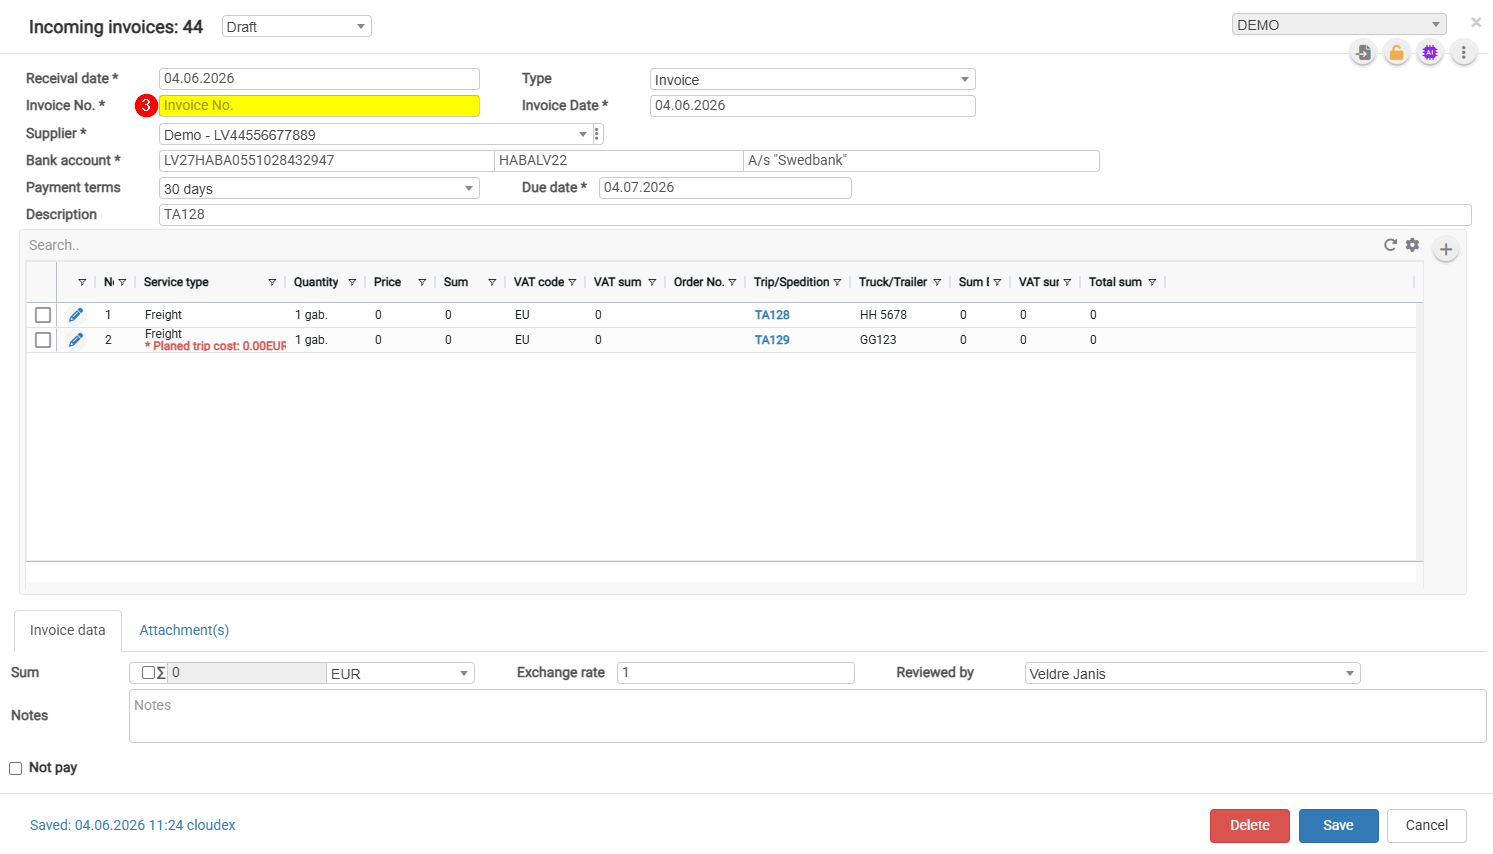
3. Complete the required fields and click **Save**.

[![image-1780561219944.png](https://ozols.lv/doc/uploads/images/gallery/2026-06/scaled-1680-/image-1780561219944.png)](https://ozols.lv/doc/uploads/images/gallery/2026-06/image-1780561219944.png)

[![image-1780561499887.png](https://ozols.lv/doc/uploads/images/gallery/2026-06/scaled-1680-/image-1780561499887.png)](https://ozols.lv/doc/uploads/images/gallery/2026-06/image-1780561499887.png)
# Applying a Cash Discount (Skonto) to an Incoming Invoice

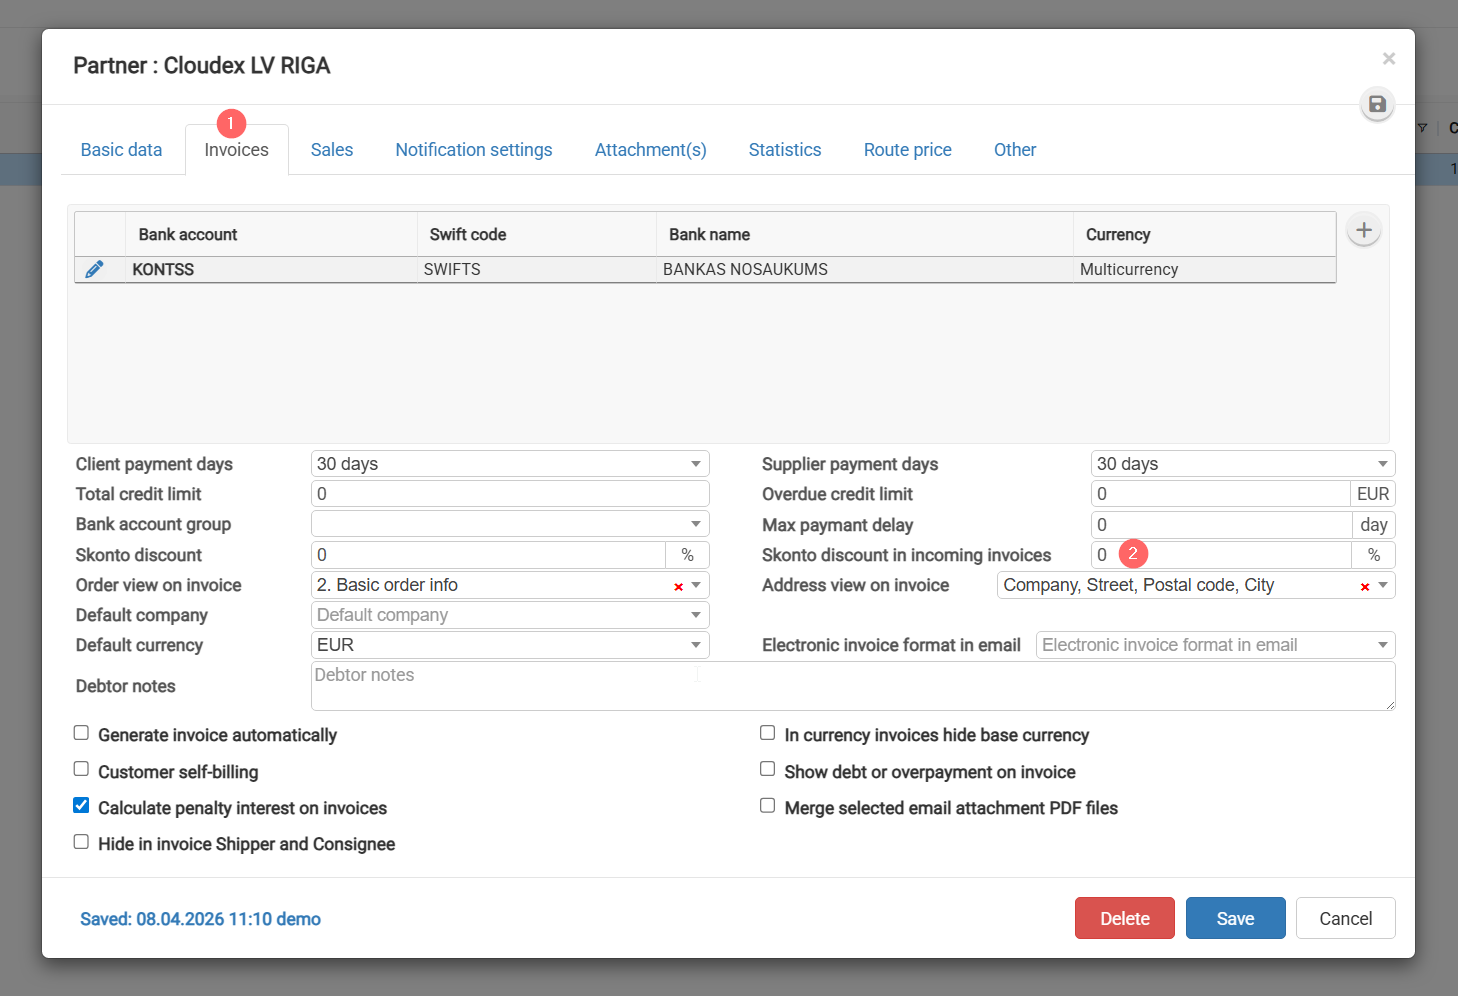
1\) In the Partner List, find the relevant partner.  
2\) Open the "Settlements" section and enter the discount.

[![image-1780901854138.png](https://ozols.lv/doc/uploads/images/gallery/2026-06/scaled-1680-/image-1780901854138.png)](https://ozols.lv/doc/uploads/images/gallery/2026-06/image-1780901854138.png)
# 9. Bank payment import/export

# Bank outgoing payment export

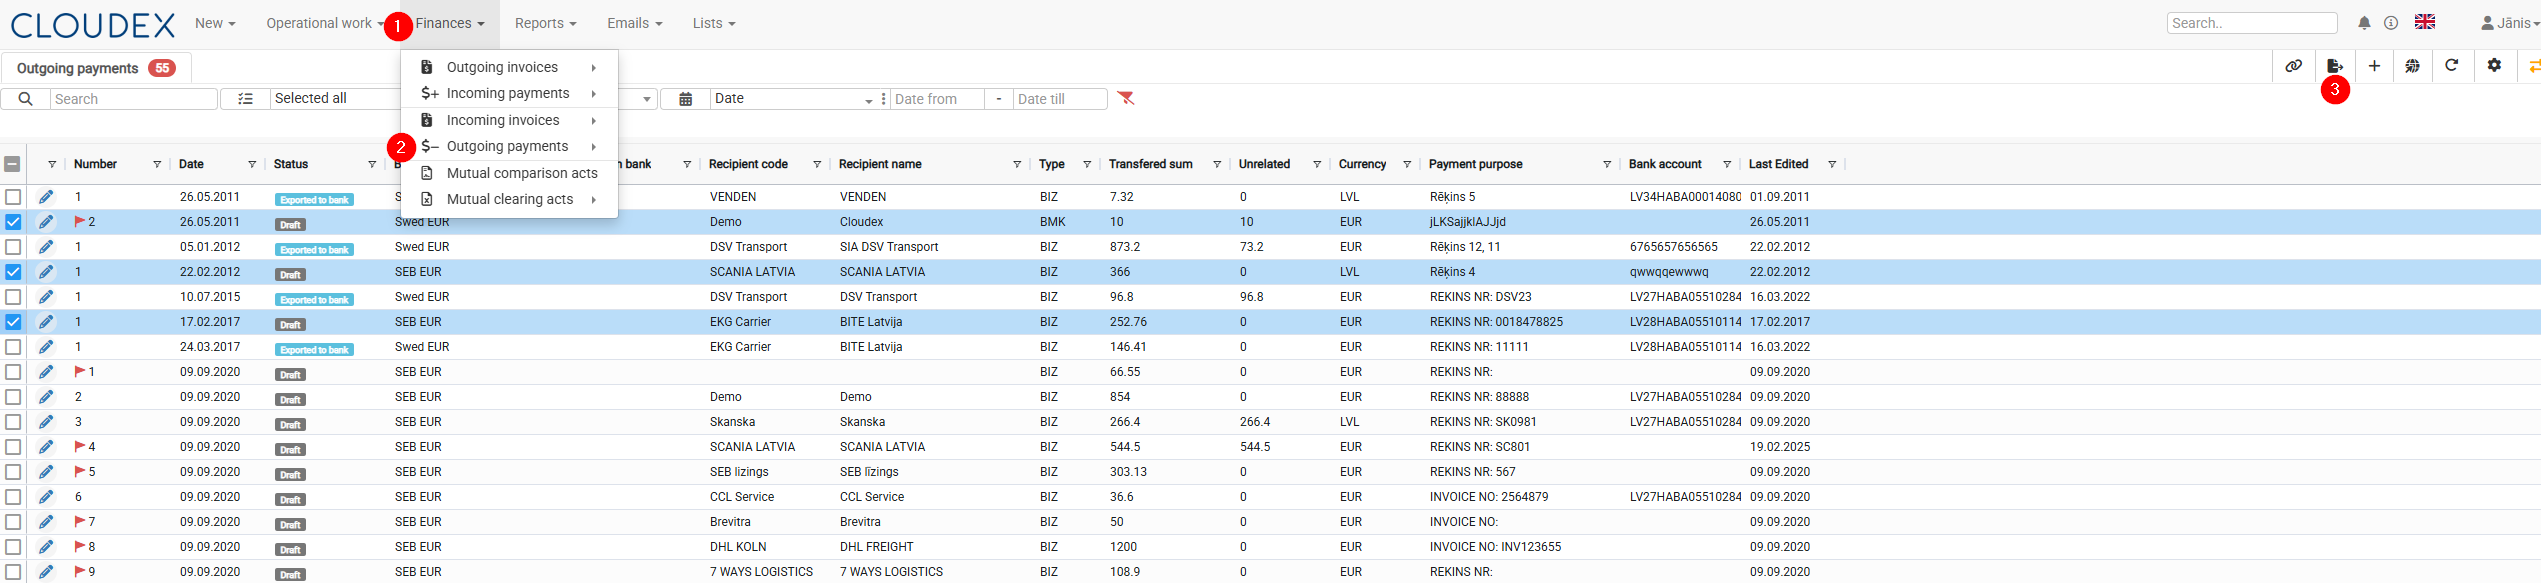
1. In the top menu, click on **"Finance"**.
2. In the drop-down menu that opens, select **"Outgoing payment"**.
3. The system will open the **Outgoing payment** list, where you will be able to: 
    - import bank payments.

[![image-1780385927804.png](https://ozols.lv/doc/uploads/images/gallery/2026-06/scaled-1680-/image-1780385927804.png)](https://ozols.lv/doc/uploads/images/gallery/2026-06/image-1780385927804.png)
# Bank incoming payment export

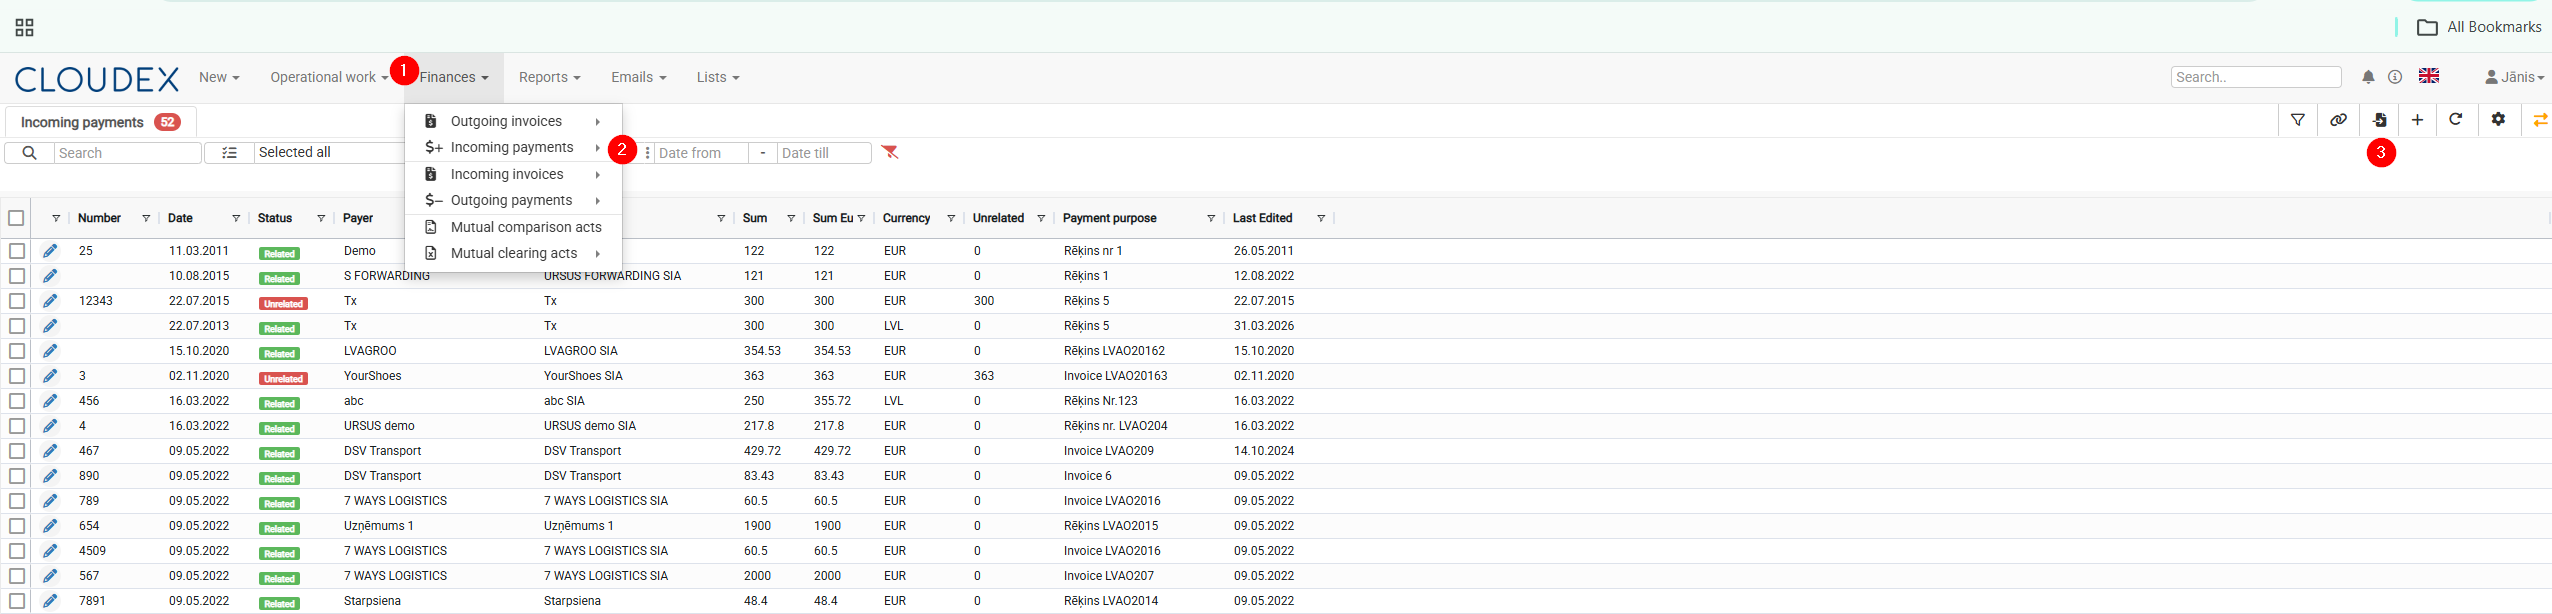
<div id="bkmrk-in-the-top-menu%2C-cli"><div><div><div><div data-message-author-role="assistant" data-message-id="0a9f8501-97c5-4979-9c00-cfb0ad556613" data-message-model-slug="gpt-5-5" data-turn-start-message="true"><div><div>1. In the top menu, click on **"Finance"**.
2. In the drop-down menu that opens, select **"Incoming Payments"**.
3. The system will open the **Incoming Payments** list, where you will be able to: 
    - import bank payments.

</div></div></div></div></div></div></div>[![image-1780385611235.png](https://ozols.lv/doc/uploads/images/gallery/2026-06/scaled-1680-/image-1780385611235.png)](https://ozols.lv/doc/uploads/images/gallery/2026-06/image-1780385611235.png)

# 11. Customer and Freight Carrier Portal

# Customer portal

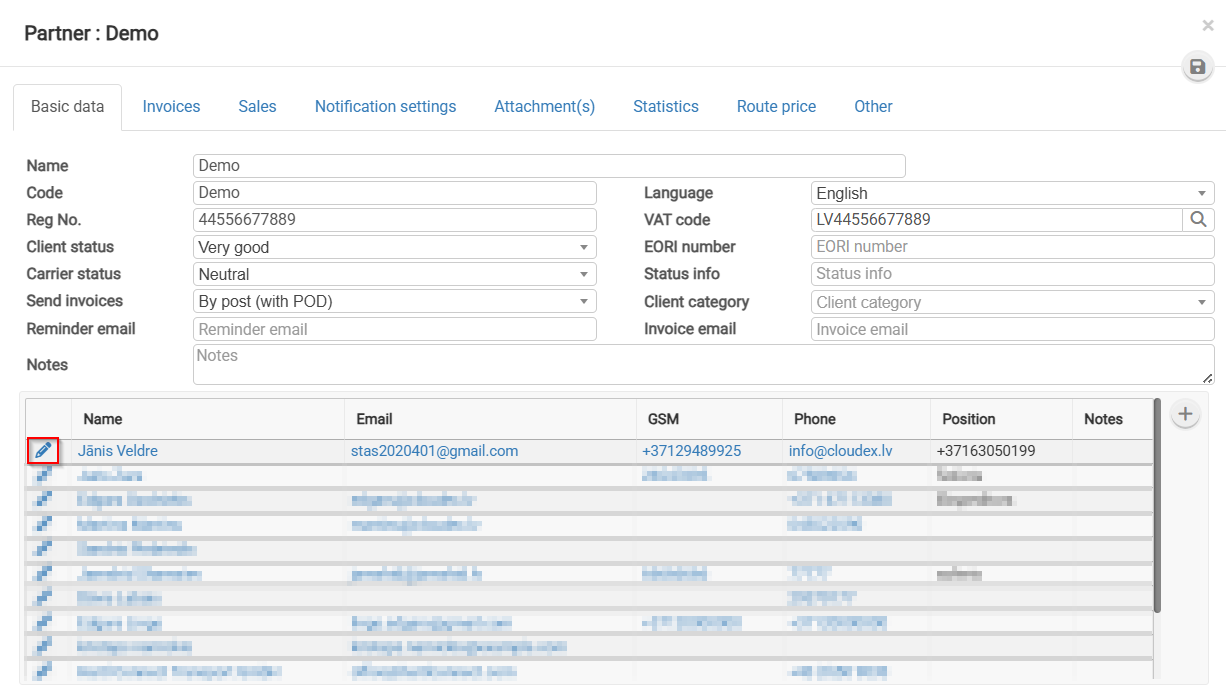
[![image-1782722303125.png](https://ozols.lv/doc/uploads/images/gallery/2026-06/scaled-1680-/image-1782722303125.png)](https://ozols.lv/doc/uploads/images/gallery/2026-06/image-1782722303125.png)
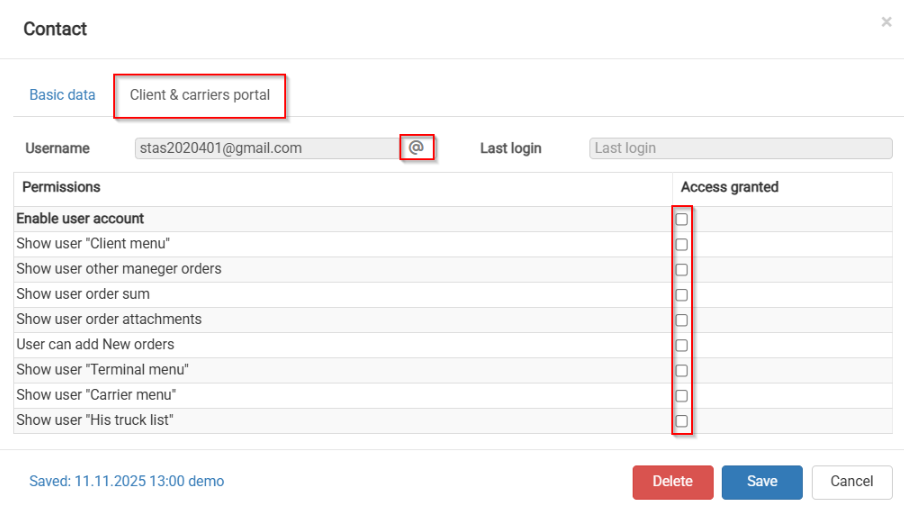
[![image-1782722418351.png](https://ozols.lv/doc/uploads/images/gallery/2026-06/scaled-1680-/image-1782722418351.png)](https://ozols.lv/doc/uploads/images/gallery/2026-06/image-1782722418351.png)
# Freight Carrier Portal

# 20. Integrations

# Shipment manifest export to CLOUDEX API

In order to import shipments in CLOUDEX/OZOLS you need to use CLOUDEX API [https://my.cloudex.lv/cloudex-api/swagger/index.html](https://my.cloudex.lv/cloudex-api/swagger/index.html) **shipment-manifest** end-point

API key you can get writing to <info@cloudex.lv>

[![image-1770800504717.png](https://ozols.lv/doc/uploads/images/gallery/2026-02/scaled-1680-/image-1770800504717.png)](https://ozols.lv/doc/uploads/images/gallery/2026-02/image-1770800504717.png)

# Order for carrier

# Transport order for Carrier, CMR and invoice upload

When you send order for carrier in e-mail is unique link on which Carrier manager need to click in order to mark loading/delivery dates and upload CMR and Invoice.

[![image-1748594998018.png](https://ozols.lv/doc/uploads/images/gallery/2025-05/scaled-1680-/image-1748594998018.png)](https://ozols.lv/doc/uploads/images/gallery/2025-05/image-1748594998018.png)

1\. Click to open the page  
2\. Upload CMR  
3\. Confirm loading  
4\. Upload invoice PDF file

[![image-1748596806088.png](https://ozols.lv/doc/uploads/images/gallery/2025-05/scaled-1680-/image-1748596806088.png)](https://ozols.lv/doc/uploads/images/gallery/2025-05/image-1748596806088.png)

Add invoice date  
Add invoice number

[![image-1748598349241.png](https://ozols.lv/doc/uploads/images/gallery/2025-05/scaled-1680-/image-1748598349241.png)](https://ozols.lv/doc/uploads/images/gallery/2025-05/image-1748598349241.png)

# Driver app "Cloudex drive"

# Clear Storeage

(1) Finger press the "CLOUDEX drive" icon for 1 second (2) and then select "App info"

Options for how it could look

[![image-1723205327380.png](https://ozols.lv/doc/uploads/images/gallery/2024-08/scaled-1680-/image-1723205327380.png)](https://ozols.lv/doc/uploads/images/gallery/2024-08/image-1723205327380.png)

(1) Click on storage and cache

Options for how it could look

(2) Clear storage (2) Clear cache

[![image-1723202516500.png](https://ozols.lv/doc/uploads/images/gallery/2024-08/scaled-1680-/image-1723202516500.png)](https://ozols.lv/doc/uploads/images/gallery/2024-08/image-1723202516500.png)

(1) Click on storage

(2) Click clear data

[![image-1723202514780.png](https://ozols.lv/doc/uploads/images/gallery/2024-08/scaled-1680-/image-1723202514780.png)](https://ozols.lv/doc/uploads/images/gallery/2024-08/image-1723202514780.png)

(1) Click on storage

(2) Click clear data

[![image-1723202119914.png](https://ozols.lv/doc/uploads/images/gallery/2024-08/scaled-1680-/image-1723202119914.png)](https://ozols.lv/doc/uploads/images/gallery/2024-08/image-1723202119914.png)

# How to send electronic invoice to your customer

In other to send electronic invoice to your customer (PEPPOL, rekini.lv or other formats)

Go on Partner &gt; Invoices &gt; Electronic invoice format in email chose: **Peppol** or other &gt; Save

[![image-1773305815682.png](https://ozols.lv/doc/uploads/images/gallery/2026-03/scaled-1680-/image-1773305815682.png)](https://ozols.lv/doc/uploads/images/gallery/2026-03/image-1773305815682.png)

When you send an invoice to your client, electronic invoice (PEPPOL or other formats) will be included as an attachment.

[![image-1773306189484.png](https://ozols.lv/doc/uploads/images/gallery/2026-03/scaled-1680-/image-1773306189484.png)](https://ozols.lv/doc/uploads/images/gallery/2026-03/image-1773306189484.png)

# Tips and Tricks #1

#### Clearing Browser Cache and Cookies

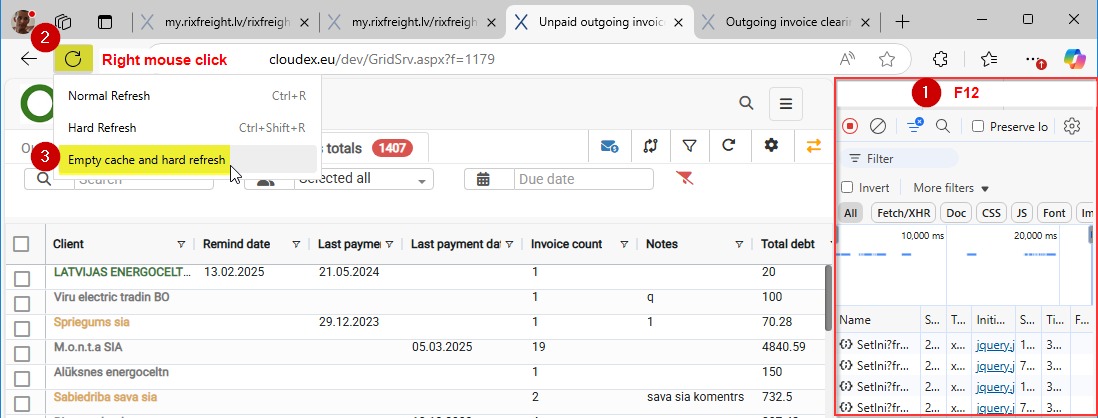
**Quick cache clearing in Google Chrome:**

1. Press **F12** to open **Developer Tools**.
2. Right-click the **Refresh** icon (usually located in the upper-left area next to the address bar).
3. Select **"Empty Cache and Hard Reload"**.

<p class="callout info">This method clears the cache only for the current page, which is useful for developers and testing purposes.</p>

#### Clearing Cache and Cookies for the Entire Browser

1. Open the browser menu (the three dots in the upper-right corner).
2. Go to **Settings &gt; Privacy and Security &gt; Clear Browsing Data**.
3. Select **"Cookies and other site data"** and **"Cached images and files"**.,
4. Click **"Clear Data"**.

[![WhatsApp.jpeg](https://ozols.lv/doc/uploads/images/gallery/2025-05/scaled-1680-/whatsapp.jpeg)](https://ozols.lv/doc/uploads/images/gallery/2025-05/whatsapp.jpeg)3
# Tips and tricks #2

##### **Delete: Data Transfer**

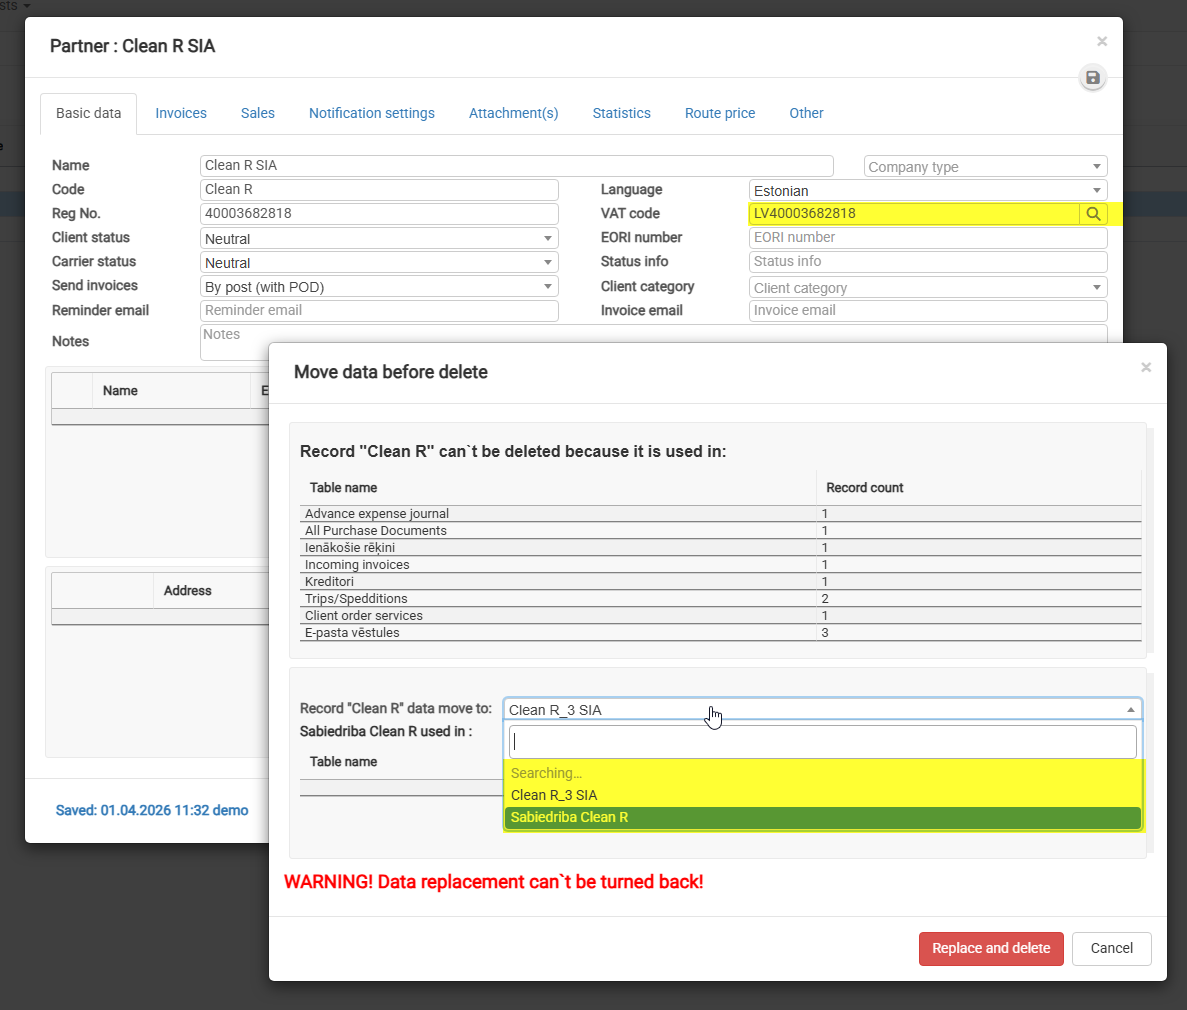
 **1) Open the “Delete” window**  
This window appears when you try to delete a company that is used in existing records.

**2) Review where the data is used**  
In the top table, you’ll see all places where the company is linked (e.g., invoices, purchases, shipments, etc.).

**3) Find the field “Record ‘Clean R’ data move to”**  
This is a dropdown list where you must select the target company.

**4) Select a company from the list**

- Click on the dropdown field
- Start typing the company name (e.g., *XXXXX*)
- Choose the correct company from the suggestions

**5) Double-check your selection**   
All data will be transferred to this company, and this action cannot be undone.

**6) Click “Replace and delete”** Data will be moved to the selected company  
The original company will be deleted


[![DATAMOVE.png](https://ozols.lv/doc/uploads/images/gallery/2026-04/scaled-1680-/datamove.png)](https://ozols.lv/doc/uploads/images/gallery/2026-04/datamove.png)