# 1. Settings
# E-mail settings
**To send emails** from Cloudex TMS:
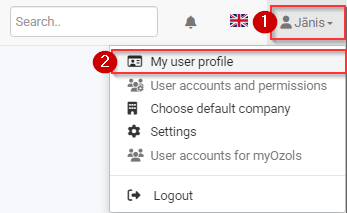
1\) Click on the Your User Name icon
2\) Select the "My Profile" menu
[](https://ozols.lv/doc/uploads/images/gallery/2025-03/image-1742462603046.png)
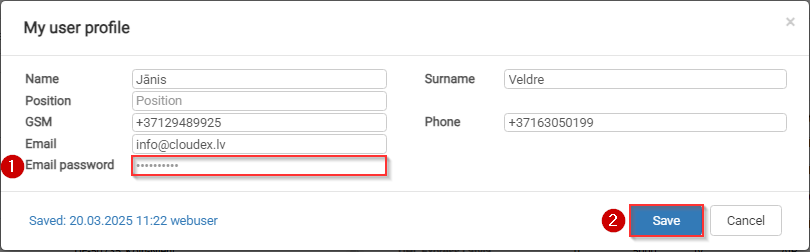
**In the "Email password" field:**
1\) Enter your email password
2\) Click the "Save" button
[](https://ozols.lv/doc/uploads/images/gallery/2025-03/image-1742462758441.png)
# Create google email password
1\) Open google account and login:
[https://myaccount.google.com/](https://myaccount.google.com/)
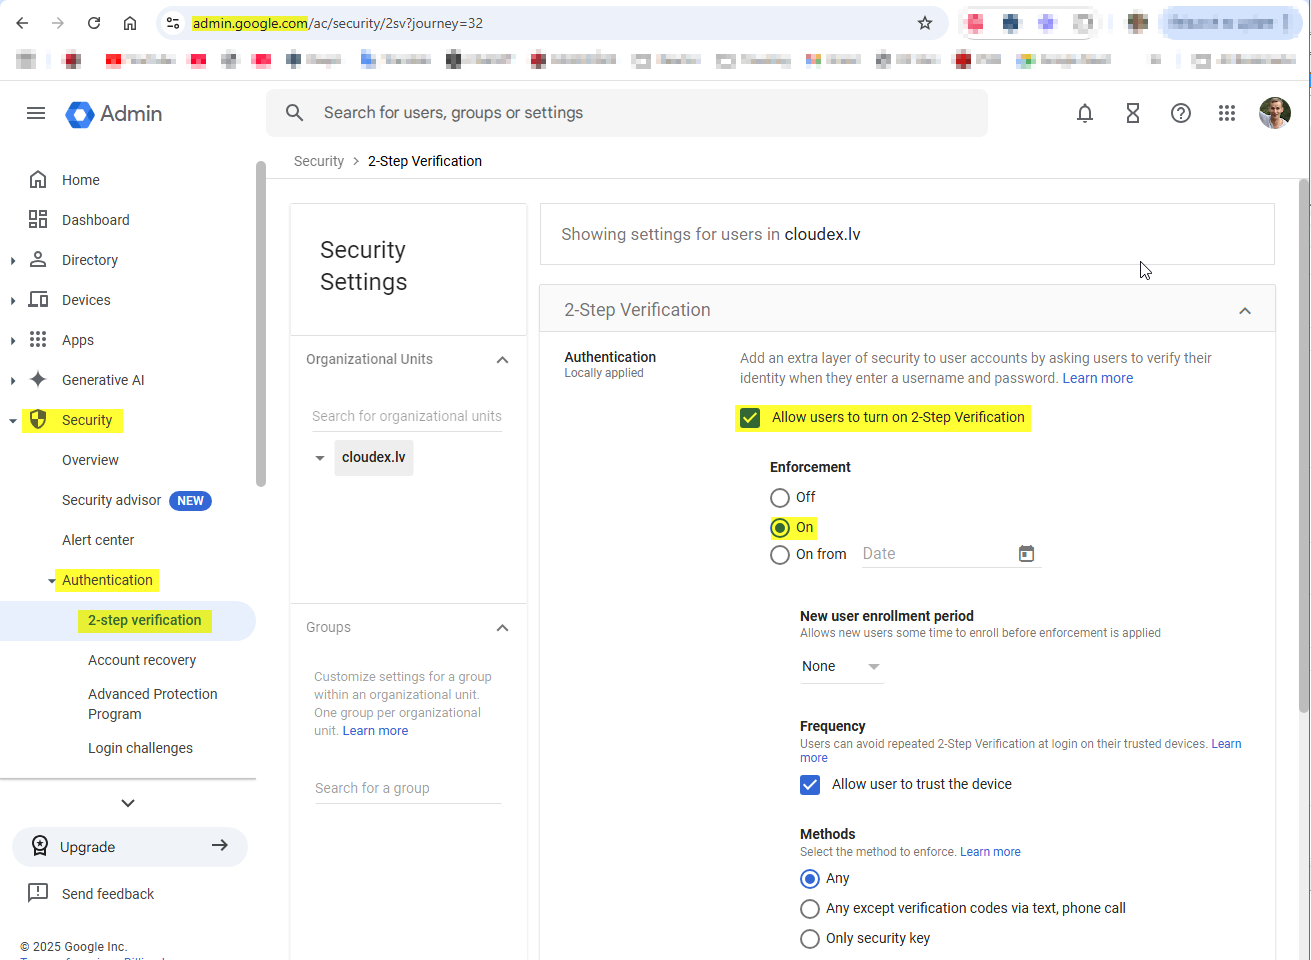
If 2-step verification is not available in the section, your company's email administrator must first enable it: [instrukction how to do it read here](https://ozols.lv/doc/link/382#bkmrk-uz%C5%86%C4%93mumiem-ir-j%C4%81b%C5%ABt-)
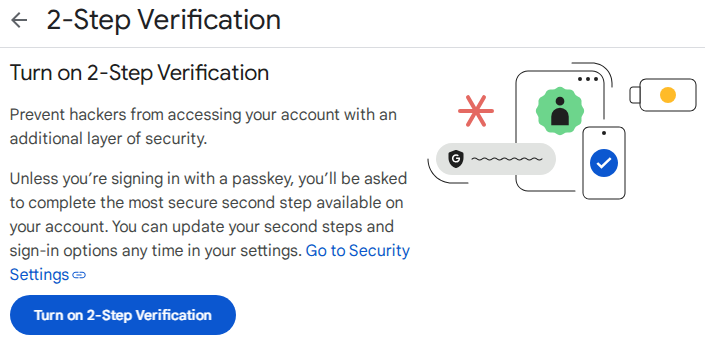
**3) Ieslēgt "2-pakāpju verifikāciju / 2-Step verification"**
[](https://ozols.lv/doc/uploads/images/gallery/2025-03/image-1742982231557.png)
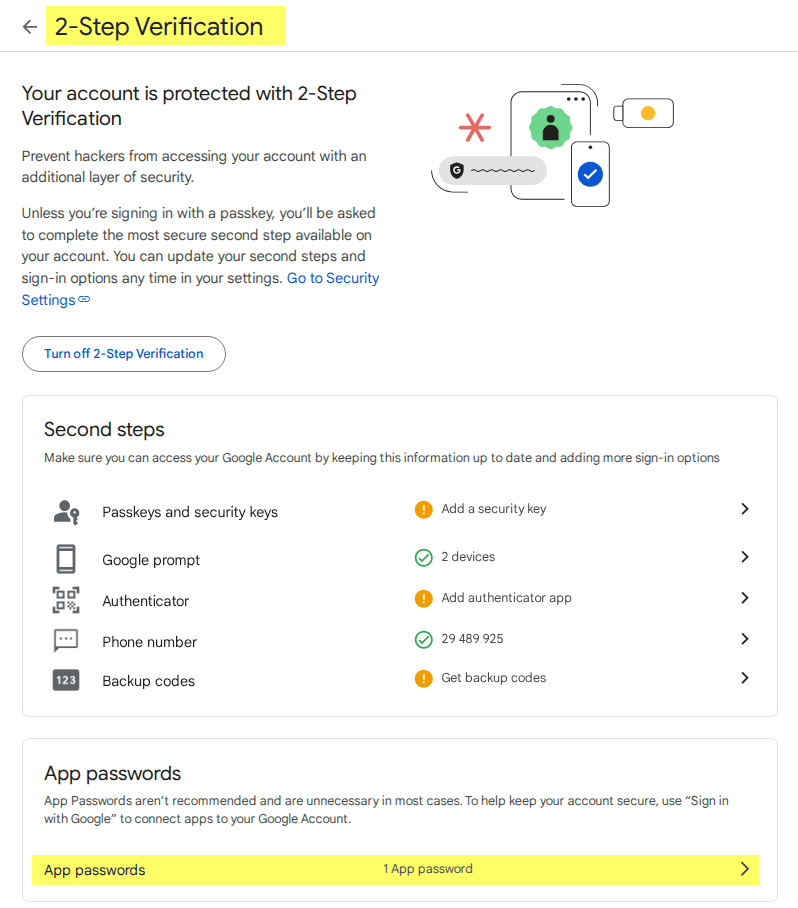
**4) Create a password/key for emails**
If there is no "App passwords" section in the Two-step verification / 2-step verification section, you must exit the page and re-enter it. Or use the link **[https://myaccount.google.com/apppasswords](https://myaccount.google.com/apppasswords)**
[](https://ozols.lv/doc/uploads/images/gallery/2025-10/image-1761209173707.png)
**5) Create password**
[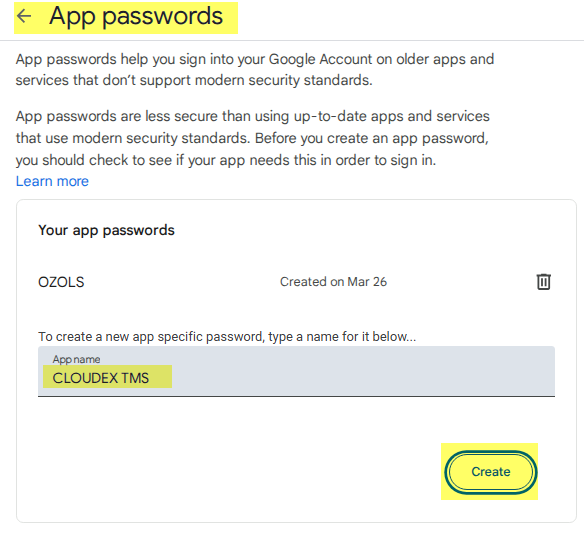](https://ozols.lv/doc/uploads/images/gallery/2025-10/image-1761209442553.png)
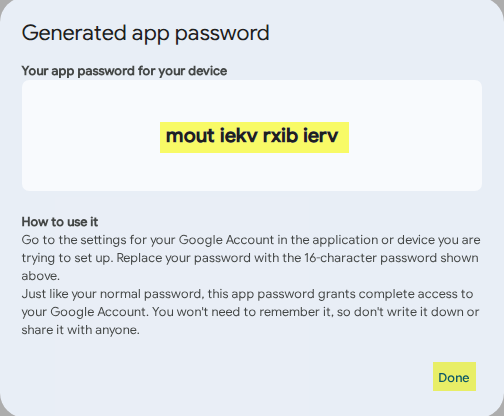
6\) Copy new password and enter it in OZOLS or CLOUDEX TMS
Instructions for entering your email password in Ozols: [https://ozols.lv/doc/books/ozols-tms-english/page/5-e-mail-settings](https://ozols.lv/doc/books/ozols-tms-english/page/5-e-mail-settings)
Instructions for entering your email password in CLOUDEX TMS: [https://ozols.lv/doc/books/cloudex-tms-english/page/e-mail-settings](https://ozols.lv/doc/books/cloudex-tms-english/page/e-mail-settings)
[](https://ozols.lv/doc/uploads/images/gallery/2025-10/image-1761209548234.png)
#### Companies must have the option enabled that is available
[Instrukction from google](https://support.google.com/a/answer/9176657?product_name=UnuFlow&visit_id=01742980293793-8471960249317013911&rd=1&src=supportwidget0)
[](https://ozols.lv/doc/uploads/images/gallery/2025-03/image-1742980788837.png)
# Office365: HOW TO GET TenantId, ClientId and ClientSecret
If you use Microsoft office 365 for email sending. Your company Microsoft admin need to get following settings from **Azure AD Application**
- **Directory (Tenant) ID**
- **Application (Client) ID**
- **Client Secret Value**
These three values are required for integrating CLOUDEX TMS with Microsoft Graph using OAuth2.
---
#### **1️⃣ Sign in to Azure Portal**
Open: [https://portal.azure.com](https://portal.azure.com)Sign in with a Microsoft 365 **Global Admin** or **Application Administrator** account.
---
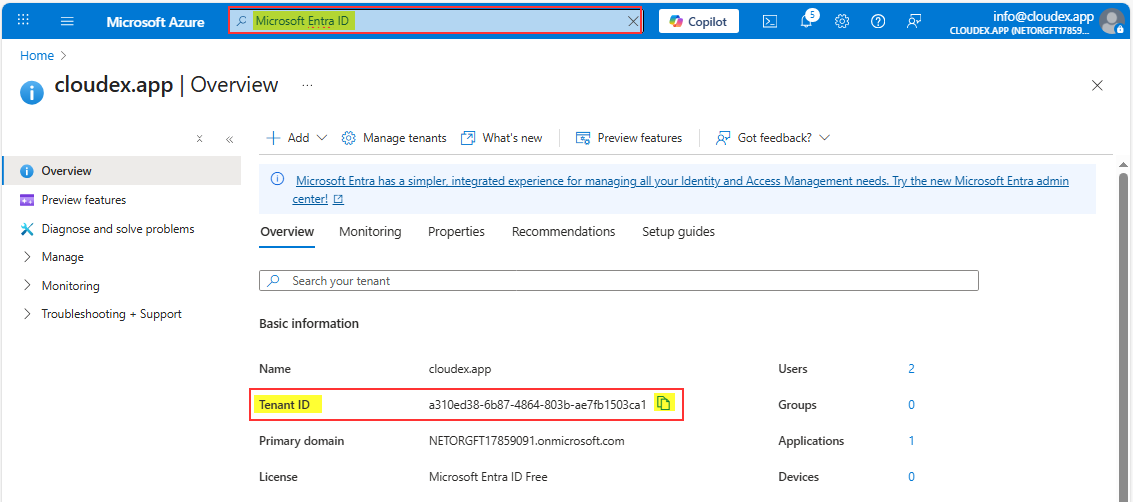
#### **2️⃣ Open “Microsoft Entra ID” (Azure AD)**
Left menu → **Microsoft Entra ID**
(or search “Entra ID” in the top search bar)
[](https://ozols.lv/doc/uploads/images/gallery/2025-12/image-1764595464188.png)
---
#### **3️⃣ Create a new App Registration**
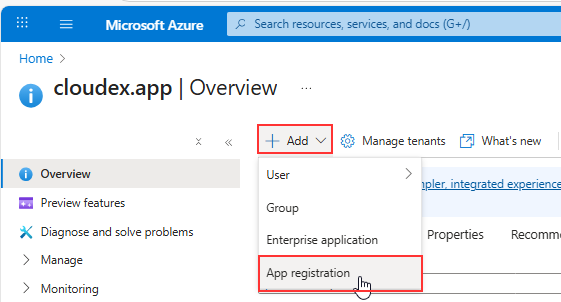
1. Left menu: **App registrations**
2. Click **New registration**
[](https://ozols.lv/doc/uploads/images/gallery/2025-12/image-1764595545977.png)
[](https://ozols.lv/doc/uploads/images/gallery/2025-12/image-1764595721522.png)
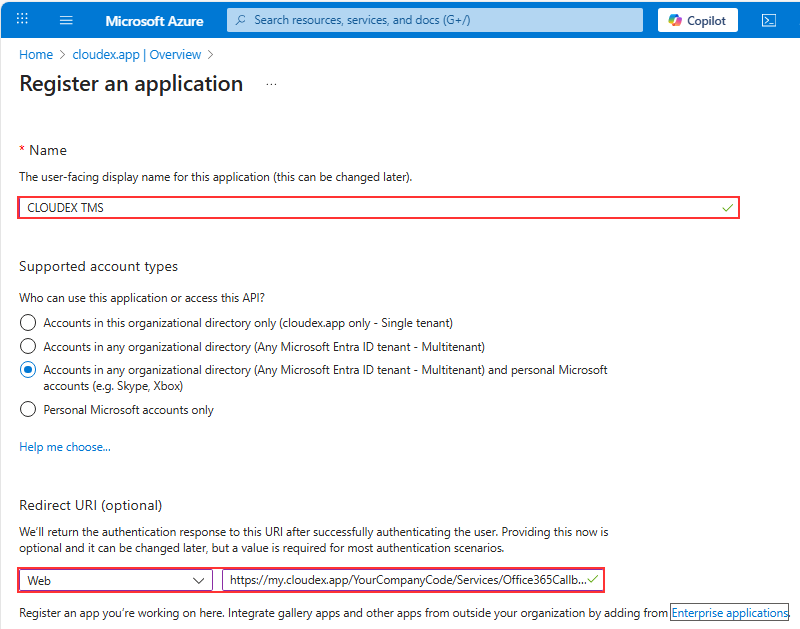
URL type must be "Web" NOT "Single page application"
Looks like beter to register as Single tenant. If you register as multi tenant then can be so than you need to enter CLOUDEX MpnId 7086574
**Fill the form:**
Field
Value
**Name**
CLOUDEX TMS Email Integration (or any name)
**Supported account types**
✔️ **Accounts in any organizational directory (multitenant)**
**Redirect URI**
Select **Web** → Enter your redirect:
`https://my.cloudex.app/YourCompanyCode/Services/Office365Callback.aspx`
1) Replace `YourCompanyCode` with your web app CompanyCode2) Redirect URL is case-sensitive``
Click **Register**.
---
#### **4️⃣ Get the Tenant ID and Client ID**
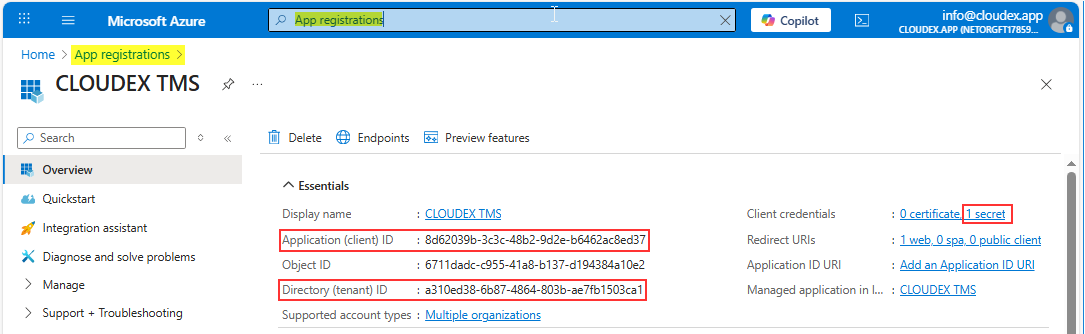
After creation, you will be redirected to the app’s **Overview** page.
Here you will see:
**✔ Directory (Tenant) ID**
**✔ Application (Client) ID**
[](https://ozols.lv/doc/uploads/images/gallery/2025-12/image-1764596895074.png)
Copy them and save.
You already have **2/3 values**.
---
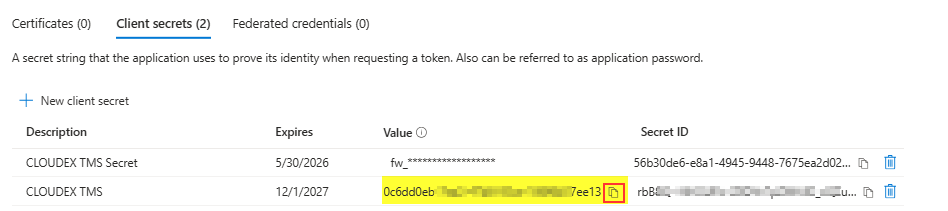
#### **5️⃣ Create Client Secret**
Side menu → **Certificates & secrets**
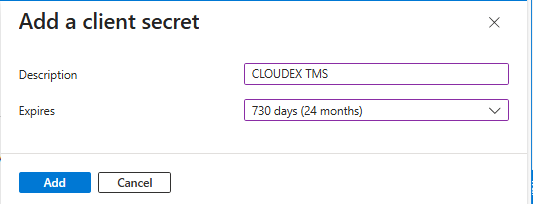
1. Click **New client secret**
2. Enter a name: `CLOUDEX Secret`
3. Choose expiration:
- 6 months (not recommended)
- 12 months
- **24 months** (recommended)
- Or “Custom”
4. Click **Add**
[](https://ozols.lv/doc/uploads/images/gallery/2025-12/image-1764596973920.png)
[](https://ozols.lv/doc/uploads/images/gallery/2025-12/image-1765269172104.png)
IMPORTANT ⚠️
**Copy the Client Secret VALUE immediately.**
You will never be able to see it again later.
Store it securely (Azure Key Vault, password manager, etc).
Now you have:
- **ClientId**
- **TenantId**
- **ClientSecret Value**
---
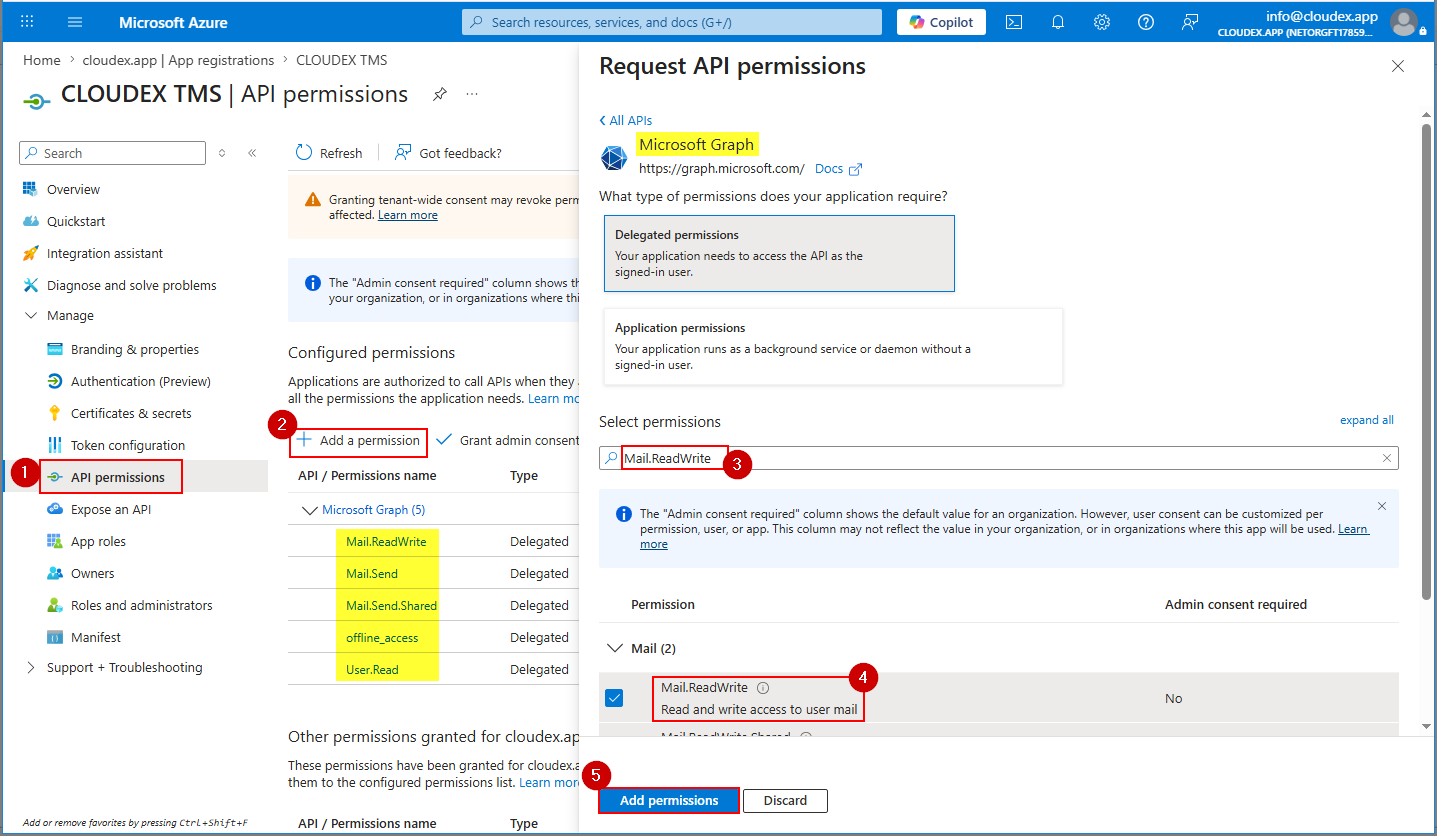
#### **6️⃣ Add Required API Permissions**
Side menu → **API permissions**
Click:
- **Add a permission**
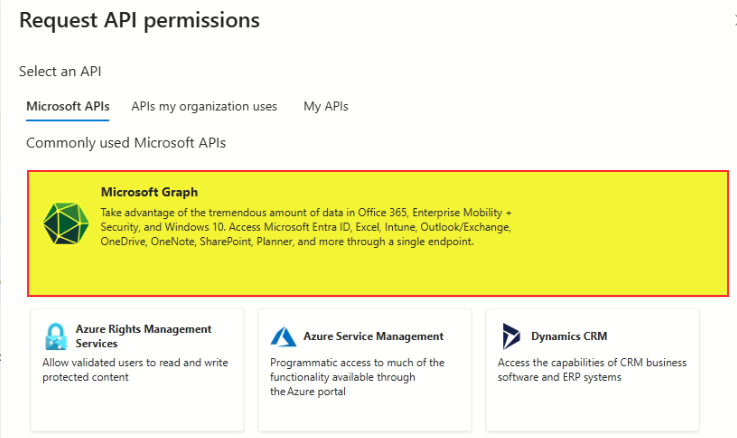
- **Microsoft Graph**
- **Delegated permissions**
Search + select:
✔ `Mail.Send`
✔ `Mail.ReadWrite ✔ User.Read`
✔ `offline_access`
Then click **Add permissions**.
Then click **Grant admin consent**.
[](https://ozols.lv/doc/uploads/images/gallery/2026-05/image-1779801024445.png)
Can be in new interface need to choose Microsoft Graph API
[](https://ozols.lv/doc/uploads/images/gallery/2026-01/image-1768998214141.png)
---
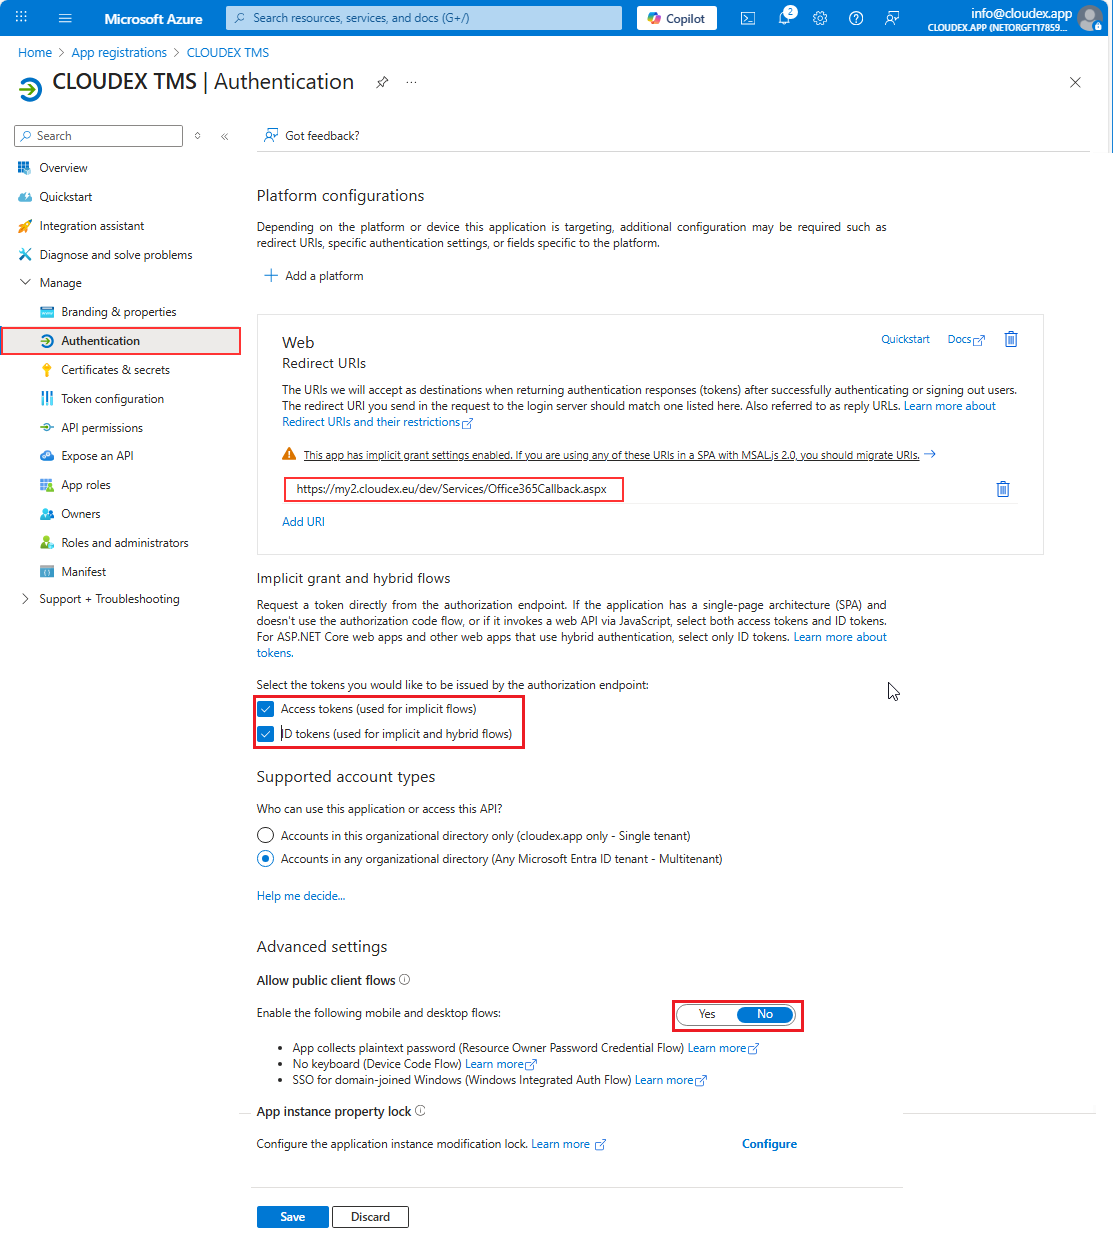
#### **7️⃣ Final Check: Authentication Settings**
Side menu → **Authentication**
Ensure:
✔ Your redirect URI is correct
✔ “Allow public client flows” is **OFF**
✔ “Access tokens” and “ID tokens” are **ON**
[](https://ozols.lv/doc/uploads/images/gallery/2025-12/image-1764598136406.png)
#### 🎉 DONE — Values ready to use
You now have everything:
Parameter
Where to find it
**TenantId**
App → Overview → Directory (tenant) ID
**ClientId**
App → Overview → Application (client) ID
**ClientSecret**
App → Certificates & Secrets → **Value**
#### Problem solution
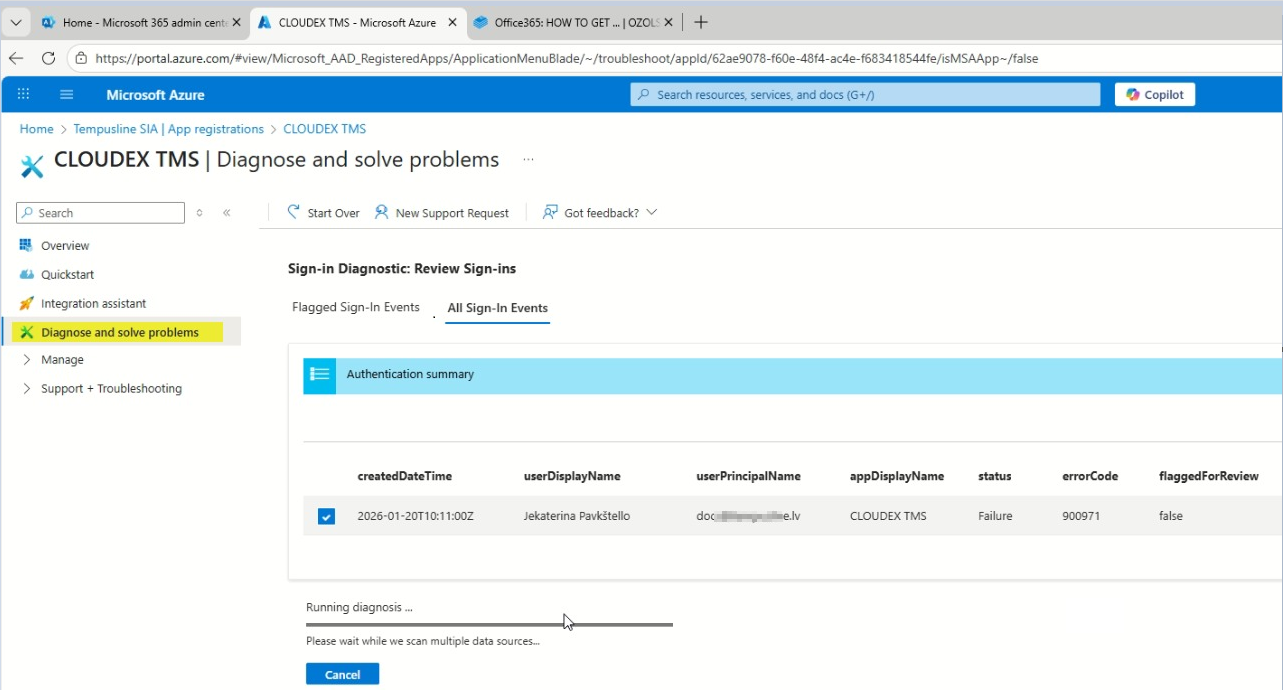
In case you have any problems sending out emails from CLOUDEX TMS or Ozols you can run **"Diagnose and solve problems"** tool
[](https://ozols.lv/doc/uploads/images/gallery/2026-01/image-1768999877635.png)
# Microsoft email configuration
#### 1. Enable “Authenticated SMTP” for the mailbox
Open the Microsoft 365 Admin Center: [ https://admin.microsoft.com](https://admin.microsoft.com)
### Steps to enable Authenticated SMTP
[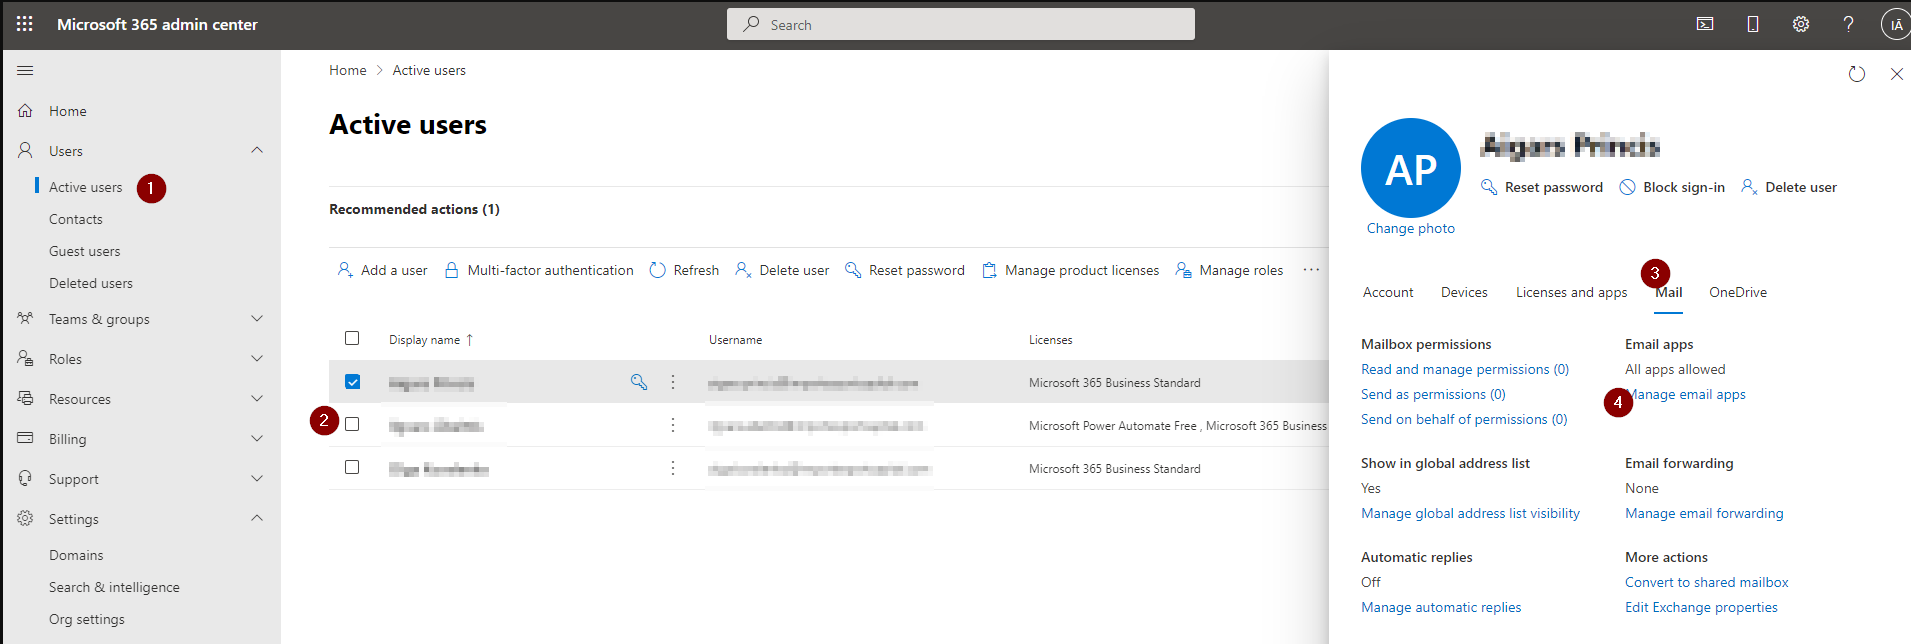](https://ozols.lv/doc/uploads/images/gallery/2025-11/image-1764062017876.png)
1. In the left menu, click **Users → Active users**.
2. Click on the user/mailbox you will use for CLOUDEX TMS.
3. In the user details pane, go to the **Mail** tab.
4. Click **Manage email apps** (or *Email apps*).
5. In the list of email apps, find **Authenticated SMTP** and make sure the checkbox or toggle is **ON / enabled**.
6. Click **Save**.
⚠️
#### 2. Create an app password (if MFA is enabled)
If Multi-Factor Authentication (MFA) is enabled for the mailbox you use (recommended), SMTP cannot use your normal password. In that case you must create a special **app password** and use it in CLOUDEX TMS.
🔐
If MFA is **not** enabled for this user, you can use the normal account password instead of an app password. However, using MFA + app password is more secure and recommended.
### Instruction to generate an app password
[https://ozols.lv/doc/books/ozols-tms-english/page/8-e-mail-server-configuration-for-work-with-ozols-tms](https://ozols.lv/doc/books/ozols-tms-english/page/8-e-mail-server-configuration-for-work-with-ozols-tms)
#### ❗ What to do if “Authenticated SMTP” switch does NOT appear
1. Turn off Checkbox "Turn off SMTP AUTH protocol for your organization""
2. Turn on use of old legacy TLS clients.
3. After enabling, wait **3–5 minutes**, then check the user mailbox again.
[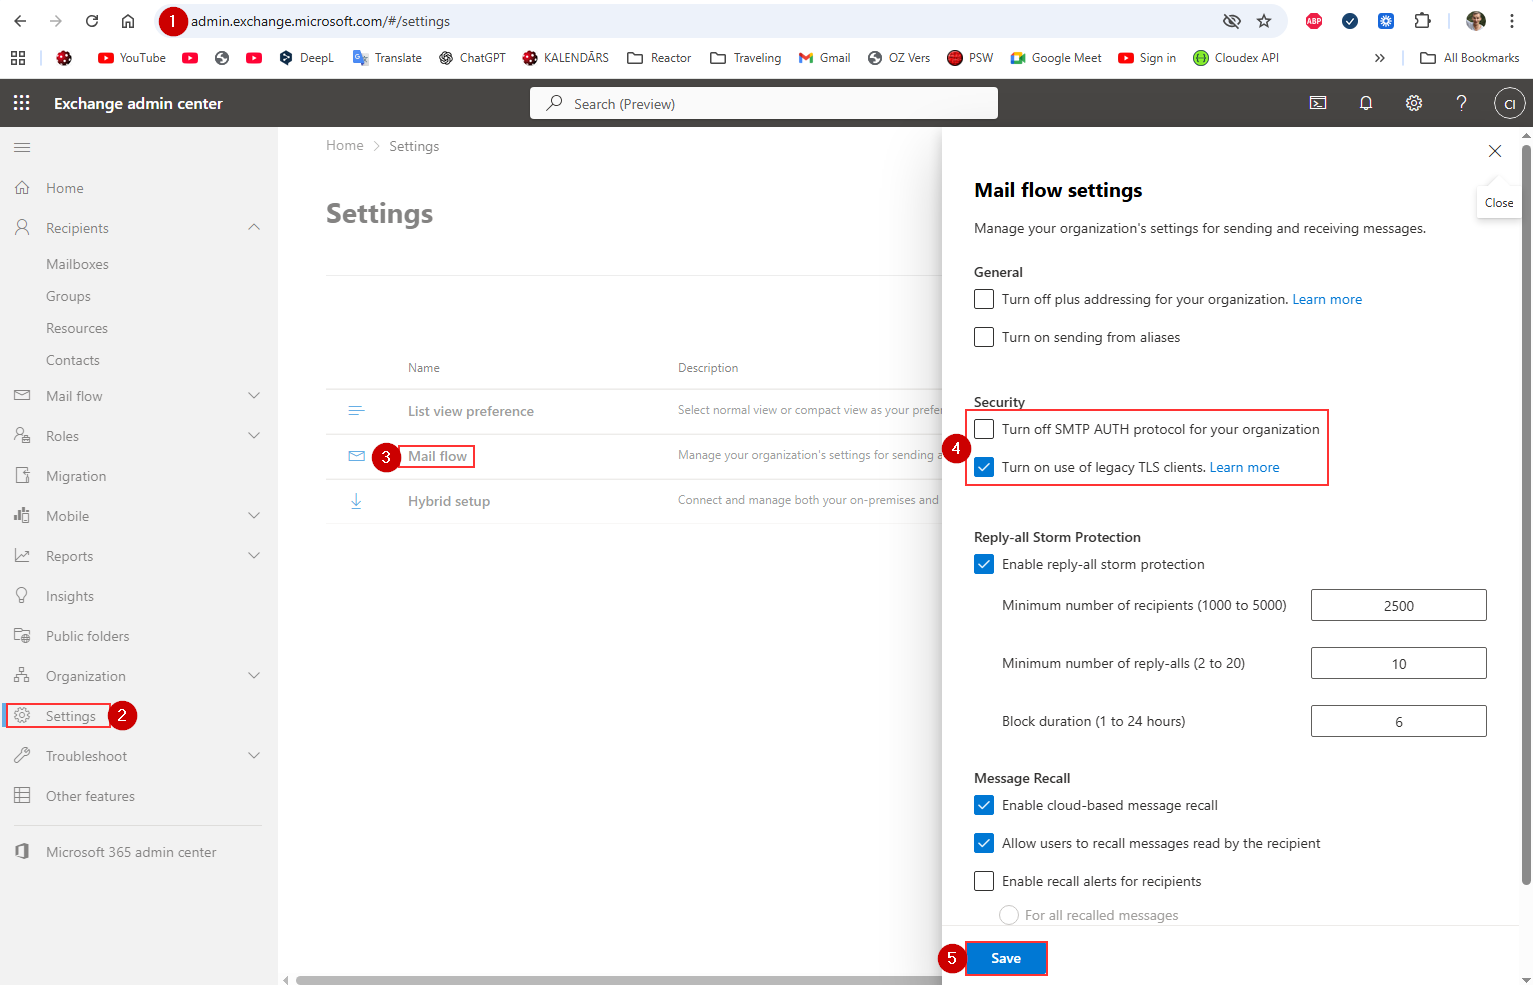](https://ozols.lv/doc/uploads/images/gallery/2025-11/image-1764064038680.png)
#### **Confirm the mailbox type (SMTP is NOT available for some accounts)**
The **Authenticated SMTP** switch is available ONLY for:
- User mailboxes with Exchange Online Plan 1 or 2
- Shared mailboxes
- Microsoft 365 E3/E5 Business Standard/Business Premium accounts
It will **NOT appear** for:
❌ Mailboxes with no Exchange license
❌ Accounts converted to *Microsoft 365 Groups*
❌ Mailboxes that were soft-deleted or recently restored
❌ Resource mailboxes (Room / Equipment)
### How to check:
In Microsoft 365 Admin Center:
**Users → Active users → Select user → Licenses and Apps**
Make sure:
✔ **Exchange Online** is enabled
If Exchange Online is missing → SMTP will NOT be available.
---
#### **Ensure modern authentication SMTP is not forced**
Microsoft sometimes blocks SMTP for users with strict conditional access.
### Check these items:
- Conditional Access policy requiring MFA for all protocols
- Legacy auth blocked at the tenant level
- Security defaults enabled (this disables SMTP)
### To check Security Defaults:
1. Go to Azure Portal
[https://portal.azure.com](https://portal.azure.com)
2. Search for **Azure Active Directory**
3. Open **Properties**
4. Click **Manage Security Defaults**
5. If **Security defaults = Enabled**, you must turn it **OFF** to allow SMTP.
> After disabling, wait up to 15 minutes, then check Manage Email Apps again.
---
#### **If none of the above works – your tenant may have SMTP permanently disabled**
Microsoft has been turning off SMTP AUTH for security reasons.
Admins must manually re-enable it per mailbox.
### To force-enable for a specific mailbox (Admin only):
1. Go to:
[https://admin.exchange.microsoft.com](https://admin.exchange.microsoft.com)
2. Navigate to:
**Users → Active Users → select user → Mail → Email apps → Manage**
3. If still missing, enable via PowerShell:
*(Admins only — if customer cannot run PowerShell, you can give them this line to pass to their IT provider.)*
---
#### **Summary: Why SMTP may not appear**
Reason
Solution
Tenant-wide SMTP disabled
Enable under Exchange Admin Center → Settings → Mail flow
New UI hides the option
Use Classic Exchange Admin Center (ECP)
No Exchange Online license
Add a license
Security Defaults enabled
Disable Security Defaults
Legacy auth blocked by Conditional Access
Update policies
Mailbox type unsupported
Use a licensed user or shared mailbox
Needs PowerShell
Run `Set-CASMailbox`
# Order conditions update
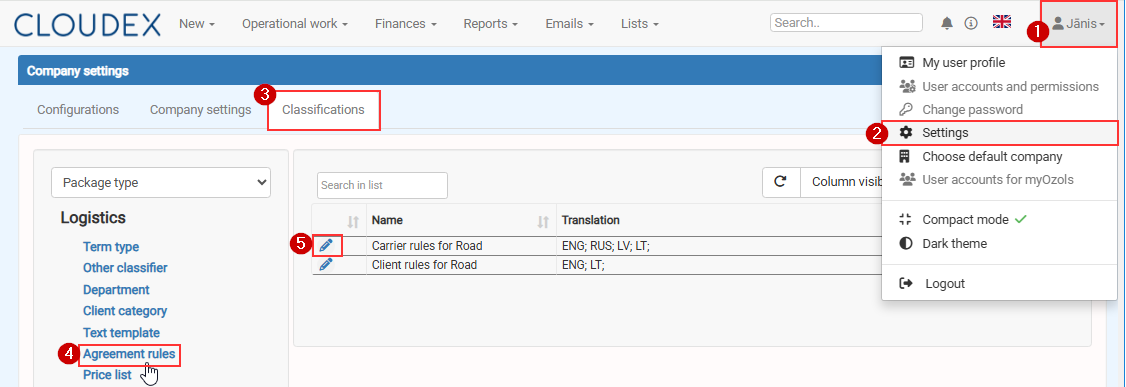
In order to edit Order for carrier rules or Order for Client rules Click on Your name > Settings > Classifications > Agreement rules > Edit
[](https://ozols.lv/doc/uploads/images/gallery/2025-12/image-1765206565501.png)
# Set up Office365 e-mail
If your email provider is Microsoft Office365 You need o set up email sending following this instruction
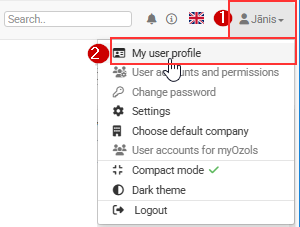
1\) Click on your name
2\) Choose My user profile
[](https://ozols.lv/doc/uploads/images/gallery/2025-12/image-1765283087826.png)
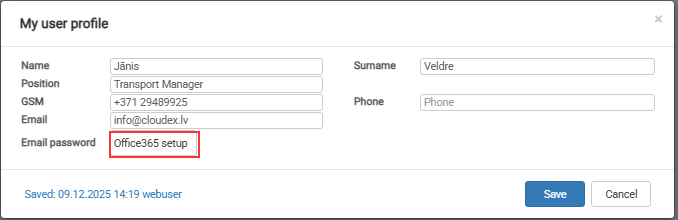
Press comand button \[Office365 setup\]
[](https://ozols.lv/doc/uploads/images/gallery/2025-12/image-1765283215435.png)
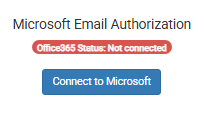
Then press command button \[Connect to Microsoft\]
[](https://ozols.lv/doc/uploads/images/gallery/2025-12/image-1765283367634.png)
Login with your email and follow further instructions
# HOW TO CHANGE APPLICATION Callback URL in Azure Portal
#### **1️⃣ Open Azure Portal**
Go to: [https://portal.azure.co](https://portal.azure.com)m
Sign in using a **Global Administrator** or **Application Administrator** account.
---
#### **2️⃣ Open *Microsoft Entra ID***
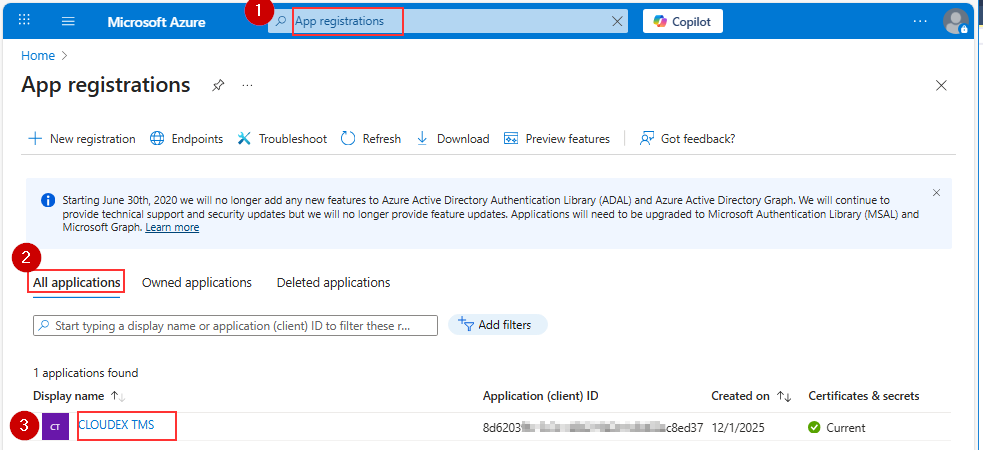
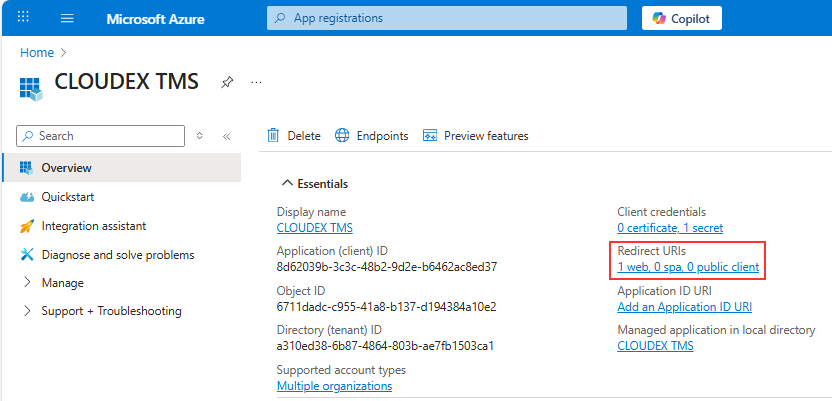
1\) In the left menu, click: **Microsoft Entra ID or Search for App registrations** 2) Open All Applications
3\) Open CLOUDEX TMS application
[](https://ozols.lv/doc/uploads/images/gallery/2025-12/image-1765285865602.png)
Choose Redirect URLs
[](https://ozols.lv/doc/uploads/images/gallery/2025-12/image-1765286018399.png)
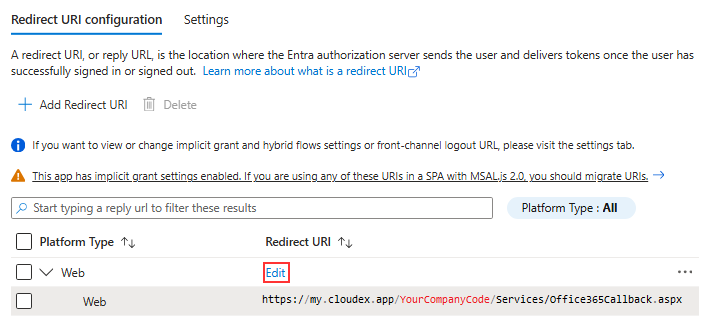
Press edit button and set correct URL
!!!! In YourCompanyCode you should place your company code https://my.cloudex.app/YourCompanyCode/Services/Office365Callback.aspx
[](https://ozols.lv/doc/uploads/images/gallery/2025-12/image-1765286250615.png)
Redirect URL should be under Web NOT under SIngle-application